TMG's Van Thread! (Picture-heavy.)

Van Living Forum

Help Support Van Living Forum:

This site may earn a commission from merchant affiliate links, including eBay, Amazon, and others.
Apparently you traveled to the future to get those batteries and bought them back to September.

J 15 would indicate a October 2015 date code. Today is September 30th

But Trojan states they do not use that method, rather this:

http://www.trojanbattery.com/pdf/TRJN_0522_date_code.pdf

If it were the 'finishing code' and made in September this year it should read I5


Perhaps the J15 sticker is for the seller to remember when to recharge them.


Can you put a spacer between the 6's, give em a little breathing space? 


[font=Arial, Helvetica, sans-serif]1-2
Make sure there is enough space between batteries to allow for minor battery expansion that occurs during use and to allow proper airflow to keep battery temperature down in hot environments.[/font]


reference:
http://www.trojanbattery.com/tech-support/battery-maintenance/


I would certainly find a better method to secure them.
#1 Bungees will rot from the gassing
#2 That is 130 lbs of batteries.  Hit a speed bump just right and I don't care how strong the bungees are, they will jump up and could short out on the top of the metal box.  Think about if the worst were to happen, and the vehicle rolls. 
#3.  Those caps and perhaps the top of the battery  case itself  are going to warp under the constant pressure of the bungees, until they rot out from the sulfuric acid mist that has to occur in the 85%+ charging range when gassing occurs, and has to occur to achieve 100% state of charge
#4.  None of the rest of your photos show any halfassery.  Why start now with the heart of your electrical system?
#5. You will have to remove the bungees to check the electrolyte level, and to check specific gravity.  making this task more difficult at all, can make one put it off too long.  If the plates get exposed that portion of the plates is basically useless and one can easily notice instant capacity loss when refilled.
#6. Have you ever seen a battery loose or attached with bungee cords under the hood?  Well the hood would stop it, so why bother securing it. Perhaps Yugo thought along these lines.
#7, warranty, say they fail due to manufacturer error, you bring them in and they see the top of the casing bowing inward from the pressure of the bungees, or perhaps just the ganged caps....  Denied
 
Man, sometimes people just enjoy lecturing. Can we not assume that I'm ignorant of all these considerations? This is what I was able to do start to finish in two hours behind a liquor store off a New Jersey highway, because I picked the batteries up on my way south and didn't want 130lbs of batteries continuing to slide around the floor of my van. The bungees are not permanent, but apart from those the batteries are much more secure than they appear, from the blocking of their perimeter not visible in the photo. If I really slammed a speed bump maybe I could launch them and that's why the bungees are there until I decide on a better method.

I initially did have a spacer between these two batteries until I realized there is not enough room for them to clear a drain pipe that was run through this compartment. The batteries are tapered so presently they touch at the top and not the bottom.

Incidentally, the battery that was installed previously was not secured with metal straps. It was held in place only by lashing straps, which do not ratchet, but just pull taught similar to a one piece belt buckle. The previous battery, as I noticed during the swap, was free to slide laterally within that box, and in fact had a gouge in the housing where it had been contacting one of the screws through the sheet metal.

This system, if not perfect, is a far improvement over what was in place. But I understand the temptation for an expert to provide expert scrutiny.
 
Well, if you stated it was not permanent I wouldn't have bothered wasting time typing.
 
Just finished going through the entire thread and have to tell ya, I enjoyed it. As everyone said, nice find. You certainly did a few modifications I wouldn't have thought of looking for an alternative solutions like the vent cap. I do this all the time with renovating properties (within code, naturally) because some of the perfect solutions are just crap and can be easily assembled with stronger stuff for a third of the cost.

Keep the update coming, you certainly inspired me. I forgot to check but how long is it from when you bought the van to now? 3 months? 6 months? Just curious because I always hear it takes longer than expected to renovate a van and this thread makes it looks like you did it all over a span of a few days.
 
TheSimpleNomad said:
Just finished going through the entire thread and have to tell ya, I enjoyed it.  As everyone said, nice find.  You certainly did a few modifications I wouldn't have thought of looking for an alternative solutions like the vent cap.  I do this all the time with renovating properties (within code, naturally) because some of the perfect solutions are just crap and can be easily assembled with stronger stuff for a third of the cost.

Keep the update coming, you certainly inspired me. I forgot to check but how long is it from when you bought the van to now? 3 months? 6 months? Just curious because I always hear it takes longer than expected to renovate a van and this thread makes it looks like you did it all over a span of a few days.

Very true about creating better solutions with a little ingenuity.

I suppose it's only been about five months now! Pretty crazy. I made sure to jump on top of the things that needed to be done in order to live comfortably in here. Before buying a van I had planned to buy a high-top Sprinter and convert it, but I was having a hard time finding just the right one, and in the end I jumped on this class B when I found it because I knew it would take a lot longer to build from scratch in a cargo van. Some people gut class B interiors when they buy them and that may be some of what you're hearing. But all it takes is not being shy about getting things done. Bring extra caulking. ;)

I've done a bunch of other little stuff not posted here that I keep meaning to update too. Body work, rain deflectors...

Thanks for the interest.
 
Everyone seems to say it's hard to stop a leaky window, but I don't think so....

I installed drip rails above my overcab windows. Now water has to either run off the sides of the rail or drip 1 1/2" off the face of the window. It's been raining the last three days here on the east coast and I haven't had another drop through the window.

Made it out of a piece of aluminum stair noise from Lowe's. Came in an 8' piece for I think $7. Plenty for both windows.
 

Attachments

  • IMG_20151001_181735394.jpg
    IMG_20151001_181735394.jpg
    1.1 MB
Does anyone like my new battery hold down yet?
 

Attachments

  • IMG_20151004_191324960.jpg
    IMG_20151004_191324960.jpg
    1.4 MB
  • IMG_20151004_194209743.jpg
    IMG_20151004_194209743.jpg
    1.3 MB
  • IMG_20151004_210521384.jpg
    IMG_20151004_210521384.jpg
    1.3 MB
Updated my cast iron hold downs. The nylon wing nuts were okay but they were only ever intended to be temporary; I knew I'd get tired of threading those on and off sooner or later.

Seen here, I used some draw latches. I discarded the other half of the latch, and the wire loop that came on the latch, in favor of making my own that would fit my needs. I used a paint can bail, available for free most anywhere, to craft the new latches. I recommend at least three beers for this process. The end result is that I can now quickly throw or fasten one latch to access my pans, and once again, they don't rattle while going down the road.
 

Attachments

  • IMG_20151005_230028105.jpg
    IMG_20151005_230028105.jpg
    1 MB
highdesertranger said:
nice,  and that is some good looking iron.  highdesertranger

Thanks. Most are surprised to hear that I season them with mineral oil. Yet they're always jet black.
 
I have heard to use mineral oil, it doesn't goes rancid. do you use food grade USP. highdesertranger
 
Food grade? I buy it from the drug store. If it's safe enough to lubricate a baby from the inside it's safe enough for my pans.
 
I've also been working on my bottle label collage...
Does this count as a van mod?

IMG_20151006_103115733.jpg
 

Attachments

  • IMG_20151006_103115733.jpg
    IMG_20151006_103115733.jpg
    1.4 MB
TMG51 said:
I've also been working on my bottle label collage...
Does this count as a van mod?


Not according to the judging rule sheets in use at van shows it doesn't!!

Nice Try though... :D :D :p
 
TMG51 said:
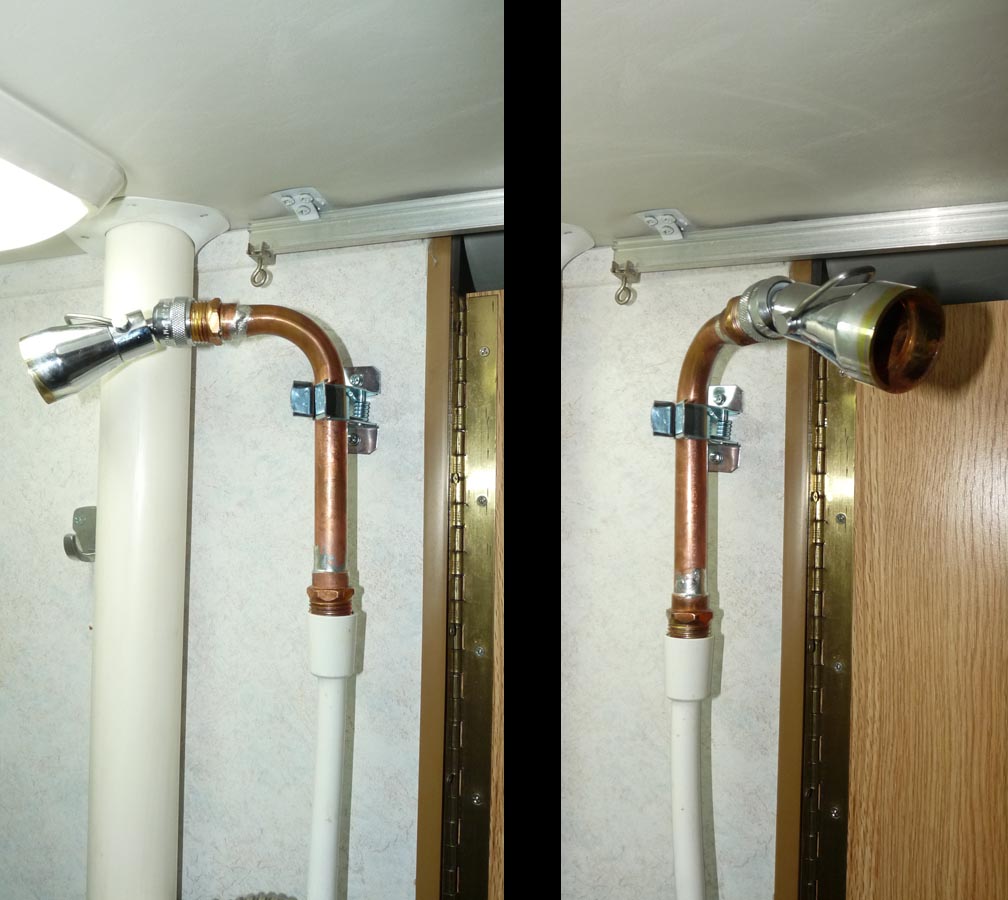
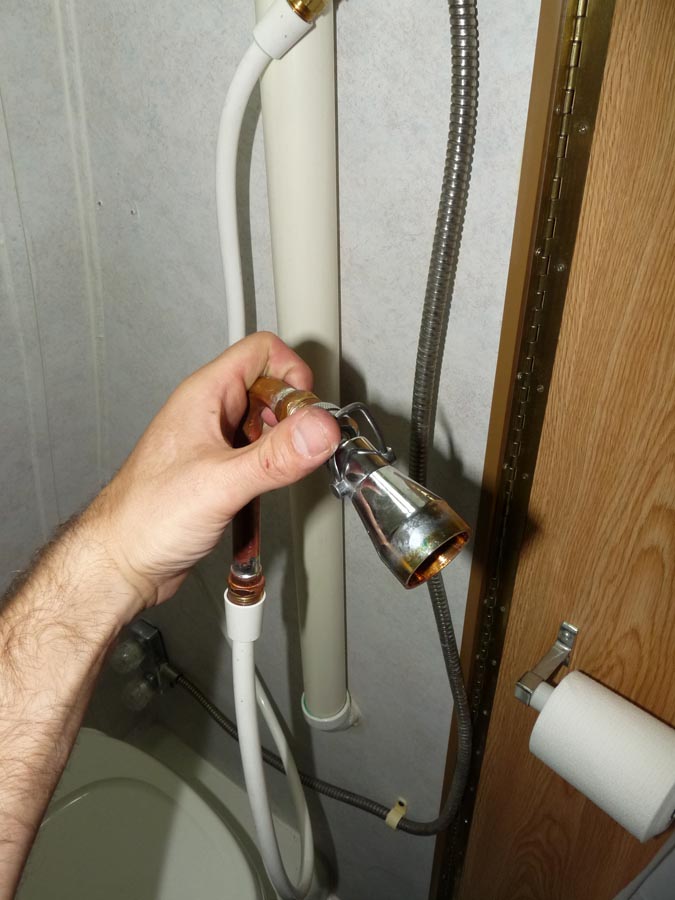
Modded the shower too. Threw out the wand that came with it, soldered up this thing with a low-flow showerhead that has a built in on/off valve, and mounted it in such a way that it can be positioned to actually spray on you while standing...folds away or pops off in the hand...

byaUbBI.jpg


Added plenty of hose too.

TKOzup2.jpg


Oh yeah - I forgot to mention. For anyone who needs to bend copper pipe without buying a tube bender, fill the pipe with soapy water and freeze it. Then bend it over a surface somewhere while frozen. The pressure inside will keep it from kinking. Then let it thaw.
 
Oh, look... the engine got shinier... 

iEMnGPU.jpg


Huh... so did the transmission... how 'bout that...

VxkWHm3.jpg
 
TMG, stumbled on your thread here after seeing you on trv. That was a sweet thread, glad I saw it there and ended up finding this forum. Stoked you got your rig running again, though that sucks that your repair bill was that steep. If I was in your shoes I'd probably have to save whatever money I could and do the R&R of the trans and engine myself, and it isn't fun. I guess it's cool just letting someone else deal with that pain though.

So where is your next place? Do you plan on coming out in this area, NM, AZ, CA? Have you been yet?
 
Top