You are using an out of date browser. It may not display this or other websites correctly.
You should upgrade or use an alternative browser.
You should upgrade or use an alternative browser.
TMG's Van Thread! (Picture-heavy.)
- Thread starter TMG51
- Start date


Help Support Van Living Forum:
This site may earn a commission from merchant affiliate
links, including eBay, Amazon, and others.
sassypickins
Well-known member
- Joined
- Feb 28, 2013
- Messages
- 477
- Reaction score
- 0
Brilliant!
More strange plumbing from TMG!
I've had an ongoing fued with my faucet. Evidently whoever designed it decided that, despite a high vantage point and a wide basin, the stream of water should land about 1/2 inch from the edge such that water goes all over the f$&#ing place should you actually decide to use the sink.


It was constantly getting the counter wet, which then dripped into the cabinets below... It was just a crap design when so much sink basin was available for use.
So my solution? Buy a different faucet perhaps? Nonsense! Instead I cut my faucet apart and soldered some crap together!

My faucet is now both 1) high for filing pans etc 2) extended such that it pours into the sink rather than the counter. Altogether it cost me about $7 to make this modification and I am thoroughly pleased with it. Also I painted the handles black for no good reason; I find that fake brass coating to be among the most tacky appearances in existence.
If I get really bored I may try to figure out how to add an aerator to it.

I've had an ongoing fued with my faucet. Evidently whoever designed it decided that, despite a high vantage point and a wide basin, the stream of water should land about 1/2 inch from the edge such that water goes all over the f$&#ing place should you actually decide to use the sink.
It was constantly getting the counter wet, which then dripped into the cabinets below... It was just a crap design when so much sink basin was available for use.
So my solution? Buy a different faucet perhaps? Nonsense! Instead I cut my faucet apart and soldered some crap together!
My faucet is now both 1) high for filing pans etc 2) extended such that it pours into the sink rather than the counter. Altogether it cost me about $7 to make this modification and I am thoroughly pleased with it. Also I painted the handles black for no good reason; I find that fake brass coating to be among the most tacky appearances in existence.
If I get really bored I may try to figure out how to add an aerator to it.
Attachments
highdesertranger
R.I.P HDR
- Joined
- Apr 4, 2012
- Messages
- 22,892
- Reaction score
- 92
cool very nice. necessity is the mother of invention. it appears as if you have very low water pressure. highdesertranger
highdesertranger
R.I.P HDR
- Joined
- Apr 4, 2012
- Messages
- 22,892
- Reaction score
- 92
here I just noticed your blue line moved a little more. getting closer congrats. highdesertranger
highdesertranger said:here I just noticed your blue line moved a little more. getting closer congrats. highdesertranger
Ahh, so someone is watching that. I'd started to wonder Yes I do update it when I move. Gotta hang in FL for another week or so as I may have business here but then I'll be moving again...
As far as water pressure though I don't think it's low. I have an accumulator tank and my shower (after my mods) has a piercing spray on full. I think the reason the sink looks weaksauce is that there's no aerator on it to fluff up the volume. (There was no aerator before I modded 'er either, that thing on the end had no screen in it).
Like I said if I get bored I'll add one.


$36.16
$39.90
Van Build: A complete DIY guide to designing, converting and self-building your campervan or motorhome
Amazon.com


$22.59
$24.95
The Falcon Guide to Van Life: Every Essential for Nomadic Adventures
❄ FirstSnowball


$19.97 ($2.00 / Ounce)
Harmony House Premium Vegetable Soup Mix - Dehydrated Vegetables for Cooking, Camping, Emergency Supply and More (9 oz, Quart Size Jar)
Harmony House Foods, Inc.


$17.00
$19.95
The Van Life Cookbook: Delicious Recipes, Simple Techniques and Easy Meal Prep for the Road Trip Lifestyle
Amazon.com


$30.59
$40.00
The Van Conversion Bible: The Ultimate Guide to Converting a Campervan
Amazon.com


Who's ready for some more strange problem solving?
One of my irks has been no convenient way of monitoring water levels in my freshwater tank. The only way to do that is to look inside the compartment under one of my rear benches. (And in fact, that was screwed shut when I bought it, before I turned it into a hinged access lid.) So that means if I want to check my water level, I have to dismantle my cushions, lift the lid, poke my head in there with a flashlight and see.

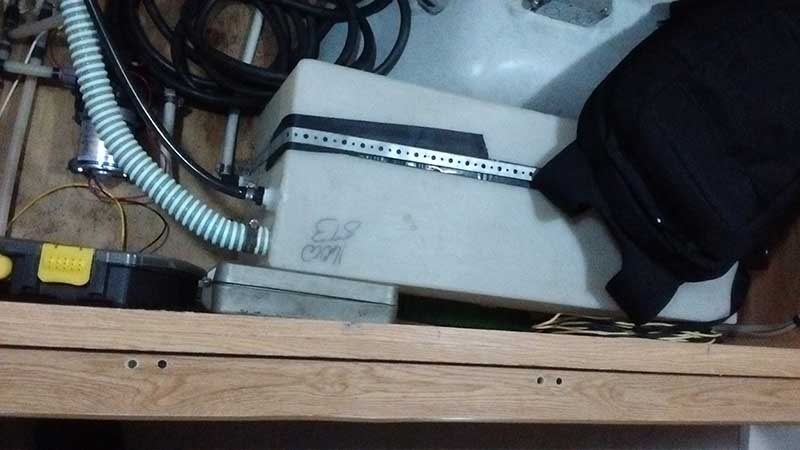
My solution? Step #1, locate panel and destroy with prejudice.

Step #2, some acrylic glass and ingenuity.


Step #3, get one of those cheap LED work lights, open it up, and solder a lead on it to the "lantern: low" circuit.

Step #4, slap it together.
The LED work light is affixed to the water tank at the bottom. Press a hidden switch, and the water tank illuminates. See fill level through the window. The most luminous portion represents the water level since the light is shining into it.

Cost: $20, couple hours' work, and four beers.
One of my irks has been no convenient way of monitoring water levels in my freshwater tank. The only way to do that is to look inside the compartment under one of my rear benches. (And in fact, that was screwed shut when I bought it, before I turned it into a hinged access lid.) So that means if I want to check my water level, I have to dismantle my cushions, lift the lid, poke my head in there with a flashlight and see.
My solution? Step #1, locate panel and destroy with prejudice.
Step #2, some acrylic glass and ingenuity.
Step #3, get one of those cheap LED work lights, open it up, and solder a lead on it to the "lantern: low" circuit.
Step #4, slap it together.
The LED work light is affixed to the water tank at the bottom. Press a hidden switch, and the water tank illuminates. See fill level through the window. The most luminous portion represents the water level since the light is shining into it.
Cost: $20, couple hours' work, and four beers.
LowTech
Well-known member
- Joined
- Jan 23, 2012
- Messages
- 431
- Reaction score
- 2
TMG, really like some of your "solutions". I look at most people's rigs as the builder I am, and yours stand out as very original. Very nice work.
One question, does that water tank have the fill line attached at the bottom? Don't know that I've ever seen that.
One question, does that water tank have the fill line attached at the bottom? Don't know that I've ever seen that.
B and C
Well-known member
I think that picture was taken from above and not the side although it is disorienting to look at 
LowTech said:TMG, really like some of your "solutions". I look at most people's rigs as the builder I am, and yours stand out as very original. Very nice work.
One question, does that water tank have the fill line attached at the bottom? Don't know that I've ever seen that.
Thanks! I like finding my own ways to solve problems. That's one of the things I enjoy about the mobile life and owning my own space.
And yeah that picture of the water tank was from above, didn't realize it could be confusing.
highdesertranger
R.I.P HDR
- Joined
- Apr 4, 2012
- Messages
- 22,892
- Reaction score
- 92
no Low Tech when I first saw it I thought the same thing. highdesertranger
My newest bit of wall...
Some may recall when I bought the van there was a soft spot in the wall around one window. It had been allowed to leak at some point in its life and that area was all rotted. Basically the veneer sides of the plywood were left and the middle of the plywood was gone.
Short of emptying my van, tearing out the wall and putting in a new one, what I did was punch some holes in the broken crap, fill it with spray foam (I know, not a recommended material) and allow the foam to push out what was left of the veneer surface. Then I cut away anything protruding and slathered Bondo on anything low. Followed by lots of sanding.
The Bondo I used was actually designed for vertical wall repair (more viscous), but that's not why I chose it over the auto body stuff. I felt its off-white appearance would be a good accent piece for my wall and save me painting the pink stuff.
I probably won't be entering any van dweller interior decorating competitions any time soon, but it still looks like an improvement to me.
Attachments

B and C
Well-known member
It looks like a good patch job to me. Way to go.
lterry
Well-known member
TMG51 said:My newest bit of wall...
Some may recall when I bought the van there was a soft spot in the wall around one window. It had been allowed to leak at some point in its life and that area was all rotted. Basically the veneer sides of the plywood were left and the middle of the plywood was gone.
Short of emptying my van, tearing out the wall and putting in a new one, what I did was punch some holes in the broken crap, fill it with spray foam (I know, not a recommended material) and allow the foam to push out what was left of the veneer surface. Then I cut away anything protruding and slathered Bondo on anything low. Followed by lots of sanding.
The Bondo I used was actually designed for vertical wall repair (more viscous), but that's not why I chose it over the auto body stuff. I felt its off-white appearance would be a good accent piece for my wall and save me painting the pink stuff.
I probably won't be entering any van dweller interior decorating competitions any time soon, but it still looks like an improvement to me.
Nice job! I like your shoe rack/kitchen storage too. I cut mine in half and put one on the inside of the bathroom door. Not sure where the best place for the other is yet.
Okay, curtain time.
Following some input from people here, I both bought one of those handheld sewing machines as well as experimented with heat welding synthetics. The little sewing machine works okay but it won't penetrate more than a couple layers of fabric. I'm bad at sewing and was folding lazily. I found it was much faster (and, for me, cleaner) to heat weld the material. But instead of cutting with a hot knife, I found the way that works best for me to get a clean edge:
1) Lay the material out and mark it where you want it cut.
2) Put a straight edge over that line and cut with a razor knife.
3) WITHOUT MOVING the straight edge, run a butane torch along the line that's currently pinned under your straight edge.
Doing that keeps everything from fraying and leaves one very clean, straight line. Singing more of the material than the very edge leaves it clumpy/warped/cracking etc thus the importance of the straight edge.

I used "aurora" satin blackout curtains from Wal-mart. They're $20 per 84" panel but two panels was enough for every window in the van including the overcab. This material blocks out light MUCH better than the stock vinyl backed curtains, as seen here with one old and one new.

Seen from the inside in bright daylight. They almost work too well, as it's dark in there unless I pull a curtain. But I planned for that with the layout of my snaps and they're actually much more modular than they appear. Also I painted those speakers gray as a bit of an accent while I was at it...

I did all the rear windows except this one, which I spray painted black because it's hidden from the interior and idgaf.


Overall these curtains are much easier to use. I hated those old vinyl ones - the stuck on the rods, the rods protruded... these are all recessed into the window, modular, able to open/close windows without fighting with curtains, and they totally block light. At night, with lights on, it's almost impossible to see from outside that there's light in there unless you get really close and peak into corners of windows.
Also I just think the van looks more awesome with all the windows all blacked out!

Following some input from people here, I both bought one of those handheld sewing machines as well as experimented with heat welding synthetics. The little sewing machine works okay but it won't penetrate more than a couple layers of fabric. I'm bad at sewing and was folding lazily. I found it was much faster (and, for me, cleaner) to heat weld the material. But instead of cutting with a hot knife, I found the way that works best for me to get a clean edge:
1) Lay the material out and mark it where you want it cut.
2) Put a straight edge over that line and cut with a razor knife.
3) WITHOUT MOVING the straight edge, run a butane torch along the line that's currently pinned under your straight edge.
Doing that keeps everything from fraying and leaves one very clean, straight line. Singing more of the material than the very edge leaves it clumpy/warped/cracking etc thus the importance of the straight edge.
I used "aurora" satin blackout curtains from Wal-mart. They're $20 per 84" panel but two panels was enough for every window in the van including the overcab. This material blocks out light MUCH better than the stock vinyl backed curtains, as seen here with one old and one new.
Seen from the inside in bright daylight. They almost work too well, as it's dark in there unless I pull a curtain. But I planned for that with the layout of my snaps and they're actually much more modular than they appear. Also I painted those speakers gray as a bit of an accent while I was at it...
I did all the rear windows except this one, which I spray painted black because it's hidden from the interior and idgaf.
Overall these curtains are much easier to use. I hated those old vinyl ones - the stuck on the rods, the rods protruded... these are all recessed into the window, modular, able to open/close windows without fighting with curtains, and they totally block light. At night, with lights on, it's almost impossible to see from outside that there's light in there unless you get really close and peak into corners of windows.
Also I just think the van looks more awesome with all the windows all blacked out!
highdesertranger
R.I.P HDR
- Joined
- Apr 4, 2012
- Messages
- 22,892
- Reaction score
- 92
nice ingenuity. highdesertranger
highdesertranger said:nice ingenuity. highdesertranger
Thanks once again. I always enjoy finding my own solutions.
Just logged my best-ever economy: 12.64 MPG over 295 miles.
To my success I credit 1) removing the AC relay (it runs whenever the cab air is on regardless of AC setting, hence removing relay to disable) and 2) setting the cruise @ 55 for hours of I-10W. :dodgy:
To my success I credit 1) removing the AC relay (it runs whenever the cab air is on regardless of AC setting, hence removing relay to disable) and 2) setting the cruise @ 55 for hours of I-10W. :dodgy:
Similar threads
- Replies
- 5
- Views
- 4K
- Replies
- 12
- Views
- 4K
- Replies
- 84
- Views
- 15K