Building Arabella

Van Living Forum

Help Support Van Living Forum:

This site may earn a commission from merchant affiliate links, including eBay, Amazon, and others.
There might be some glues on the market that would hold that much weight in a suspended horizontal position with vibration going on but I have no idea what that would be.

Not only would you have to find a glue that would take the weight but also be compatible with all three materials (or use different glues). I'd worry about the layers separating and/or the bubble wrap blowing it's holes out and flattening!

I did the bubble wrap/reflectix layer on the ceiling of the high top and stapled it in place to the mounting blocks I had installed. Then I took Luan paneling, glued 1/8" closed cell foam to it for a softened effect and glued and wrapped/stapled marine vinyl to the panels. The panels were then installed by screwing them to blocks I had adhered to the ceiling with PL Premium caulking 

WARNING - I have to drop the ceiling and re-glue about half of the mounting blocks....the PL Premium didn't hold up to the job.

This time the blocks are going to be epoxied to the fiberglass high top.

I had to use mounting blocks to screw in to because there were only 3 thin strips of wood running lengthwise down the hightop. They were there strictly to stiffen the fiberglass in the horizontal part of the ceiling and were too thin to provide me with enough bite on screws. Also none were in teh right places. This was in addition to the 1/4" steel rib cage inside the top which I had to work over top of so it was concealed.
 
Again Reflectix has no insulating properties in itself, hardly worth using 99% of the time, except reflecting incoming radiant back out.

XPS or polyiso rigid sheets, supplemented with flexible stuff for nooks and crannies will do the job much better than trying to get a fully dead airspace in a van.

 3M "Super 77" spray adhesive works with either, wear a mask
 
John, NO Where did I ever say that reflectix has any insulation properties. If you check I constantly refer to it as a radiant heat barrier.

This is a build thread of how I built my van out.

It is NOT a discussion on insulation, type of fasteners to use or anything else.

Please refrain from 'correcting' how I built my van. If you want to show  how you built out your van, then please start your own thread!
 
Sorry I was responding to ValerieP, quote function's broken but I'll try to remember to indicate manually
 
I was only thinking about using it to reflect the heat as well.
 
Okay, we don't need to correct everyone else, especially when they do and say nothing wrong. John61ct, do NOT POST TO THIS THREAD ANY MORE.
 
A beautiful RV build. You did quite a lot into making it a functioning home. Thanks for the post and Bob's video of your van. I'm only behind you by a million (or two) steps. Enjoy your new home and Drive Safe!
 
After noticing I liked things you said on other threads; I found this one and just read it all.  Very nice job. 

 Thank you for being inspiring.  I'm currently contemplating taking off soon in my (new to me) hightop which replaced my Toyota Sienna.  I say inspiring because my Sienna was all ready; and now I've been procrastinating on starting OVER.. lol

I think I'm still gonna just 'go' this summer without a serious build, have fun, and take notes to see what I Really want to do with 'MoonGlobie".
ANYWAY... very much enjoyed the read...

My only problem:  The video link you posted of a video Bob did on Arabella is dead!  I wanted to SEEE.. lol
 
Found it for you!


Since that video was done, I've added the fridge and the freezer unit and have a full electrical system installed including 4 Trojan T105RE batteries, 55 amp Iota battery charger, 400 watt PSW inverter, 12 volt fuse panel, 6 - 12 V electrical outlets, 2 duplex outlets running straight to a 120V electrical sub panel as well as 2 duplexes running to the inverter. I also have 2 - 100 W solar panels that are portable with the solar controller hard wired to the battery. Both 120 (generator and shore power) and solar systems are wired to Marinco Inlet chargers in the rear bumper so that it's just plug and play essentially.

I also added a Stowaway platform hitch and a Husky Tool Box to the rear that carries all the crap that one needs to carry.

Oh, yea, the roof vent went in the week after Bob shot the video. The kitchen sink is also in. I didn't put in the manual pump that we talked about in the video. I find it just as convenient to use water straight out of the one gallon jugs that I refill at any water fill station.
 
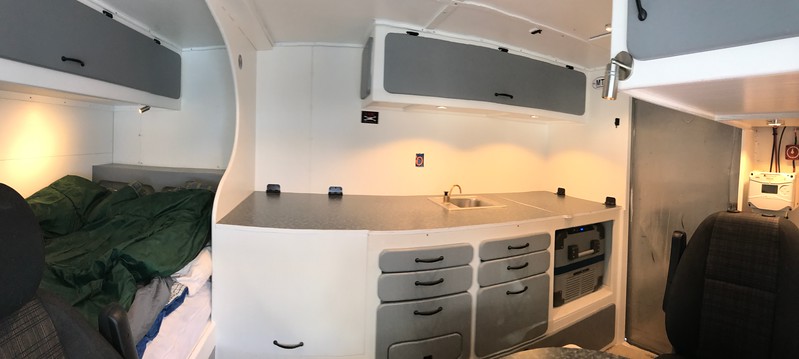
Cool! Great build, Beth. Our taste in cabinetry run along similar lines. My rig is gray and white as well.  

IMG_2268-L.jpg
 
Putts

Cool! Great build, Beth. Our taste in cabinetry run along similar lines. My rig is gray and white as well.  

IMG_2268-L.jpg

Holy Batman, I thought it WAS the Putts-mobile
With a curve in the counter from going Warp 10 speeds.
SLOW DOWN! :D

Great Job Beth.
 
Thanks for the compliments but I suspect that your woodworking skills and results greatly surpassed anything I could do.

My interior is actually 2 tone gray..a really light gray marine vinyl with a soft gray paint on the wood.

Gray is a soothing color and it also allowed me to go fairly dramatic with fabric for all the curtains.
 
Almost There said:
Thanks for the compliments but I suspect that your woodworking skills and results greatly surpassed anything I could do.


Maybe a little, but my goodness, a really fine build you've done there. Just goes to show with determination and good thinking these van rigs can be quite comfortable homes. Big thumbs up!
 
OH MY DAYS!  My jaw completely hit the floor with a thud!  That is absolutely stunning!  Do you have a video tour of it on YouTube or a website that I can watch?  Or even multiple pictures from different angles?  This is, by far, the most gorgeous build I've seen!
 
Thanks for the compliment!

It's done me quite well for the past 3 years, I still find that I've got everything I need and nothing that I don't!

Link to video Bob did in Jan 2016 is here:

Let me know if the link doesn't work, I had trouble getting it to load. But then I have a really crappy internet connection at the  moment.

The van wasn't quite completed at that time, the fridge and freezer compartments were holding coolers   :D  and the wiring wasn't even started. I also added a swing away hitch hauler with a Husky Tote box mounted on it to carry all the odds and ends like toolbox, power cords, spare engine fluids etc. etc. etc.

The van and I will be at the RTR and it's often 'inspected'... :D
 
You've done quite a bit of work to it since that video, haven't you?! Thanks for posting the link! I really like the curved wood between the bed and the counter. Those pictures above make it look like a Luxury Class A RV valued at six-figures! What is the gray wall on the right side of the picture? It looks like it extends onto the floor?
 
Jack, you're looking at some pics that Putts put up on my build thread showing that he used somewhat of the same color scheme as I did.

No curved walls for me.

The van was substantially complete when Bob did the video, I just hadn't added the fridge and freezer (the space was there for them) and did the wiring/electrical system.

It's probably time for a repaint job though - 3 years of full-timing in it has left more than a few yucky spots in the paint job. The vinyl has held up fine though. It's extremely durable.

If I get around to painting it this year I want to add at least a few coats of polyurethane to help protect the paint job and make it more washable. It's a big IF though, I always find myself with too many better things to do.... :D
 
Almost There said:
I also added a swing away hitch hauler with a Husky Tote 
Hi - If possible, would you post a pic of your "swing away and tote" setup?
 
I checked out your vid with Bob and I am super impressed! You have done a wonderful job and have a fab home on wheels.

just wondering, how are you carrying the kayak?
I saw the life jacket/paddle etc but you didn't mention where you kayak is going? on a roof rack? just curious on that but I have to say I thoroughly enjoyed checking out your home! :)
 
Top