My slow but hopefully successful NV conversion

Van Living Forum

Help Support Van Living Forum:

This site may earn a commission from merchant affiliate links, including eBay, Amazon, and others.
Free Range Chicken said:
d174a0651fb8a5ec1df4ab4e0fdeb951.jpg


Sent from my SM-G386T using Tapatalk

I'll be feeling happy when my components finally reach this point, even if it looks like spaghetti ;)

I've built lots of PCs over the years and I always just push through to get a working system, then go back and redo all the cabling to look nice and play well with air flow.
 
The documentation will be a big help the first time you have to work on it a year or two in the future!  You think you'll remember what color wire, or what ran where, but in my experience that is wishful thinking... I've kicked myself a few times for making a contraption only to find out I have no idea about how I got it working some time later!

And as for the spaghetti wiring, I'd do it exactly the same way for a test setup!  I was thinking for the future when you do your final install.  I've even seen some car audio installs where they hide all the wiring and put the equipment on a slide out tray, which would be very cool for accessing screw terminals in tight places.  Often the electrical gets installed in some hard to reach crevice, or the bottom of a cabinet somewhere.  You'd have to be very careful not to pinch wires in this sort of setup, and I suppose it's a bit drastic for a van build!

If you have a door on your finished electrical cabinet, maybe you could print out the diagram when it's done and stick it on the inside, I've seen this in many commercial RV's and it seems like a good idea.  At any rate keep up the good work, it looks like this NV is going to turn out to be one spectacular machine!
 
ELECTRICAL POST - LITHIUM !!!! :)

HI all
IT is time for a long overdue post on my progress.

Bear with me , LOOOONG POST WARNING

This is not a beginner post on LIFEPO4 ( lithium ) . If you want more info on lifepo4, go and lookup on  Technomadia, and the https://marazuladventures.wordpress.com/about-us/Mar Azul Adventures (look for the PDF attachment at the bottom) which was my inspiration / guideline for designing my own system.

THE LITHIUM (LIFEPO4) SYSTEM  has been built and tested and it's working now!!

IT has not been any easy  endeavour, it was a very bumpy road , and i don't think it's a simple project to undertake, specially if you don't get an integrated system ( like smart battery or lithionics or mastervolt's lithium / victon's lithium , but they are pricey.)

I went on the route of custom LIFEPO4. system for the following reasons:
- I wanted to save money , vs an integrated system. In the long run, it saves you money.  THe initial investment may be very similar to an integrated system.
- I wanted to be able to power an RV air conditioning solely on batteries. In theory,I implemented my system so i could run the AC and another major appliance like a space heater or a microwave. THis still needs to be tested.
- I wanted to be in total control and understand my system - this is  to blame on the geek side of myself, but i know it'll pay off in the long run since i got to understand and know every component in my system. Moreover, if something breaks, i would be able to diagnose / fix  / replace quickly.
- THe inverter / charger that i decided to go with, will be the victron 12v/3000 watt. it is a powerful inverter which will be able to power up my dream loads.  I have not yet gotten the inverter, but it is still in my todo list.

- The end result is:I ended up with a sturdy monster that is capable of handling up to 500 AMP continous. I  have tested the system, but with far less current ( 15 amps)  , once I buy and connect the inverter, i will provide an update.


After all these design thoughts, i went ahead and bought a 12V 200AH 2.6KWh LiFePO4 system from Elite Power Solutions.It was $2,100 two years ago. It comes with cell balancers, which will balance the cells by applying  a load of 1 ampere.  The package  included a shunt, an LCD screen, the Battery Management System (BMS). The BMS is very handy, and a MUST HAVE from my point of view if you go the route of LIFEPO4. The package also included a tiny 15AMP charger.

THe first thing i did was to read a lot and to build my diagram in microsoft VISIO. It is very worth to put time designing your diagram first. Once i got the design of the system I went ahead and started buying components.

masterDiagram256.jpg

The providers that i used were mainly amazon and genuinedealz, but also found gregsmarinesupply pretty cheap. The one that was too expensive is waytekwire, they even charged me a 'small order fee'.

Additionally, spent around 936 dollars on the rest of the compontents, the most expensive components were the  BLUE SEA latching relay(BLue sea 7713, 190 on amazon) and a couple of massive BLue Sea 500Amp busbars, 75 each.

I decided to go with a latching relay because it has ver very little energy consumption, compared to a regular contactor.  If i remember correctly, it consumes less than 10 mA according to my multimeter. THat is a significant power savings versus traditional relays/ contactors that consume 10 times more if not more (>140 mA) ,

Another design consideration: The Blue Sea 7713 has to consume some energy even when OFF. That wouldn't work for me, so i got a tiny relay (ELK912) that would cut the negative side of the 7713 to completely cut off the power consumption when OFF. The tiny relay consumes 30 mA, which is still kind of energy savvy compared to a traditional relay.

I designed the system so when there is an undervoltage event ( any cell is less than 2.7 or 2.8, my memory is bad), it  disconnects everyhing from the system.

Also, i put an extra tiny relay (ELK912),  so in case that it is charging from the victron and there is an overvoltage event ( any cell is greater than 3.8 Volts), it'll  send a signal to the victron ( inverter / charger) .

At this point of time i have succesfully tested the system  in the following ways:

- The cells came from the factory at around 50% charge ( 13.3V) ,and first i charged it all the way to 100%. I could see how the cell balancers started acting on some

cells  when we were getting close to full. Then, the charger stopped charging ( it didnt trigger an over voltage because NO cell reached 3.8 V.)

- Then i put a load ( my new led bars that i got, but that's for another post), and discharged until i triggered the alarm of undervoltage. (any cell is less than 2.7

or 2.8, my memory is bad), which successfully trirggered an undervotage alarm event ( it changed from +12V to 0V on the ov output pin of the BMS)

- Then I recharged again, and the cycle was successfull!!!!!

YOu can see the monitor of the BMS very useful, showing the current load, the current voltage per cell and in the entire system, and the capacity. It is measuring all that through the shunt, so it is a reliable way to monitor loads.
This also monitors each cell's temperature:
bmsScreen1.jpgBMSScreen2.jpg

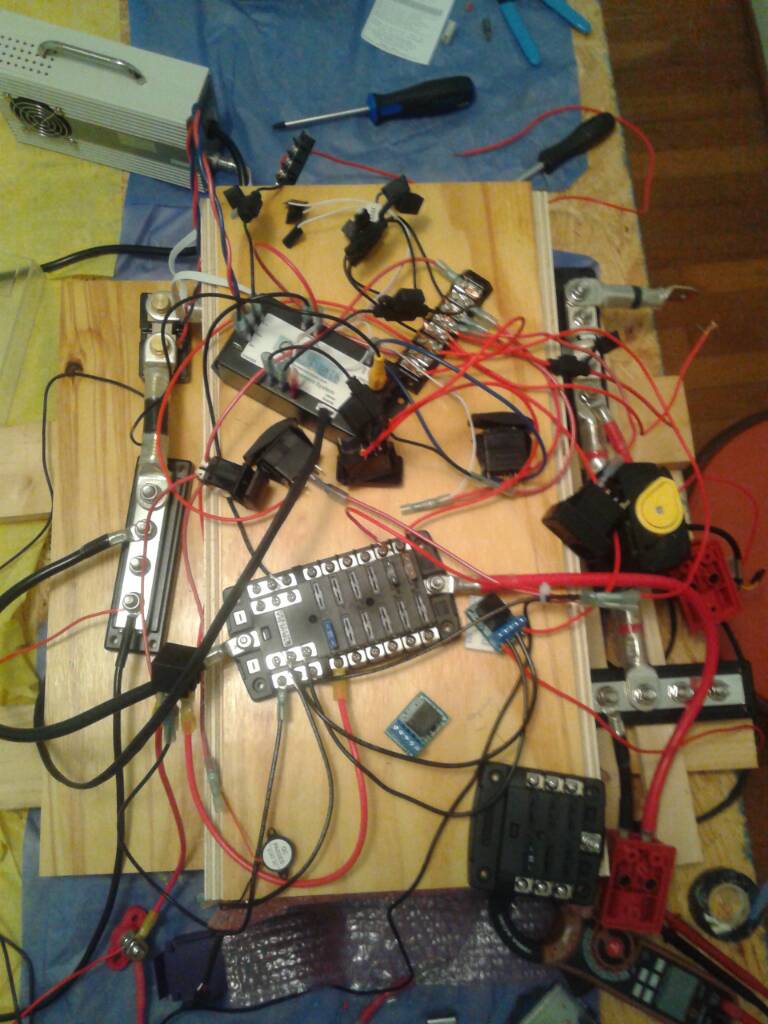
Physical IMplementation:

I wanted to utilize as little space as possible, so decided to create a 'Case' for the battery that will actually have attached all the elecrical components to it.

SInce it is a lithium battery, it won't offgas. No need to have it in an enclosure separate from the main living space.
The one disadvantage of my custom enclosure is of course poor ventilation of the battery. I am thinking of making several tiny holes ( 1 - 2 inches in diameter) on the 1/2 inch plywood case, in hopes to enchance ventilation to the battery. I hope those ventilations hole ( still to be made), will provide relief to the battery on summer temperatures, which are anyways harmful to my Lifepo4 battery.

batteriesAtBottom.jpg

At the very bottom of the fixture are the cell batteries ( 4). Then, once you connect the cell balancers (following the manufacturer's manual), you need to run cables along from one end to the other. ON top of all that, i made my plywood case making it a bit taller than the batteries, so that it doesn't crush the BMS' cables (underneath the plywood case).


Then on top of the plywood case, you can see these components:
topb4Connecting.jpg
1. The bms, which is the heart of the entire system. Elite POwer solutions did a great job documenting this thing so i won't go through it again.
2. a blue sea 5026 fuse block, it's integrated negative bus comes very very handy, and it is there for the 12V loads. I anticipate connecting my fantastic fan, the led lights, a 12v fridge, and all my 12v loads, like ciggy chargers, etc.
3. a blue sea 5028 fuse block, this is always hot  and its to turn on the entire system, also i connected the charger directly to this one , IT also can power up the BMS system / lcd without having to turn on the entire system . THis may come in handy for diagnosis/ failure / troubleshooting of the system in the future.
4. A terminal block in the center , for connections between all these devices.
5. A couple of small relays ( THe tiny blue ones, they are ELK 912 relays), one connects the negative pole of the 7713 latching relay, and the other one is to 'cascade' the two outputs (Over voltage and Under Voltage). THis is gonna come handy when the victron becomes the main source of charge. IN that case, either if there is an overvoltage or an undervoltage, the victron should be disconnected.  Both ELK relays are driven by switches, one is directly on the battery since i dont anticipiate to use it heavily.
6. CLose to the rear, a car didode relay RC400112DN, this is to control the 'alternate' charging source (other than the inverter / charger),  so far i have used it to control the charging. I have been charging my system with the included 15amp charger .But i decided to install this relay to possibly control other charging sources in the future ( perhaps solar??)
7. CLose to the front, you will see a looong strip of terminal blocks, which connect to the different switches of the system.

Next post will show a pic of the TOP already connected, and will continue explaining some of the components.
 

Attachments

  • masterDiagram256.jpg
    masterDiagram256.jpg
    356.9 KB · Views: 11
  • batteriesAtBottom.jpg
    batteriesAtBottom.jpg
    1.1 MB · Views: 6
  • topb4Connecting.jpg
    topb4Connecting.jpg
    1.4 MB · Views: 12
  • bmsScreen1.jpg
    bmsScreen1.jpg
    1.3 MB · Views: 8
  • BMSScreen2.jpg
    BMSScreen2.jpg
    1.2 MB · Views: 5
Just know this...

1. Your project, your direction, your schedules, all yours!
2. Your doing a hi quality job, it takes a minute to do it as right as you have been doing!
3. Don't fret over how long it takes, it is what it is!
4. The electrical stuff was by far the most expensive, and labor intensive, so far.
5. Don't give up, EVER!!!!

Our project has been a huge mind game, and it has been brutal on me.
I have spent many hours fretting, stressing, and PONDERING, yet no results to show for it.
But days later, things just fall in place, and get done with little effort.

Personally, I think this is the best thing I have EVER attempted, and I don't want it to end!
And it has been the worst, I almost yelled at the wife for not helping me when I needed a third hand... Yet, not realizing she WAS. Doing all the housework, cooking, cleaning, just being here!
Sometimes, I feel so idiotic, unable, and out of control, then other times it is all good...

So, moral? Keep going. You got this! Me I'm gonna take today off, Again!
 
Electrical post / lithium - part 2.

Here you can see the explained components on the top, ( from my last post's in the last part)  connected:

TOpConnectedTOUpload.jpg

NOw you will see the left side of the system:
20160923_225529.jpg
YOu can see the shunt and the 500 amp negative busbars. You can also see the braided cable red and blue,  ( it has to be braided) that connects from the shunt to the BMS.

NOw you will see the right side of the system:

rightside.jpg

ON the right side of the battery, you can see the main fuse holder (blue sea 5502), with a class T fuse 400AMP.

THen you see the blue sea 7713  latch relay, that big monster that has a yellow manual switch on top, and lastly the blue sea 500 amp positive busbar.

THe 2 red boxes hanging around are positive fuses that i still need to attach to the wood casement. one is 80 amps and the other one is 30 amps.

Lastly, i got rocker switches and arranged them here:
switches.jpg

THe rocker switches are attached in test mode, but once the van gets finished, i will reconnect them to the proper terminals, and use longer cables.
I am glad that i decided to use terminals.

HEre are the explanation of the switches:

2 momentary switches are to turn on the tiny relay that will close the negative connection of the latch relay, and another momentary switch is to turn on the latching relay. SO both switches ought to be activated at the same time to turn on the system.
Then, we have a momentary switch that toggles the screen mode in the bms.
Then there is another switch to turn off the system.
and there is another swicth to turn on / off the LCS display of the BMS.
THe last switch is to turn on / off the charging source.
 

Attachments

  • TOpConnectedTOUpload.jpg
    TOpConnectedTOUpload.jpg
    1.7 MB · Views: 10
  • 20160923_225529.jpg
    20160923_225529.jpg
    1.1 MB · Views: 9
  • rightside.jpg
    rightside.jpg
    1.3 MB · Views: 5
  • switches.jpg
    switches.jpg
    1.3 MB · Views: 7
I am offering my van for sale!!!

Sadly,  have to move on and leave this unfinished project behind.

I have spent so far around 26k on this project, and it could turn into a wonderful  stealth van conversion but unfortunately i have no more time / money left for finishing.

I think this would be a solid foundation for an aspring van dweller, i would give you a 5k discount if you take everything with the van, and considering the hundreds of hours that i've put on this project, i think it'd be a nice deal.

I could also sell the van without the 12 v electrical system, but ideally you would take all from me.

RV inlcudes:
Lithium 200Ah Electric Sytem ( see previous post for details / pictures on electric system) , value of $3000
Insulation is very solid, I see it as an advantage to show the insulation (rather than hiding it behind 'pretty walls'), because it truly shows you what's it made off, and it is truly solid. Utilized Loctite Construction adhesive and the best foil tape: Nashua Extreme Weather foil tape. I did the insulation over 1.5 years ago, and it is very solid.
Insulated with PolyIso - Ceiling: 1.5 inches - R9, Walls: 2 inches average - R12 , Back: 2.5 inches average - R15, Floor: 0.5 inches average - R3
Fantastic Fan 7350 Plus vent cover (it can be open in the rain), installed and working, with remote control, value of $308.00
Body is Noise insulated with FAT MAT Rattle Trap.

Van Extras:
Genuine Nissan Cargo Floor Mat
Genuine Nissan Side Wind Deflectors
Genuine Nissan Backup Camera
The cargo area has no scars, dents or scratches form cargo shifting
Stock Aux input radio with CD
A/C works very good.
Low tire pressure warning
Outside Temperature Display
180 degree rear doors


The Van:
Year: 2012
Make: Nissan
Model: NV Cargo
Series: 2500 S
Mileage: 92,300
Exterior: White
Interior: Charcoal
Transmission: Automatic
No. Of Cylinders: 6.
Engine: 4.0L V6 FI DOHC 24V
MPG: 18 in highway, 13 in city.
CLEAN CARFAX, CLEAN TITLE in HAND.

Van is located in Columbus, Ohio.
Please send me a message if you are interested or want to discuss about it.

Please see 3 more posts for more pictures.

1Front.jpg2FrontRight.jpg3RightBack.jpg4LeftBack.jpg5backOpen.jpg
 

Attachments

  • 1Front.jpg
    1Front.jpg
    227.6 KB · Views: 5
  • 2FrontRight.jpg
    2FrontRight.jpg
    263.3 KB · Views: 5
  • 3RightBack.jpg
    3RightBack.jpg
    187.1 KB · Views: 5
  • 4LeftBack.jpg
    4LeftBack.jpg
    208.6 KB · Views: 4
  • 5backOpen.jpg
    5backOpen.jpg
    195.1 KB · Views: 18
Here are 5 more pictures:
backup camera is nice, but picture has poor quality

6BackFan.jpg7InsideSide.jpg8InsideFront.jpg9tire.jpg91BackupCamera.jpg
 

Attachments

  • 6BackFan.jpg
    6BackFan.jpg
    283.3 KB · Views: 9
  • 7InsideSide.jpg
    7InsideSide.jpg
    276.2 KB · Views: 15
  • 8InsideFront.jpg
    8InsideFront.jpg
    250.7 KB · Views: 11
  • 9tire.jpg
    9tire.jpg
    270.9 KB · Views: 5
  • 91BackupCamera.jpg
    91BackupCamera.jpg
    237.8 KB · Views: 5
Last batch of pictures.

Van is located in Columbus, Ohio.
Please send me a message if you are interested or want to discuss about it.

92Copilot.jpg93Odometer.jpg94Pilot.jpg
Finally,
I have to say thanks to this community, this project made me grow up a lot, people can say and think whatever about me but the build was a great experience for life and i owe it to you guys.

Thanks everyone!!!!!
 

Attachments

  • 92Copilot.jpg
    92Copilot.jpg
    195.5 KB · Views: 4
  • 93Odometer.jpg
    93Odometer.jpg
    213.4 KB · Views: 6
  • 94Pilot.jpg
    94Pilot.jpg
    216 KB · Views: 5
So, how much $$$$ for the whole thing?  I may have missed it but I didn't find it in the post.
 
closeanuf said:
So, how much $$$$ for the whole thing?  I may have missed it but I didn't find it in the post.

IF you get me 18k i'll give you all.
We can negotiate.
Vehicle's KBB is 12k, clean title in hand, no check engine light, + Fantastic Fan (SPent 400) + INsulation ( I don't know how much i spent but it was 100s) + the electrical system which was $5,000.

I can attest with notes and invoices all the above.
You basically get for free all my labor (100s of hours).

You get everything new, insulation new, 12V LiFePo4 200Ah Lithium battery system new, unused (95% finished, but functional).


Message me if you are interested.
Here is the official craigslist add:

https://columbus.craigslist.org/rvs/d/stealthy-van-half-way/6338479107.html
PRice is discounted in this site.
 

Latest posts

Top