My slow but hopefully successful NV conversion

Van Living Forum

Help Support Van Living Forum:

This site may earn a commission from merchant affiliate links, including eBay, Amazon, and others.
More about the floor:

How I dealt with straightening bowed plywood:

floor5.jpg

Then I considered electrical run under the floors. I got some half inch PEX from menards and put it  in parallel with 4 more pex pipes,  under the floor for running cables. I hope this turns useful when I make the electrical installation. In this picture you can appreciate the final result of the sandwich of all the layers: fat mat, then strips of insulation in between the ribs, then half inch of insulation (looks kind of white), and then on the very top half inch of acx ply.

floor 6 - electrical.jpg
 

Attachments

  • floor5.jpg
    floor5.jpg
    806.3 KB · Views: 38
  • floor 6 - electrical.jpg
    floor 6 - electrical.jpg
    1.4 MB · Views: 38
I believe that bed may be the single most creative and innovative thing I've ever seen done in a van!!

Bravo! You can't see it, but I am giving you a standing ovation! :p
Bob
 
akrvbob said:
I believe that bed may be the single most creative and innovative thing I've ever seen done in a van!!

Bravo! You can't see it, but I am giving you a standing ovation! :p
Bob

Thanks Bob!!!
 
Fantastic Fan setup.
I put it 2 months a go here my details
A very stupid mistake was to make the hole in the roof smaller than needed. that made unnecessary delays and extra dents / damages to the roof.
I'd recommend to have in hand the automotive cleaner  (i used a clay bar) for the roof, since all the little dust was sort of 'inserted' into the van roof through the clear coat.
Then painted the edge with white paint, i wonder if i should have sanded the edge first, but it's too late right now  - so time will tell.
A very important consideration that i think was another mistake: My nissan NV high roof is curved, it's not flat.
It nas some valleys and crests but it also slightly curved. I was lucky to put enough putty and cope with the curvature, but if i'd redo it again i'd consider the curvature of the roof when putting the butyl tape so that in the middle of the fan i'd put less butyl tape and in  the edges i'd put a bit more butyl tape.
I didn't mind hitting a bit the fan cover when drilling, but i made accurate holes, after drilling, i put a drip or to of the dicro sealer and then screw over the whole. THen top the screws with dicor sealant.
I prepared the whole thing so my vent cover would be installed at the same time.  It's been over a month of the install, there have bee a couple of windy storms and lots of rainy days and it never leaks! AND, i am with my vent ALWAYS openned all the way! I am so glad i got the vent cover!!!!!!!
Another nice thing is that i can leave fan running when raining, and it won't get wet. Sometimes it splashes only a tiny drip or two and it trips the rain sensor, but you can deactivate it from the remote control ! :):)
Connected the Fan temporarily with a cheap cigg connector and cable from Wal-Mart - less than 8 dollars total.
I calculated the time that my truck could run the fan with the factory battery this way:
My battery is a 999M1-NC24F and it has a spec of RC130. According to Ehow, i can convert that number to Ampere hours: 130*60*25/3600 = 54.16 AH.
Since i don't want to go lower than half of it's capacity and also i want to leave some power to start the engine, i believe it'd be safe to use only 20 AH  out of those 54.15 AH.
SO, considering that at MAX speed  the fantastic fan runs 3 amperes, i think i could run (20/3) between 6 and 7 hours safely without having to recharge the battery.
ffan1.jpgffan2.jpgffan2.5.jpgffan3.jpgffan4.jpg
 

Attachments

  • ffan1.jpg
    ffan1.jpg
    1.5 MB · Views: 25
  • ffan2.jpg
    ffan2.jpg
    1.1 MB · Views: 28
  • ffan2.5.jpg
    ffan2.5.jpg
    1.1 MB · Views: 25
  • ffan3.jpg
    ffan3.jpg
    1.1 MB · Views: 27
  • ffan4.jpg
    ffan4.jpg
    1.2 MB · Views: 25
More fantastic pictures

ffan5.jpgffan6.jpgffan7.jpgffan8.jpg
 

Attachments

  • ffan5.jpg
    ffan5.jpg
    759.7 KB · Views: 22
  • ffan6.jpg
    ffan6.jpg
    802.8 KB · Views: 25
  • ffan7.jpg
    ffan7.jpg
    1,022.4 KB · Views: 29
  • ffan8.jpg
    ffan8.jpg
    1.1 MB · Views: 29
nice, smart choice with the cardboard box to catch debris. what is that insulation/vapor barrier you have on the roof? you said you cut the hole to small why didn't you just trim a little more off? highdesertranger
 
highdesertranger said:
nice, smart choice with the cardboard box to catch debris. what is that insulation/vapor barrier you have on the roof? you said you cut the hole to small why didn't you just trim a little more off? highdesertranger
Thanks! ! The vapor barrier is the fat mat rattle trap, it is also a sound deadener.

Yeah I had to trim a little more off and made it work but I miscalculated so bad that had to cut a tiny part of the ribs. .. it was tougher to cut through them but it finally worked.
 
Having a hard time. Have I made a mistake. Have I spent thirty grand and two years spending ever bit of my leasure time on this.

I having a hard time getting motivated.

I believe I may have start due to the wrong reasons -fear. Fear of a system , fear of not succeeding, a fallback plan.


But life is so short that I need to focus on the things that will bring and give love in my life. This is not fitting anymore in my desires

I feel drained, non motivated, I haven't even finished insulation. I think I will sell the van and my things. Still unsure


c64e1a8fb69f0539e13ad7ae971e6218.jpg
uploadfromtaptalk1460396500534.jpguploadfromtaptalk1460396516839.jpguploadfromtaptalk1460396541638.jpg
 

Attachments

  • uploadfromtaptalk1460396500534.jpg
    uploadfromtaptalk1460396500534.jpg
    36.9 KB · Views: 22
  • uploadfromtaptalk1460396516839.jpg
    uploadfromtaptalk1460396516839.jpg
    32.6 KB · Views: 22
  • uploadfromtaptalk1460396541638.jpg
    uploadfromtaptalk1460396541638.jpg
    38.4 KB · Views: 24
Before you sell, maybe throw a sleeping bag and pad in, a cooler and camp stove, and take a road trip. Sometimes a change of scenery can give you a new perspective, even if it's just a weekend away. The first trip I took in my cargo trailer I barely had the walls up. Slept on cots but it was dry and out of the wind. Spent a week in it that trip and couldn't wait to get back out there. That was 2 years ago and it's still not "done", but closer. I'm still a ways from being able to be anywhere close to full time, but it allows me to escape whenever I can. It also motivates me to continue to downsize so when the time comes, it won't be such a dramatic change to go full time.

Also, look at Bob's blog post a couple back - guy has the same van as you and he outfitted it very simply using found and cheap furniture. That may help with the motivation. While it's nice to see the vans that are done really top notch with craftsman style interiors, the simple ones can be just as homey and comfortable. Some people really enjoy building, while others just want to be able to jump in and go and have what they need. Neither way is wrong.
 
I agree with Masterplumber. Try it as is and if you don't like it at least you know rather than defaulting to pass on your investment and not ever know if it was you.
 
I agree with the other comments. Take a little road trip and see if its for you. You don't have to be a full timer to enjoy and love road trips. I've done around 15k miles of road trips out of my old 03 Chevy Express and loved every minute of it. Plus, you've already spent a lot of money and time you can't recoup, but if you enjoy using it that's the best way to make out on the investment.
Once on the road I have a hard time stopping because I keep needing to see whats over the next mountain or around the next corner.

Good Luck!

-Matt-
 
Those pics look like you have done a great job on the insulation .
That will pay off in extra comfort when it's hot OR cold.
I'm sure lots of us here will be a little jealous.
The rest can be simple or elaborate but it's livable now . I agree with the posters that say get some traveling done in it to see if you don't become totally addicted to living in your rig !
 
Thanks everyone for your comments. They are comforting. I was having a small anxiety crisis but I shouldn't worry, the outcome of this is going to be good for me.

I had to vent myself and i figured to do it here cause this site is my original motivation.


I'll do another trip this summer and spend three more months doing conversion on weekends to see my progress.

I guess to be non handyman had delayed me a great deal or maybe I too slow or too detail oriented. Thanks for the words of cheers.

I didn't bite the dust. ...
 
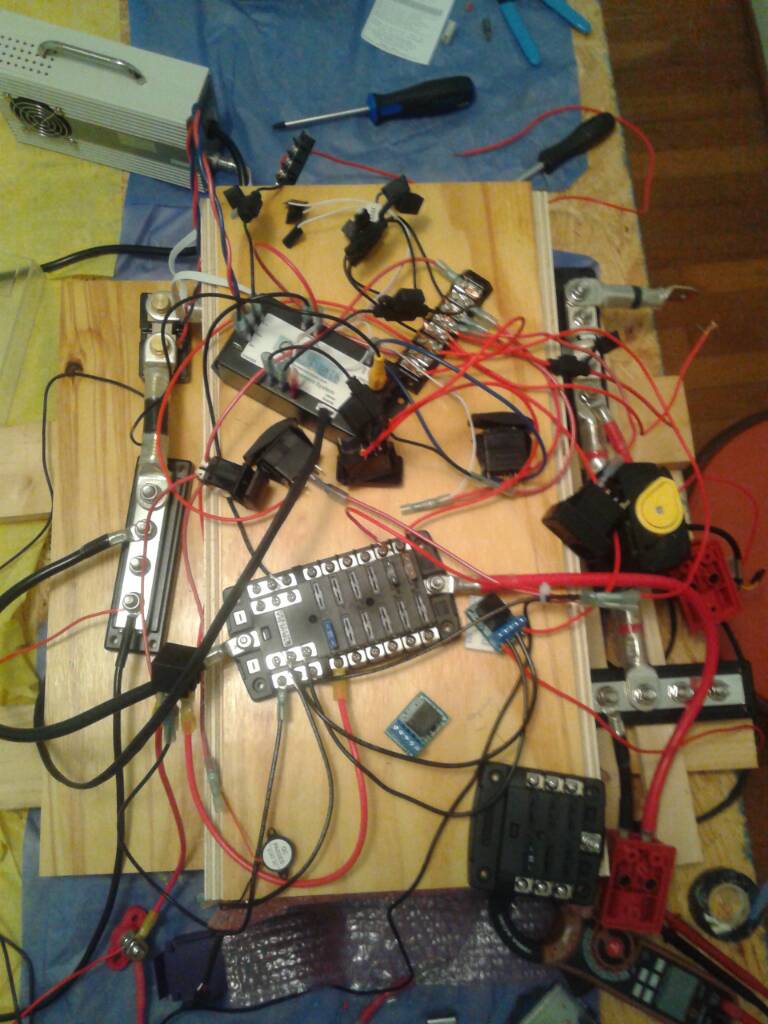
HI all. I have been a bit sick but decided to plan the design of my electrical system. THis is a 200AH LIFEPO4 based system, but please get back to me with any feedback  / improvement suggestions you may have.


Please help and tear apart my design!!!!!


I decided to buy elite power solution's 200AH battery + BMS system and am just planning the main system. I will later buy a 3000 watt victron inverter / charger. but for now i will bear with the 15A charger provided. I have not yet used / tested the battery. The package included a charger, a video screen for monitoring SoC, BMS, the battery, and a shunt. (all of them shown in the diagram below).

Contrary to many opinions that i've seen, I decided to go with a latching relay for switching the main loads (BLue sea 7700, 500 amp) , and will be controlled by relays and the BMS. THis latching relay can be manually switched without power, saving me the need to buy a switch.

My installation is somehow inspired on the mar azul boat blog, and i slightly modified the relays to control the under voltage. There are also very helpful manuals that were provided by elite power solutions, and of course learned some from this forum.

The below diagram is a reduced version that omits some components of the BMS package (FUSES, Ground connections, video screen, and others), hoping to give a good understanding for controlling Under VOltage and Over Voltage Conditions:

elecricalOVUV.jpg

THe BMS has ( Black biggest central component) , among other, these outputs:
- OV : Over voltage, +12V normally, GND if any cell >3.6V
- UV : Under voltage , +12V normally, GND if any cell <2.5V

(note) both OV and UV go to GND for other errors like over temperature or BMS sensing failure

For OV control, it is directly connected to the sense cables of the charger, and i am adding a buzzer ( utilizing a relay on the right side), so I can hear when there's an OV condition. This should make the charger stop charging in an OV event.

For UV control, i decided to connect two relays ( to the left of the BMS system) and then the latching relay: One Normally Closed Relay that, when actuated, it opens the circuit. If there are normal conditions on the BMS, this relay would be OPEN. IF there is an Under Voltage condition, this relay would close the circuit and activate the 2nd relay (a flashing relay), which would send the signal OPEN for a few seconds ( to the orange connection) to the latching relay. THis would OPEN the main connection


All the relays, bms, and all loads are connected after the latching relay, if an Under Voltage event occurs, all the loads get disconnected, including BMS, RElays, and everything. I added to the diagram a couple of override switches to manually connect the bms and the main latching relay for diagnosis / repairs.

Please let me know your feedback, below is the complete diagram ( i ommitted fuses and ground connections for the sake of simplicity), including all the components that would need the bms to be operable.
electricalComplete1.jpg
I welcome your feedback on every error / issue / pottential issue that you see in my design.

Several thanks in advance for your kind help!!!!!!
 

Attachments

  • elecricalOVUV.jpg
    elecricalOVUV.jpg
    101.5 KB · Views: 19
  • electricalComplete1.jpg
    electricalComplete1.jpg
    118 KB · Views: 20
How's it going Free Range Chicken? Hope you are feeling more positive about build and choices. I too have an NV2500 and invite you to find my videos on youtube, under the name Day Drifter. I have owned mine since Jan. 2015 and am still working on it. Money and health issues main reasons for my slow build... but I really do still love the van. Please, if you have a youtube channel or vlog, post the link. Thanks! - Marty
 
Thanks for the encouragement!!!!! I have no other documentation than this thread and o couple of other threads that I started in this forum for specific questions.

At this point I'm feeling more encouraged and will take off from work and put ten straight days of effort on July first. I have made good progress on the electrical build, I'll post all my progress probably in 15 more days.

The Nissan NV hasnt disappointed, and slowly getting there. My goal is to be significantly ahead by the end of the year.
I'll look at your videos , Marty.
 
When I'm building control cabinets or electrical gizmos, I mount the equipment solidly first and then route the cables in bundles. I think of it like designing cable roadways with nice gentle curves and an orderly flow of traffic. I try to keep my entry and exit points to an equipment "area" down to a minimum, and route everything to those points. I used to use zip ties everywhere, but got tired of cutting and wasting the things when I messed up or added stuff, so now I use velcro wraps almost exclusively on interior bundles, along with rubber-padded or plastic cable clamps, the kind with one hole that you can screw to the panel.

Sometimes in tricky builds with limited space in height and width, I'll use the extra depth at my disposal and run the wires behind the equipment in a hidden cable tray area, bringing them out to connect to equipment using drilled holes or slots. It makes for a very clean appearance in tight spaces, and prevents the wires from obstructing the equipment. All the wires are behind the board the equipment is bolted to.
 
AngryVanMan said:
When I'm building control cabinets or electrical gizmos, I mount the equipment solidly first and then route the cables in bundles.  I think of it like designing cable roadways with nice gentle curves and an orderly flow of traffic.  I try to keep my entry and exit points to an equipment "area" down to a minimum, and route everything to those points.  I used to use zip ties everywhere, but got tired of cutting and wasting the things when I messed up or added stuff, so now I use velcro wraps almost exclusively on interior bundles, along with rubber-padded or plastic cable clamps, the kind with one hole that you can screw to the panel.

Sometimes in tricky builds with limited space in height and width, I'll use the extra depth at my disposal and run the wires behind the equipment in a hidden cable tray area, bringing them out to connect to equipment using drilled holes or slots.  It makes for a very clean appearance in tight spaces, and prevents the wires from obstructing the equipment.  All the wires are behind the board the equipment is bolted to.

Hello Angry Van Man. I appreciate the guidance. I guess i am new to this and perhaps was doing the lazy, quick & dirty way.
But I guess for an initial test it may be difficult to have it all properly sorted and cabled.

A good thing i did is: every conexion  is being documented in my master diagram, which has changed quite a bit. I will repost it soon. This diagram will allow me to rewire the whole circuit even if i disconnect everything.

I will start again from zero and first fixate the components , and then will put the wiring, the way you suggested.

Thanks a lot for the suggestion!!! I expect to come back with a more neat cabling  and not a zoo of cables :):)
 
Top