Making window screens

Van Living Forum

Help Support Van Living Forum:

This site may earn a commission from merchant affiliate links, including eBay, Amazon, and others.

Odyssey

Active member
Joined
Jul 12, 2016
Messages
36
Reaction score
0
I'm making window screens for the minivan and have learned a few things.

After several trips to both Home Depot and Lowe's, I have found what works for me and what doesn't. Skeeter Beaters are overpriced and not strong enough for me, the over the door sleeve type mesh is not sized for my minivan. DIY to the rescue!

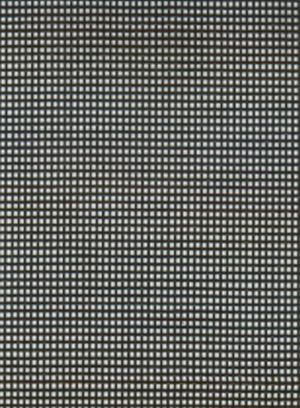
Buy the premium NoSeeUm mesh. The more open weave cheaper material lets in critters you don't want. One roll is plenty. Don't skimp on magnets, and don't use the flimsy flexible magnets. Go ahead and buy the more expensive and better quality rare earth neodymium magnets. The ceramic magnets are just okay. That must be what Skeeter Beater used, the "pull weight" is maybe 2 lbs. The "rare earth" neodymium is more like 5-8lbs.

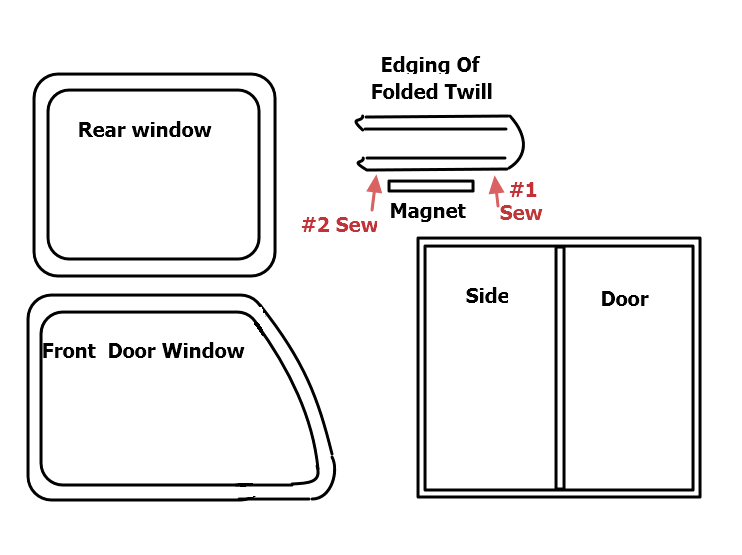
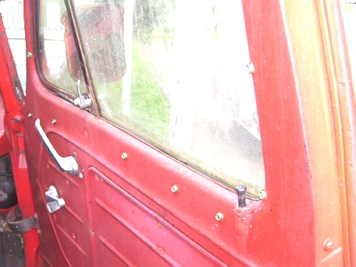
Lay the screen over the outside of the window, trim and adjust with a generous overlay. This makes for  a better fit over rain deflectors, side mirrors and door handles. My minivan has dual sliding doors with 3 carrier brackets each that prohibit a two-sided fit. Plus that is really a waste of material when using the NoSeeUm mesh. Affix magnets and mark locations. I used at least 6 size 1/2" magnets on each of the sliding side door Windows, size 1/4" across the top of the front windows with the 1/2" magnets on the lower part. 

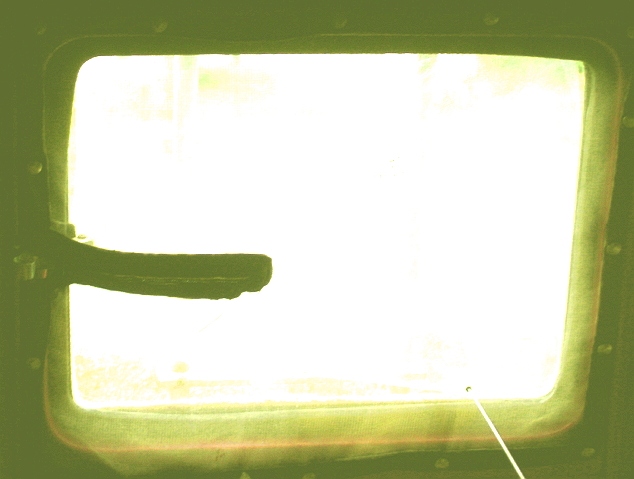
I couldn't figure out how to screen off the rear quarter vent Windows without interfering with the door slides, so I opted to leave them alone. If I affixed screen from inside, there would be a layer of adhesive that would annoy me later. That's a shame, because I can open them manually, the two front and two side windows are power windows. But I decided that I'd rather be able to open the side door than the rearmost window. The rain deflectors allow me to keep the windows partially open no matter what the weather decides to do. Enough material is leftover for me to rethink this later. 

Sewing in magnets messes up the feed dog and the bobbin on the machine. Too frustrating. If you elect to sew, mark the material with chalk and make magnet pockets, the after inserting magnets hand sew them closed. I got so frustrated with this I went with the more rigid Gorilla tape.

Do not use my good scissors on Gorilla tape. The blade of an exacto knife works well and doesn't gunk up my good scissors. I used a small craft roller to smush the tape to the mesh, and doubled the tape so the adhesive doesn't bleed through the mesh where instead it can stick to itself.

Mosquitoes carry disease like Zika and encephalitis, deer ticks cause Lyme disease and I am allergic to bees, wasps, etc. After getting sick earlier this summer when Mylan decided to make the EpiPen cost as much as 3 months' groceries, keeping bugs away from me is a very high priority. 

Feedback?
 
Wow, thanks for the detailed info! That will help a lot when I make some.
 
I just wanted to say that I love that this was NOT in the Girls Only section :D
 
I found the better magnets at Home Depot in stock. Not Lowe's, although they had the ceramic magnets a'plenty. HD did not have Reflectix, Lowe's did. And the Lowe's guy helped me find the correct barb fitting for the weed spray shower to kitchen side sprayer thingy, but the Home Depot man was unhelpful there.

Both of those stores are a 20 minute drive away from home, but close to each other. Fortunately I can look up the parts I want and from their app find out which aisle or section things are stocked. Saves me loads of time!

Special shout outs to ddbowdoin and NickTheoBennett for the inspiration on screens!
 
"Were can you get rare earth neodymium magnets other than amazon or ebay " prospecting/metal detecting stores, or old hard drives. highdesertranger
 
I made rigid screens for my old van.  I traveled with dogs and a cat, so I couldn't use anything that they could 'accidentally' push out.  I had a Ford cargo van, so just had to do the front windows.

Some extra paneling (1/8") gave me the idea.  I made a pattern from cardboard of the shape of the window, and cut out two window shapes from the paneling.  Then I bought some wire window screening and some 'h'-shaped aluminum molding stuff (I think that's what it is).

Then I positioned the h-shaped strips about an inch or so up from the bottom so they would hook onto the top of the glass window.  The top just pushed into the top groove where the glass normally goes.  Then I hot glued (HOT-- round glue stick, not oval) the screening in place, letting each edge cool and harden before doing the next one.

With these, I could leave the dog and cat in the van, parked in the shade, with the roof vent and the windows open.  My dog was a 50-lb Belgian Tervuren, and she would lie quietly on the floor, out of sight.  If anyone came near the front doors, she would leap forward and roar at them.  People don't seem to like black-faced Shepherd-type dogs doing that. :D
 
Oh, I just realized that I forgot to mention putting the hole in the center... I cut it with a jigsaw, and left about a 2" border for strength.
 
Thanks. I was trying to figure why you made a cardboard pattern and a plywood pattern. :)
 
And why have a screen when you don't have a hole for it to cover?   :blush:
 
I'd think that any of the women who are accomplished seamstresses who packed along a small portable sewing machine wold be valued company when a group gets together to have a "build party".   I know I can make patterns and cut material quite well,  but I don't own a sewing machine and wouldn't be competent with it if I did.

My first Van had screens my Dad and I built. (Mom did the sewing for us)  Dad and I put the snaps in the screens and installed the pieces that they snapped to on the door windows and main doors.   The screens keep mosquitoes, gnats, and flies out and makes life more comfortable.  

Window blinds may be another question requiring more skills than the average guy may have.  Then a guy will
just hang up bath towels or whatever for privacy.  LOL    The women will actually "make" the appropriate window coverings as they know how to. 

When I've been on the road in that old Van,  the one thing people have commented on the most was the screens.   The last ones I made fit the rear windows when I replaced the fixed ones with the flip out ones.
I went to the trouble to install zippers  over the window handles so I could adjust the windows  and zip them back afterwards.   To me it was just a practical thing to do.   But those who hadn't been around RV's and Vans that much it was a real source of intrigue.
 
I found that Amazing Goop glue held magnets to both screen and refletix very nicely.
Used it on several projects and it holds up in cold, heat, and rain.
Be sure to let it cure for 24 hours (in most cases).
 
Odyssey said:
... Buy the premium NoSeeUm mesh. ...

Rather than answering this question with a brand name, could you define "premium" with some generic specification, such as "wires per inch" of mesh, etc?  Would be a big help when trying to locate some.

Thanks,

Vagabound
 
I know nothing about No See UM. but as far as screen hole size it's called mesh and it's measured by how many holes lineal per inch. that means 10 mesh has 10 holes per lineal inch, or 100 per square inch. 10 x 10 = 100. I used ten as an example because it was easy math. my gold screens I have are 2 mesh(2 holes/inch = 1/2 inch holes), 4 mesh, 8m, 12m, 20m, 30m, 50m, 100m. I have seen screen with a mesh of 300, you can barley see through it. highdesertranger
 
My screens are made of Olive Green No-See-Ums  20x20 mesh.  

Looks about like this swatch up close

Tuff_Screen_Black.jpg


and at a distance


pestnetgreenno-see142med.jpg


The edging of the screens was made with 4" wide thin canvas twill that both edges were folded to the center
and the net placed to the center of that.   Then the twill folded over on the screen and pinned  so that the sewing machine could run a stitch all around the screen to give it a boarder to support it with the fastenings
installed in the boarder.   The fastenings may be snaps, magnets, velcro, or whatever. 

If I were making these today I'd probably use 3/4 inch wide magnetic plastic sewn inside the boarders.
The magnetic strip comes in a roll and can be cut to length.  It takes very little to sew these screens together.
One of the nice things about them is that they can be folded and rolled up to stow in a small space.

Then the screens would be placed along the metal door frame with the window rolled down or partly rolled down. 

On my 90 Ford Van I'd have screens for the front door windows,  a large one with a full vertical zipper to cover the side door, and two small ones for the rear door fold in/out windows. 

I've found that having these screens in place are enough to provide ventilation and protection from insects.
 
First I wanted to wait to see what the prevailing wisdom was.  I did some research a while back into this midge/no-see-um issue.  My cut-n-paste notes are below, as well as two links that talk about mesh size within the page somewhere.  Sorry, no time to clean it up.

-------------------

o Per wiki: 18x14 has become the standard mesh fineness.  For comparison, clothes dryer screen is 23x23.
o Get small pore screen to keep out midges.  
 Per Metro Screenworks, that is any of the following: 20x30, 20x20, or 20x17 (length x width holes per inch; more holes per inch = finer weave (less bug get-in room)
 Per different product manufacturer listed on Amazon (from the UK), the minimum fineness (per some unnamed study) is 600 holes per square inch (or 30x20).
 Per University of Florida:
• Most biting midges can pass through 16-mesh insect wire screen (normal window screen) and netting, so a smaller mesh size is required. 
• The small mesh size does limit air flow through the screens.
• Optionally, no-see-ums are so small and are weak fliers, so ceiling and window fans can be used at high speeds to keep no-see-ums out of small areas.
• DEET sprays are effective [[ in my experience, not so much ]]
o Per wiki: Charcoal color gives the best visibility, and “for coastal locations, corrosion resistance usually requires the use of bronze or synthetic screening fabric.”

-----------------------

http://www.wovenwire.com/no-see-ems-biting-midges-insect-cloth.htm

http://www.amazon.co.uk/Window-Screens-UK-Midge-Mesh/dp/B001VCHTS2

========================

Vagabound
 
"Would you please post a pic or two of these screens? I still can't figure out in my mind what you did exactly. I think the h strips are what is throwing me off."

Sorry, never did take a photo of them, and they're long gone.

1. Wall paneling cut to match the window hole (make cardboard pattern), but maybe 2" shorter.  Cut the hole out of the middle, leaving about a 2" frame.

2. Get some aluminum trim molding like this:  http://3.bp.blogspot.com/-tJHcakmzd...5o/5izyYo2NBe0/s640/Trim-Aluminum-Molding.jpg  Cut it to fit almost all the way across the bottom section of the paneling, positing it with the wide side against the paneling, and the 'h' downward to hook over the top of the window glass.  Hot-glue in place.  No part of the aluminum should extend past the wood.

3. Hot-glue the screening in place.  If you have pets, use aluminum screening.  If you need protection against no-see-ums, add that mesh over the screen.

4.  Push the top of the panel into the top window slot.  Roll up the window a bit to catch the 'h' and make it snug.
 
Vagabound said:
Rather than answering this question with a brand name, could you define "premium" with some generic specification, such as "wires per inch" of mesh, etc?  Would be a big help when trying to locate some.

Thanks,

Vagabound


What I used was from Home Depot, Phifer brand "NoSeeUm" roll of screen mesh. Not the general insect screen or solar screen or animal screen material, all of which were in the same location of the store. I think I paid about $30-35 for the roll vs $19 for the basic stuff.
 
Here's how I made mine and they work well for me.  

First I'd make a paper pattern that fit over the window with adequate coverage so that the edging containing the fasting (magnetic or whatever) would have metal to mount to.    Just some wrapping paper,  tape, and scissors will do it.  You only have to do one front door window as it can be used for the other door.  Same with rear door windows if they are the type that fold out.   The Side Door may be measured or use masking tape to lay out any compound corners.  (then remove it gently to have as a pattern of sorts).

I use 4 inch wide canvas twill edging which when folded as shown in the diagrams below will allow a 1 inch boarder all around the screen.   these don't have to fit tight or perfectly to do the job. 

When sewing the edging to the No-See-Ums,  sew at the outer edge first.  Then the magnetic strip can be inserted and placed with a few drops of super glue.   After the magnetic strip is in place the second stitching can be installed at the inner edge of the boarder.  Viola !  Screens.

The side screen will take a bit of skill if you purchase a plastic zipper to run the height of it.  I'd make the
screen first and fit it to the side door.  Then when satisfied,  calculate the center of it and cut to the top edge.
Fold canvas twill and sew it to the cut edges of the No-See-Ums screen as in all of the other operations.  Then
pin the zipper to the "inside facing" side of the screen.  Then carefully sew the zipper in place.

If you want to make a large screen for the back doors you could.  It's basically the same as the side door.


screens.png
 
Some old photos of my first Van.  I used snaps like you would see on a Convertible top cover.  Got them at an Upholstery place and paid too much for them.   That's when I started looking for cheaper ways like velcro, or
plasic-magnetic strip to sew into the edging.

The front door snaps.

screensnaps_fdw.jpg


Rear window screen snapped in place.   I installed zippers in these screens so I could
more easily operate the latches.  These windows opened at the sides.  (not the bottoms
like later Vans)   You can barely see the snaps holding the screen in place.

screens_rdw.jpg


I would say that these could be easily made at a "Build Out Gathering".    I've used No-See-Ums 20x20,  but
I would imagine fiberglass window screen purchased on rolls from Walmart "could" be used.   The No-See-Ums
is more typical camping gear material and is likely much more durable.
 
Top