Framing the irregular edges of walls

Van Living Forum

Help Support Van Living Forum:

This site may earn a commission from merchant affiliate links, including eBay, Amazon, and others.

Cavanden J

Member
Joined
Dec 9, 2016
Messages
10
Reaction score
0
Hi All,

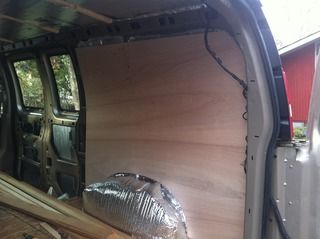
I'm converting an '09 Chevy Express with next to no carpentry skills, and I've run into a roadblock I'm hoping y'all can help with.  I'm trying to put up a frame for the paneling I want to install.  I've been screwing in 1x2s in to the ribs which have so far worked well for the ceiling and all the vertical ribs, as shown here:

IMG_0870.jpg


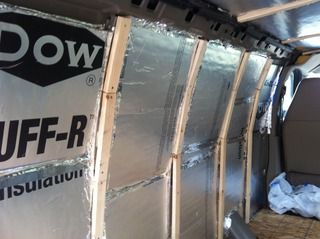
So far it seems like these vertical strips shown have maintained a pretty even surface for the panels to go onto, but I'm stuck when I get to the rear edge/corners of the van, because the edge presents a kind of undulating surface that doesn't lend itself to this above technique:

IMG_0871.jpg


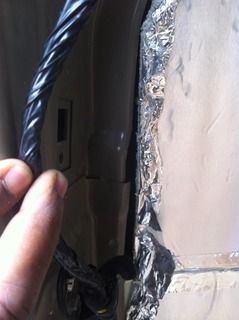
This picture is trying to show that vertical metal edge just to the left of the foil taped insulation.  Hard to see, but the edge, and the whole corner actually, goes in and out very irregularly.  I somehow need to establish a vertical flat plane around here to complete the frame for the paneling.
As I said, my skills are pretty basic, but so far I've gotten through the prep, insulation, and fan installation stages OK, and I think if I can just get this framing part done, I'll be coolio!  

Thanks for any ideas,
 
Is it possible that you could just not go all the way to the corner? Perhaps you say strong adhesive on a strip an inch away from the corner?

Jessie True
Just trying to make it through
 
Lee nailed it !
You can attach some strips to match the walls for the paneling/boards to go against.
Don't forget to insulate the corners before you cover them up!
 
Thanks a lot friends, I guess my question is, anywhere I set a flat strip against any part of the van wall like rvpopeye suggests, the plane it creates won't be parallel to the plane created by the rest of the studs. The vertical ribs of the rest of the wall are all mostly symmetrical, hence matching planes. The corner part varies a bunch in terms of "altitude" wrt the plane of the van wall. I'd stop short of the end of the wall, like JesseTrue suggested, but there are no potential horizontal points to anchor studs except the top and bottom edges, and that's not enough anchorage, and the plane that straight strip would create also would not match the planes created by the rest of the wall.

So sorry if I'm coming off like the noob I most definitely am, I'm really no kind of handy, but I'm sure if I could comprehend the solution I could build it.

The box idea is great, but seems to present the same problem, how to secure a flat surface to an unflat and variable surface. I know what scrolls and scroll saws do in theory, but I'm not at that level of woodworker! And please don't hesitate to describe it like I'm 4!
 
The box doesn't have to follow the irregular shape , you can make it more square. Just attach it at the top and bottom.
Put a piece of wood along the wall strips and over to the box and transfer the wall shape to the box by using a pencil on the back of the board as you move it up and down.
Then attach pieces of wood to the box behind the pencil line and you have a cleat to attach the wall covering to..........You might get enough support from the wall covering to not have to attach the box as much either!

Ask anything else that stumps you and there are lots of us here that can give you ideas.

(If you think fitting to the curves in a van is a pain , imagine how hard it is to do it in a boat cabin ! Compound cuts everywhere!!!!!)
 
Cavanden J said:
The box idea is great, but seems to present the same problem, how to secure a flat surface to an unflat and variable surface.  I know what scrolls and scroll saws do in theory, but I'm not at that level of woodworker!  And please don't hesitate to describe it like I'm 4!

The trick is to square it off as if it was a flat surface. Use shims behind the areas where the flat piece of board doesn't hit the variable surface.

Oh, and I noticed that you ran the 1 x 2s vertically attached to the ribs. Most of us run them horizontally - 3 or 4 of them depending on where you want to use them to attach furniture components to. Mine were set at the top and bottom for panel securing and another at the height that would allow me to screw the top of the bed frame to it.

Since yours are already in place vertically, don't be afraid to use some cross pieces to frame out the places where you're going to need horizontal places to screw in to.
 
Hi and welcome, Cavanden,

I went through all the same head scratching, too.  Was pretty fun, actually, but yeah, sometimes I about lost all my hair.

If your design doesn't mind the panel flexing inward a little toward your interior space there by the back door: Can you could cut the paneling so it fits all the way to the back, and as it lays against the bumpiest points, furr in a few 1 x 2's where you can to make additional screw points?  Before you screw it down you might want to furr out that last rib you already did, too, as likely there'll now be a void there. This is if you don't mind a bit of a 'curving-inward-toward-the-back' wall and also losing a bit of space.  I had a lot of weird bumps, too, so I furred out more to keep my walls pretty straight.  To compensate for the lost width (only a few inches), I kept my kitchen countertop to 16" deep, plenty wide for us.

You probably already know that taking photos of the uncovered frame comes in handy to later find screw points for cabinets and such, and keeping track of allowable screw lengths helps you avoid penetrating the outer van skin.  Don't ask me how I know this.

If you choose to not run your panel over the pesky area: Install one or two short 1 x 2's horizontally from the middle of your last rib section over to meet, but not overlap, the van's back frame.  Attach with small L-brackets. Now you'll have not only top and bottom fastening points but middle points that, though not adding much structural strength, will at least be short-screw backers for your paneling there. Plus, you can add insulation along that back frame.  It's always interesting to see what we all end up doing with that durn back corner.

Do have you something planned there? Cabinet uppers or lowers can be designed to fasten to parts of the pesky area and help hold that last panel section steady if you end up just letting it float in the middle.  Are you going to cut your panel longways down the middle so it lays flat on those ribs in two long pieces?

Sassy

~~~All Sassy's ideas are biodegradable~~~
 
I know a lot of folks here like to use furring strips. I used to do van/RV interiors for a living. we never used furring strips on van walls. if you get true 1/8 inch plywood/paneling it is quite flexible. we would screw it directly to the ribs like you did the furring. it would flex enough to contour to the curve. the back where you are having trouble the ply for the side wall would be cut a little long and the trim for around the back doors would hold it in place no screws needed to attach to two pieces. hope that helps. highdesertranger
 
Oh, that makes sense, HDR.

Come to think of it, my 'furring' was polyiso to even out the wall. Then I screwed my vinyl paneling through that into the van frame. Oh, and like Beth I added some 1 x 2 horizontal nailers at certain heights along each wall to give me more options to secure things to.
 
Geez highdesertranger, if I knew people did this for a living I'd a outsourced this job for sure!
Thanks so much for these explanations sassypickens and almosthere, I think I'm beginning to see the light.
The plan is to attach cedar paneling horizontally to the vertical furring strips, and I gotta say that 1/8 inch plywood directly onto the frame idea is sounding better and better, might rewind and go that route if the curious gets curiouser.
Ok, back at it fortified with the wisdom provided! I'll post the after pic if I survive this.
 
highdesertranger said:
I know a lot of folks here like to use furring strips.  I used to do van/RV interiors for a living.  we never used furring strips on van walls.  if you get true 1/8 inch plywood/paneling it is quite flexible.  we would screw it directly to the ribs like you did the furring.  it would flex enough to contour to the curve.  the back where you are having trouble the ply for the side wall would be cut a little long and the trim for around the back doors would hold it in place no screws needed to attach to two pieces.  hope that helps.  highdesertranger

Hey again,
Going with your suggestion of the 1/8" plywood to the metal for the rearmost 4 feet of wall, guess it'll be a plywood/studs hybrid.  One more question, or rather a request for reassurance: will I really be able to nail 1/4" paneling to this 1/8" luan?  Putting the panel up this afternoon it seemed pretty flimsy!
 
not sure I really understand the question. nailing anything in a mobile app doesn't work well. attaching anything to 1/8 inch ply without backing is not a good idea. there just isn't enough wood to grab. is there anyway to show a pic of what you are trying to do? highdesertranger
 
My goal is to attach cedar paneling horizontally, like these guys: http://www.instructables.com/id/Cedar-paneling-for-van-interior/

What they did was to attach 1x2s vertically along the ribs, then nailed and glued the paneling to the 1x2s.  This is what I did, and all was well until the curvy irregular back corners.  Upthread you said you didn't use furring strips, you just attached 1/8th" to the metal.  So I got a sheet of luan and attached it to the metal, no strips behind.  Like you said, it's thin enough to hold the curves.  But also like you said, that's not enough wood for paneling to grab on to without backing, which takes me back to screwing in 1x2.  Pretty sure I misunderstood something!
IMG_0885.jpg
 
maybe I misunderstood. that sheet looks good. do you want to attach slats to that? highdesertranger
 
yeah, and that's where I'm iffy: that sheet's so thin, hard to believe I can attach the 1/4" panel strips to it and they stay put...
 
Cavanden J said:
yeah, and that's where I'm iffy:  that sheet's so thin, hard to believe I can attach the 1/4" panel strips to it and they stay put...

So...? What did you end up doing?

I am going to play catch up with you as soon as the flippin weather warms slightly!
My project is kinda on hold for that?
 
Top