Ah to be young. I just about got my head crushed doing something similar. Luckily I had a long boxed end wrench in my hand I managed to use as a prop that was almost long enough to hold most of the weight, just chipped a tooth and had my head trapped for a few hours till my dad got home from work and got the floor jack and got me out. I was a little more careful after that!
You are using an out of date browser. It may not display this or other websites correctly.
You should upgrade or use an alternative browser.
You should upgrade or use an alternative browser.
Cummins Canoe (A Stepvan Story)
- Thread starter PlethoraOfGuns
- Start date


Help Support Van Living Forum:
This site may earn a commission from merchant affiliate
links, including eBay, Amazon, and others.
PlethoraOfGuns
Well-known member
bullfrog said:Ah to be young. I just about got my head crushed doing something similar. Luckily I had a long boxed end wrench in my hand I managed to use as a prop that was almost long enough to hold most of the weight, just chipped a tooth and had my head trapped for a few hours till my dad got home from work and got the floor jack and got me out. I was a little more careful after that!
Oh geez! That's scary! You are very lucky! I don't trust hydraulics, so I always use jack stands. And now I don't trust hurricane force winds. We all need to keep our guard up! I think I recently had my wakeup call.
PlethoraOfGuns
Well-known member
Transmission parts came in the mail!
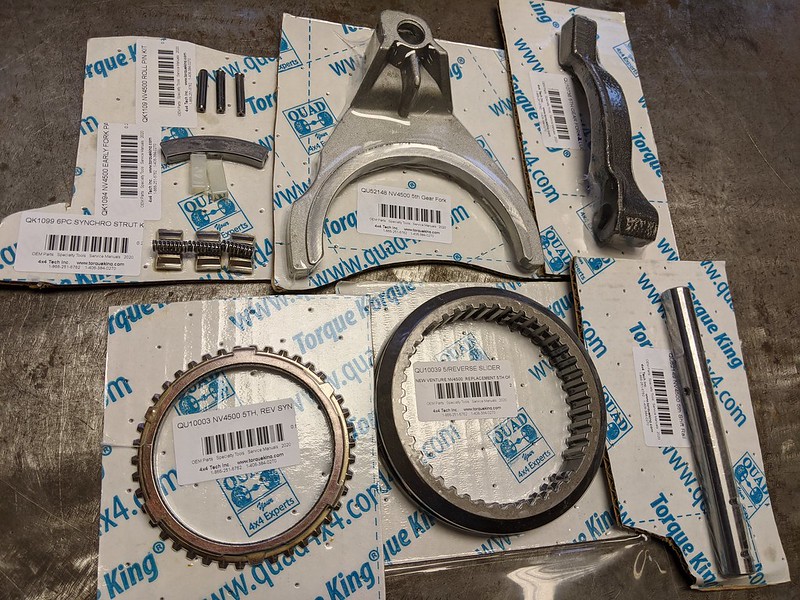
[size=small]These are all the components we think we need. Emphasize on the think part.[/size]
[size=small]
 [/size]
[size=small][size=small]Pretending I know what I'm doing.[/size][/size]
[size=small][size=small]
 [/size][/size]
[size=small][size=small][size=small]These springy thingalings looked important on the parts diagram, so they go in too.[/size][/size][/size]
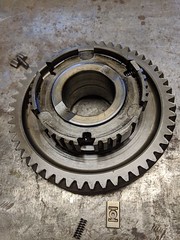
Got a new ringading funny ring to put in. Note the chassis paint that is still on my thumb. This stuff is never going to come off.
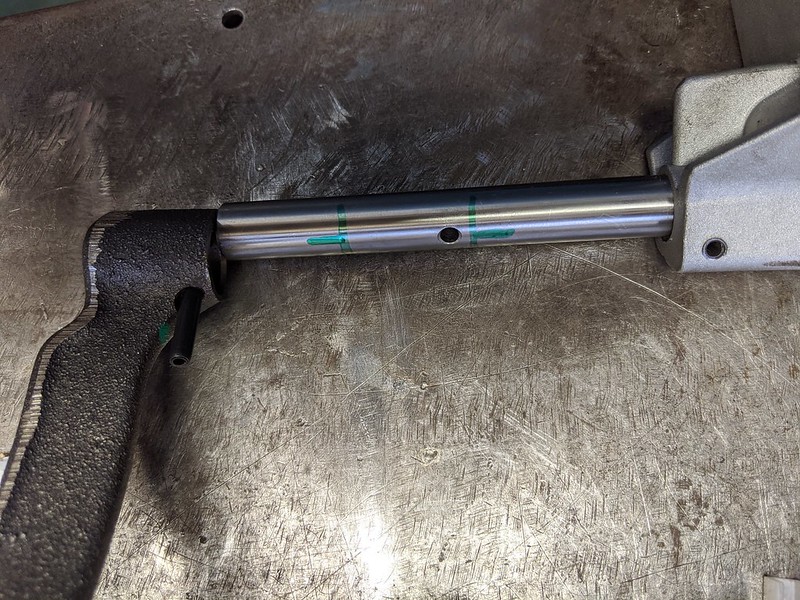
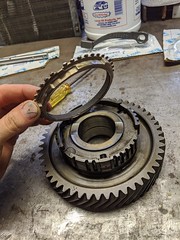
Had to drive this drift pin in to secure this black shift fork to this shift rail. Only problem is that the silver shift fork is in the tail section, and the black shift fork is in the main case, down where you can't get to it very easy. And I was by myself, and it was awkward, and I just couldn't get it all lined up. That was, until I applied marked lines on the shaft!
[size=small]With the lines on the shaft, I was able to align things properly and get the pin in no problem.[/size]
[size=small]
 [/size]
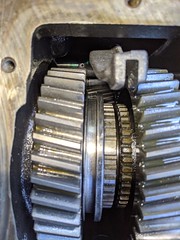
[size=small][size=small]Good news is that all the components we ordered actually went in somewhere. No spare parts laying about![/size][/size]
[size=small][size=small]
 [/size][/size]
[size=small][size=small][size=small]Some RTV sealant and wrenching and all back together![/size][/size][/size]
[size=small][size=small][size=small]
 [/size][/size][/size]
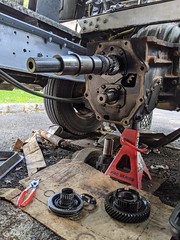
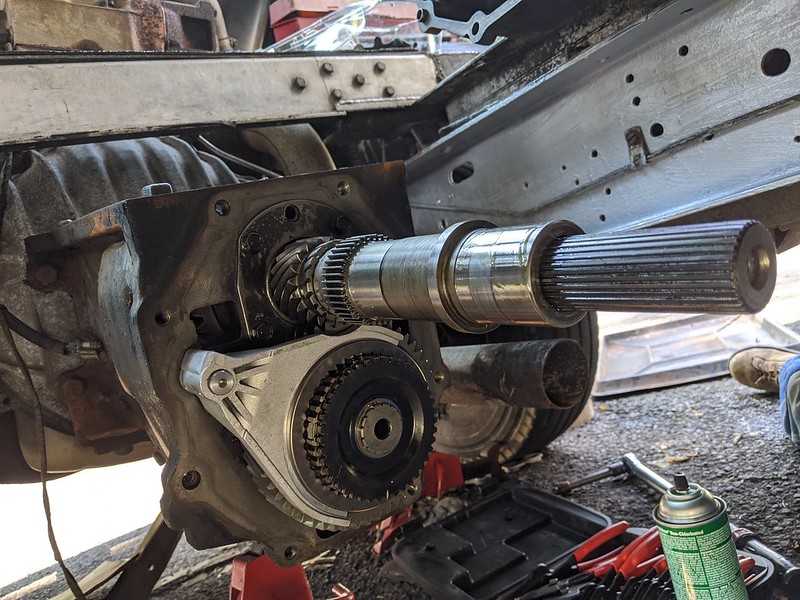
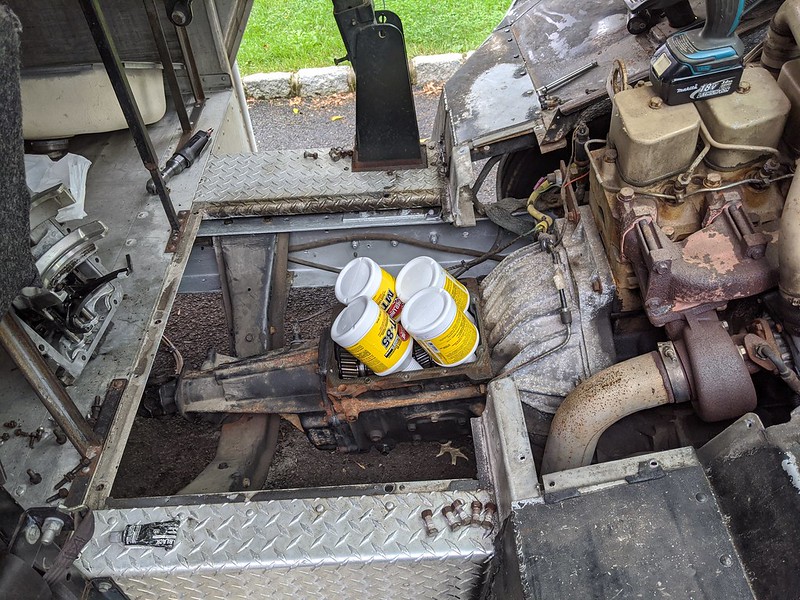
[size=small][size=small][size=small][size=small]Fill plugs are too much of a pain. You never know where they are and if you do they are usually covered in grease and grime. This is a much more effective way to fill your transmission with gear oil. I will also add the awesome fact that I tore apart this transmission and modified it while standing next to it, while it was still in the vehicle. Try doing that in your regular van or pickup truck![/size][/size][/size][/size]
[size=small]These are all the components we think we need. Emphasize on the think part.[/size]
[size=small]
[size=small][size=small]Pretending I know what I'm doing.[/size][/size]
[size=small][size=small]
[size=small][size=small][size=small]These springy thingalings looked important on the parts diagram, so they go in too.[/size][/size][/size]
Got a new ringading funny ring to put in. Note the chassis paint that is still on my thumb. This stuff is never going to come off.
Had to drive this drift pin in to secure this black shift fork to this shift rail. Only problem is that the silver shift fork is in the tail section, and the black shift fork is in the main case, down where you can't get to it very easy. And I was by myself, and it was awkward, and I just couldn't get it all lined up. That was, until I applied marked lines on the shaft!
[size=small]With the lines on the shaft, I was able to align things properly and get the pin in no problem.[/size]
[size=small]
[size=small][size=small]Good news is that all the components we ordered actually went in somewhere. No spare parts laying about![/size][/size]
[size=small][size=small]
[size=small][size=small][size=small]Some RTV sealant and wrenching and all back together![/size][/size][/size]
[size=small][size=small][size=small]
[size=small][size=small][size=small][size=small]Fill plugs are too much of a pain. You never know where they are and if you do they are usually covered in grease and grime. This is a much more effective way to fill your transmission with gear oil. I will also add the awesome fact that I tore apart this transmission and modified it while standing next to it, while it was still in the vehicle. Try doing that in your regular van or pickup truck![/size][/size][/size][/size]
highdesertranger
R.I.P HDR
- Joined
- Apr 4, 2012
- Messages
- 22,892
- Reaction score
- 92
nice job. great write up and pictures. keep them coming. highdesertranger
PlethoraOfGuns
Well-known member
Thanks! We're gonna keep moving full steam ahead! Winter is on the horizon...
crofter
Well-known member
I built a bulkhead in my cargo van using quarter inch plywood sandwiching polyiso xps sheet insulation. The insulated bulkhead warmed up the cargo area and quieted the cab. I put a schlage deadbolt in the hobbit door so the cab area can be locked out. I use the van as a work vehicle, so having the cabin locked during work was important to me. The Schlage locks will accomodate a fatter door, and was the only lock that would fit my insulated door. Have fun with your build.PlethoraOfGuns said:... a bulkhead wall with a door and having no windows. The extra r value from full insulation is just too good to pass on as we'll be going to many frozen and hot places. No need for windows....
-crofter


$19.97 ($2.00 / Ounce)
Harmony House Premium Vegetable Soup Mix - Dehydrated Vegetables for Cooking, Camping, Emergency Supply and More (9 oz, Quart Size Jar)
Harmony House Foods, Inc.


$50.30
$52.99
Mountain House Cooked Diced Chicken | Freeze Dried Survival & Emergency Food | #10 Can | Gluten-Free, 30235-Parent
Amazon.com

PlethoraOfGuns
Well-known member
Nice. Did you build a regular hinged door that swung to the rear?
PlethoraOfGuns
Well-known member
Can't wait to drive this thing and see if all our work on the axle and transmission actually worked and won't blow up! In the meantime, got more stuff to reassemble.
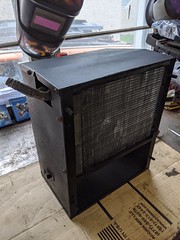
[size=small]Heater box all painted and back together.[/size]
[size=small]
 [/size]
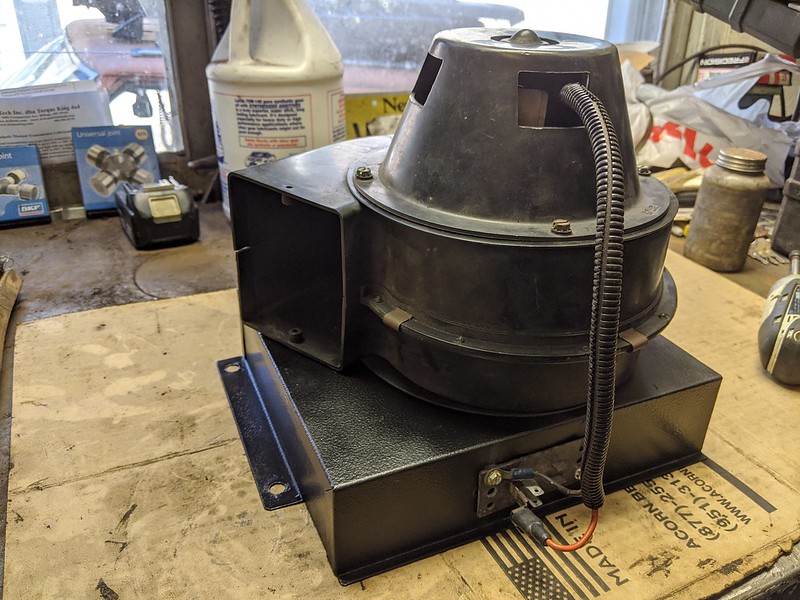
[size=small][size=small]Redid the whole blower box too.[/size][/size]
[size=small][size=small]
 [/size][/size]
[size=small][size=small][size=small]Yes, maybe we should have changed the heater core when we had it apart. But it was working great! And the best part, it only takes 10 minutes to remove! So not an issue if it ever needs to be replaced.[/size][/size][/size]
[size=small][size=small][size=small]
 [/size][/size][/size]
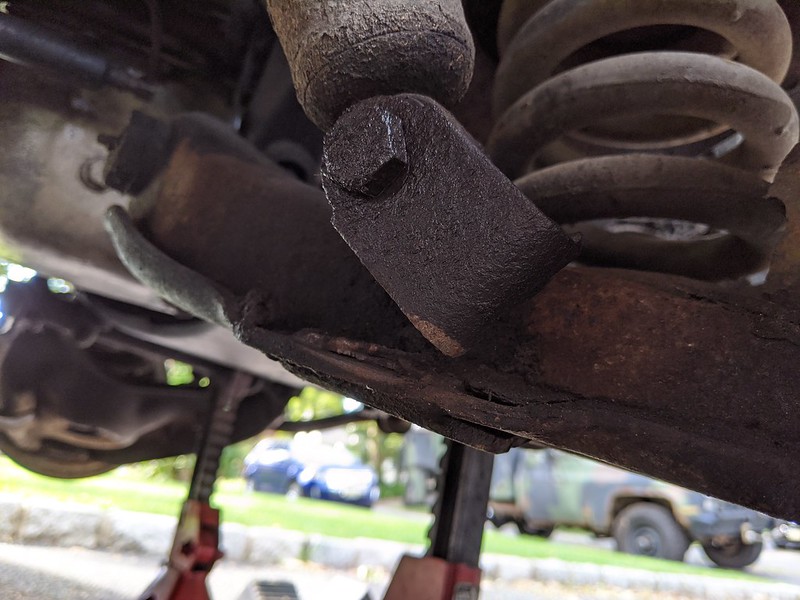
[size=small][size=small][size=small][size=small]This shock mount isn't looking so great. It's probably been broken for awhile since one of the bolt holes is not so round anymore.[/size][/size][/size][/size]
[size=small][size=small][size=small][size=small]
 [/size][/size][/size][/size]
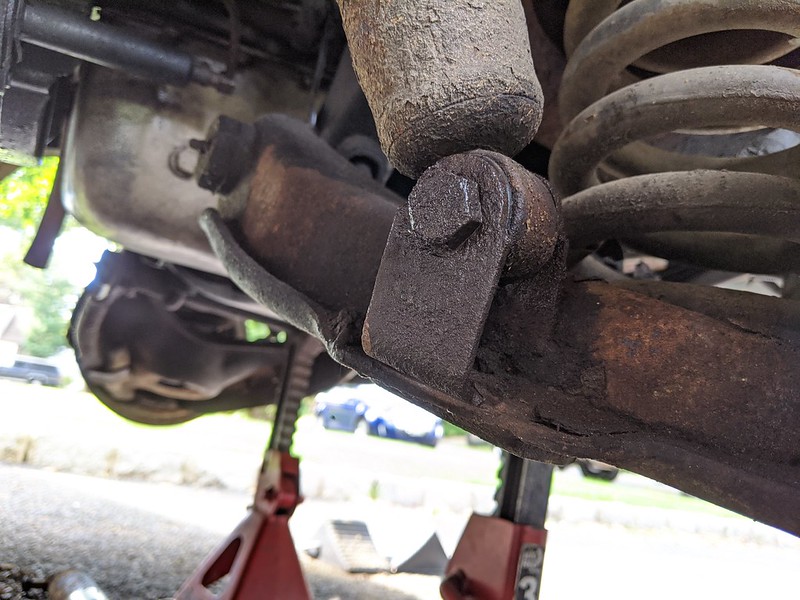
[size=small][size=small][size=small][size=small][size=small]Kinda supposed to be like this.[/size][/size][/size][/size][/size]
[size=small][size=small][size=small][size=small][size=small]
 [/size][/size][/size][/size][/size]
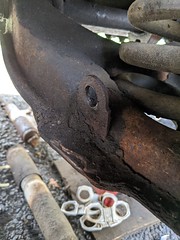
[size=small][size=small][size=small][size=small][size=small][size=small]This was not fun to clean and prep for welding.[/size][/size][/size][/size][/size][/size]
[size=small][size=small][size=small][size=small][size=small][size=small]
 [/size][/size][/size][/size][/size][/size]
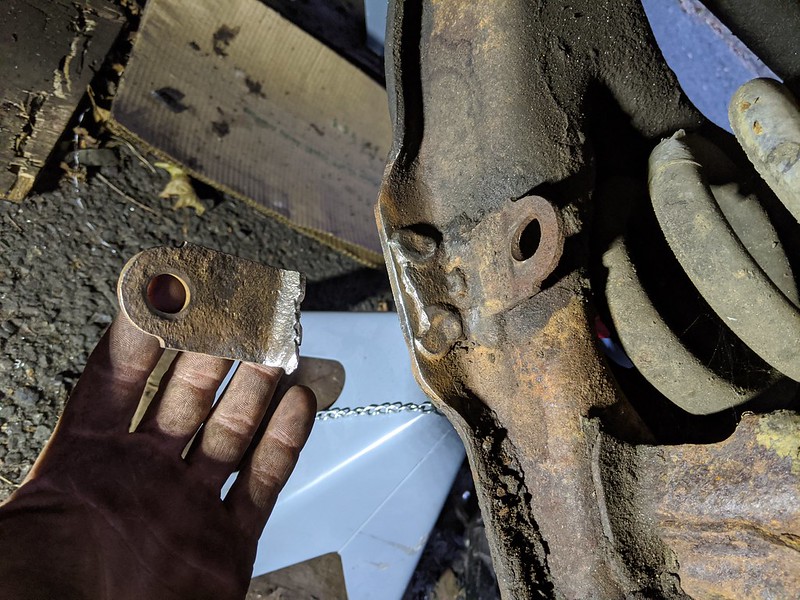
[size=small][size=small][size=small][size=small][size=small][size=small][size=small]But it will work.[/size][/size][/size][/size][/size][/size][/size]
[size=small][size=small][size=small][size=small][size=small][size=small][size=small]
 [/size][/size][/size][/size][/size][/size][/size]
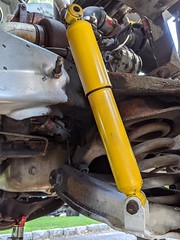
[size=small][size=small][size=small][size=small][size=small][size=small][size=small][size=small]All welded and painted. Van has all new shocks now![/size][/size][/size][/size][/size][/size][/size][/size]
[size=small]Heater box all painted and back together.[/size]
[size=small]
[size=small][size=small]Redid the whole blower box too.[/size][/size]
[size=small][size=small]
[size=small][size=small][size=small]Yes, maybe we should have changed the heater core when we had it apart. But it was working great! And the best part, it only takes 10 minutes to remove! So not an issue if it ever needs to be replaced.[/size][/size][/size]
[size=small][size=small][size=small]
[size=small][size=small][size=small][size=small]This shock mount isn't looking so great. It's probably been broken for awhile since one of the bolt holes is not so round anymore.[/size][/size][/size][/size]
[size=small][size=small][size=small][size=small]
[size=small][size=small][size=small][size=small][size=small]Kinda supposed to be like this.[/size][/size][/size][/size][/size]
[size=small][size=small][size=small][size=small][size=small]
[size=small][size=small][size=small][size=small][size=small][size=small]This was not fun to clean and prep for welding.[/size][/size][/size][/size][/size][/size]
[size=small][size=small][size=small][size=small][size=small][size=small]
[size=small][size=small][size=small][size=small][size=small][size=small][size=small]But it will work.[/size][/size][/size][/size][/size][/size][/size]
[size=small][size=small][size=small][size=small][size=small][size=small][size=small]
[size=small][size=small][size=small][size=small][size=small][size=small][size=small][size=small]All welded and painted. Van has all new shocks now![/size][/size][/size][/size][/size][/size][/size][/size]
crofter
Well-known member
I used a long piano hinge to mount the hobbit door (20 by 58 inches); door opens into the cabin with a step down from the cab. I secure the door in the open position with a bungee. Behind the door is my closet (a hook rail screwed to the bulkhead). I also have a hook rail on the passenger side in the cab for drying wet gear, lots of solar energy in the cab for drying things. If you build your own bulkhead, you can customize it the way you want. -crofterPlethoraOfGuns said:Nice. Did you build a regular hinged door that swung to the rear?
PlethoraOfGuns
Well-known member
Ah, ok. I've thought about building a hinged door that opened rearward against a closet, but a pocket door sounded too fun not to build. Also, a bulkhead wall will add lots more wall space in the cab to mount/hang all kinds of goodies.
PlethoraOfGuns
Well-known member
Great news, the van is mobile! Everything works and it drives fantastic!
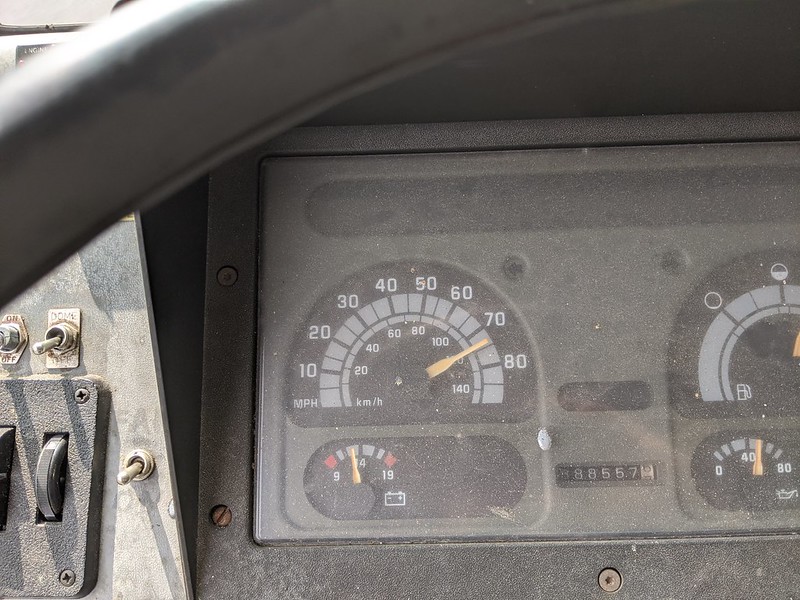
[size=small]This thing cruises on the highway! Gained 15mph with functioning overdrive. Much quieter too. Still hurts your ears, but no more bleeding out of the one ear.[/size]
[size=small]
 [/size]
[size=small][size=small]Oh boy, weeks sitting in one place made a nice mess. Lots of rust and other stuff.[/size][/size]
[size=small][size=small]
 [/size][/size]
[size=small][size=small][size=small]These bracket things gotta go. Thinking skinning the whole interior in plywood.[/size][/size][/size]
[size=small][size=small][size=small]
 [/size][/size][/size]
[size=small][size=small][size=small][size=small]Not quite sure what these metal brackets are for, but they are going also. We have better ideas for some sort of divider wall between the cab and the living quarters.[/size][/size][/size][/size]
[size=small][size=small][size=small][size=small]
 [/size][/size][/size][/size]
[size=small][size=small][size=small][size=small][size=small]Doing the old notch and chisel.[/size][/size][/size][/size][/size]
[size=small][size=small][size=small][size=small][size=small]
 [/size][/size][/size][/size][/size]
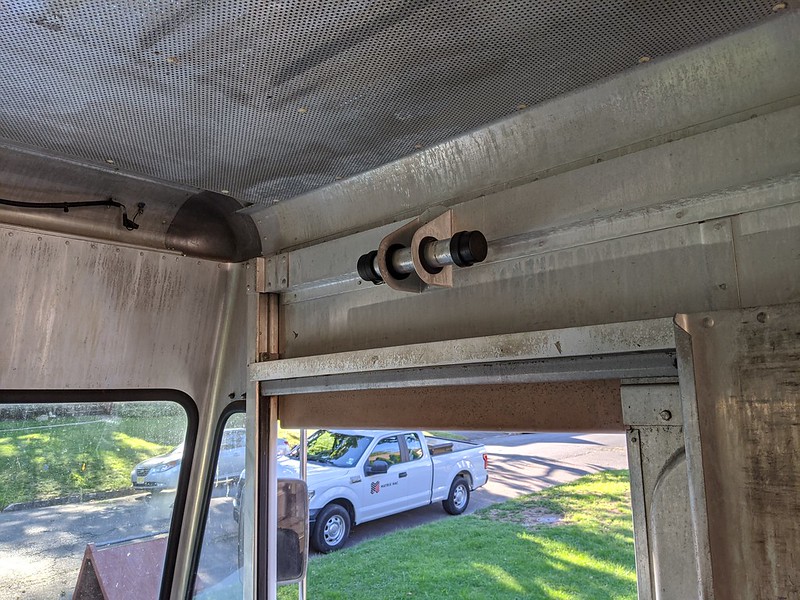
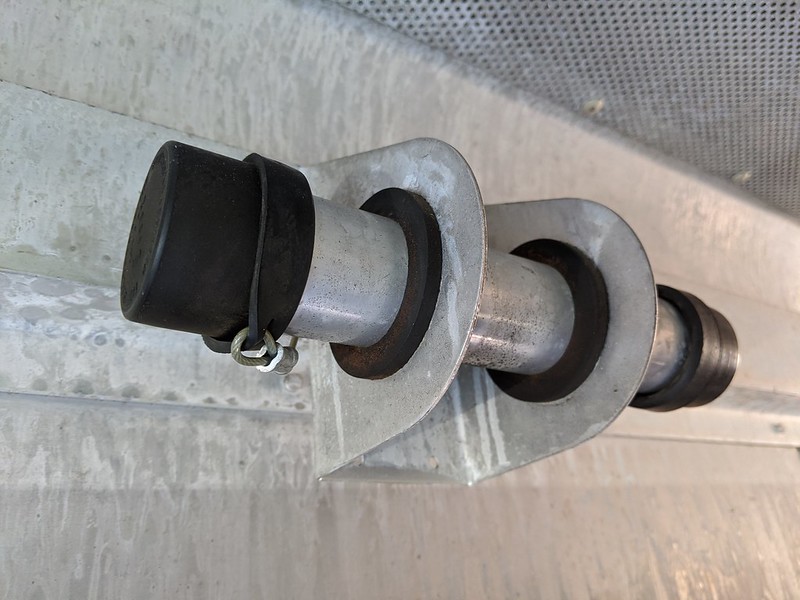
[size=small][size=small][size=small][size=small][size=small][size=small]Doing more gutting, looking at this weird tube thing. No idea what it is.[/size][/size][/size][/size][/size][/size]
[size=small][size=small][size=small][size=small][size=small][size=small]
 [/size][/size][/size][/size][/size][/size]
[size=small][size=small][size=small][size=small][size=small][size=small][size=small]Any ideas what this thing is?[/size][/size][/size][/size][/size][/size][/size]
[size=small]This thing cruises on the highway! Gained 15mph with functioning overdrive. Much quieter too. Still hurts your ears, but no more bleeding out of the one ear.[/size]
[size=small]
[size=small][size=small]Oh boy, weeks sitting in one place made a nice mess. Lots of rust and other stuff.[/size][/size]
[size=small][size=small]
[size=small][size=small][size=small]These bracket things gotta go. Thinking skinning the whole interior in plywood.[/size][/size][/size]
[size=small][size=small][size=small]
[size=small][size=small][size=small][size=small]Not quite sure what these metal brackets are for, but they are going also. We have better ideas for some sort of divider wall between the cab and the living quarters.[/size][/size][/size][/size]
[size=small][size=small][size=small][size=small]
[size=small][size=small][size=small][size=small][size=small]Doing the old notch and chisel.[/size][/size][/size][/size][/size]
[size=small][size=small][size=small][size=small][size=small]
[size=small][size=small][size=small][size=small][size=small][size=small]Doing more gutting, looking at this weird tube thing. No idea what it is.[/size][/size][/size][/size][/size][/size]
[size=small][size=small][size=small][size=small][size=small][size=small]
[size=small][size=small][size=small][size=small][size=small][size=small][size=small]Any ideas what this thing is?[/size][/size][/size][/size][/size][/size][/size]
highdesertranger
R.I.P HDR
- Joined
- Apr 4, 2012
- Messages
- 22,892
- Reaction score
- 92
the tube thingy is for the registration. the track thingy's on the walls are "E-track". if you where closer I would take those. highdesertranger
PlethoraOfGuns
Well-known member
Since there is no glove box, that's exactly where registration and insurance is going to go! But the brackets on the walls have round holes, not quite like the e-track you see on tractor trailers.
highdesertranger
R.I.P HDR
- Joined
- Apr 4, 2012
- Messages
- 22,892
- Reaction score
- 92
ah, they are round. I had to blow the pic up. I have never seen that type. highdesertranger
PlethoraOfGuns
Well-known member
Yea, not sure what's going on with the round holed track things. They work good with bungee cords and hammocks, but that's about it. Maybe it's some kind of old bakery thing?
flying kurbmaster
Well-known member
- Joined
- Oct 20, 2012
- Messages
- 1,677
- Reaction score
- 50
I built a pocket door in mine using a couple of quality Heavy duty stainless drawers rails. Made door out of two 5 mm luan Sheets with insulation sandwiched between, frame out of 3/4 x 1 1/2 around the outside to secure track to. I left those bars in mine insulated and covered them with ply. Glad it is running and back on the road. I sound proofed my cab firewall dog house, floor, pilars, above windshield. With a bulkhead noise will be reduced, once you get It built out in the back noise will be reduced some more. Mine is about as loud as 15 year old box truck now. I had those same tracks in mine they are for cargo, you can hook those ratchet tie downs to them they work ok I removed mine gave them to a guy with a box truck he installed them on his walls and uses them with rachet tie downs to hold windows and sheets of plywood .
PlethoraOfGuns
Well-known member
Nice. I think pocket doors are the way to go. I wish the van came with a factory aluminum bulkhead and pocket door. I guess we'll have to make our own. Not sure where or how to build the bulkhead. Need to figure other things out first like ceiling supports and this passenger seat dilemma.
Sofisintown
Well-known member
PlethoraOfGuns said:[size=small][size=small][size=small][size=small][size=small][/size][/size][/size][/size][/size]
[size=small][size=small][size=small][size=small][size=small][size=small]Doing more gutting, looking at this weird tube thing. No idea what it is.[/size][/size][/size][/size][/size][/size]
This bar is for some sort of pulley, since it's over the door.
Now, I just gotta say it again.. There is no reason to pound ANY holes thru the side walls to hold your interior walls in place. 3/4" Oak, bonded with a good adhesive and secured with a few stainless screws into those uprights, and you can build inside of those wooden uprights without any THERMAL TRANSFER to your desired thickness of insulation.
Nothing worse than frost growing inside an insulated box because of screw heads bringing cold into the heated moist interior air. You got enough other problem areas regards insulating with a step van. And use LUAN.. its lighter and flatter than miost plywoods, unless you get cabinet skin stuff.
If I were doing another truck, I would use a combination of traditional fiberglass and foam panels in the side walls. My first 14' truck I did all fiberglass. My second 14' was all Foam panel. The foam panel was a lot LOUDER inside... After all, if you knock on a panel, you hear it... if you knock on Fiberglass.. well, you get the idea. So, Glass for better noise cancelling, Foam for higher R values. Just keep 4-5" of only foam along the bottom edges near the floor. I actually left a gap at the bottom edge, covered with a removable baseboard that could provide inspection opportunities or the ability to pull a wire in later on. You'll probably notice when you get to doing your walls,,, that big GAP along the top edges which also makes an awesome wire/duct run for running wires and such. Just need a trim board that can be removed if necessary.
Don't forget a good plan for the floor insulation. My first truck had none down there, only 1/2" plywood and carpet. Second truck had 3/4" PolyISO under 1/2" plywood. That was night and day, but given another truck with 84" side walls, I would probably do 1-1/2" under 3/8" plywood. It's not a simple deal to insulate under the floor. It could be done, but the amount of unavoidable thermal transfer would be hard to make it worth it.
We had a 16' Grumman where I worked last with the 4BT... Truck is still there in the weeds with a bad pinion bearing. I could probably pick it up for $2000 or so, but I want a 12' Dually 6' side wall truck if I'm going to do another at all.
Still, your pics,.... recalling how dirty I could get crawling around cleaning up a frame with the needle scaler... Being able to pull a tranny from the top.... Putting a new intake and carb on during a snow storm with the furnace running...Ah... the good old days ! They were wonderfully made. I have a lot of literature I collected over the years. Grumman sales lit said it was a truck "made to run for 15 years"... shoot, many are 40 years old and still going.
I'm surprised you fixed your lower control arm... Same arm as the Chev 1 Ton Vans. Both mine had really iffy (rusty) spring pockets so I just always replaced them and the pivot shaft. Cheap parts ! Yay !
That 4BT NOISE would drive me nuts. If I had to own it, I'd be buying a whole lot of Mass Loaded Vinyl Barrier and figuring out how to knock it down. My Gas trucks were like Cadillacs in comparison.
PlethoraOfGuns
Well-known member
Sofisintown said:This bar is for some sort of pulley, since it's over the door.
Ah, we can use this to lift the engine up and out of the vehicle!
Similar threads
- Replies
- 12
- Views
- 3K
- Replies
- 24
- Views
- 3K