a good start

Van Living Forum

Help Support Van Living Forum:

This site may earn a commission from merchant affiliate links, including eBay, Amazon, and others.

IanC

Well-known member
Joined
Apr 8, 2016
Messages
617
Reaction score
1
Location
Western Massachusetts
I made a decent start on my build today. I got most of the first layer of insulation in - the channel is 1 inch so 3/4 ofpoly and 1/4 of the pink foam. I'm going to skip the pink where the wiring runs down and just tape that to the Polyshield. I was thinking the foam would compress enough (if I added the pink over the wiring ) when I put the plywood back up, but don't want to take the chance of having it bow.

Apart from the solar wire, everything is run to where I want it. 2 wall mounted lights, ceiling vent fan, water pump, fridge, 2 x 110 wall sockets, and I might run one more 12 volt for a cigarette lighter outlet.

Now a question ; there will be a trim piece that conceals wiring at the top, but I'm wondering how to hold the wiring to the trailer frame. The factory wiring for the trailer lights it taped to the frame but that was done before they put the skin on. Any suggestions ?

Then , I've been looking for something to finish the ceiling after I insulate, that will take the bend into the curve of the roof struts. Luan won't bend that much. Next I considered flexible plywood (bendy board ) It would look awesome since it's furniture grade, but pretty expensive. So I'm left with the thin shower wall liner-not my favorite option at all. Any suggestions on that ? I had heard that luan will bend more if you dampen it but I don't want to trap any moisture or risk delamination.
 

Attachments

  • rsz_trailer_insulation.jpg
    rsz_trailer_insulation.jpg
    712.3 KB
http://www.amazon.com/SPLIT-LOOM-TUBING-50-FOOT-COIL/dp/B002045XWO

http://www.amazon.com/s/ref=nb_sb_noss_1?url=search-alias=automotive&field-keywords=cable+clamps

Use zip ties where wires exit the split loom and branch off.

The Luan will bend to the roof easily, except for the edges where the bend is more pronounced. You could set the blade depth of a circular saw at /12 the thickness of the luan and cut reliefs on the backside to help increase the flexibility.

Since ceiling height on the very edges of the ceiling is not as important, you could leave an air gap and not have the luan or similar tightly to the ribs close to the walls.

Or you could have a 3 piece ceiling, instead of a one piece, with the last 6 inches or so near the walls being a separate piece with trim over it to cover the seam.

I'd polyurethane any wood type product on the backside. Perhaps buy some mylar reflective emergency blanket and 3m super 77 or super 90 it to the wood facing upwards.

Any screws you use to hold the ceiling up, will collect condensation, and should be stainless steel, unless a rusty screw head is appealing to you
 
If you're meaning to wrap from the ceiling down to meet the vertical wall, yeah, that's too much of a bend. While it's possible with wood, you'd also need to add more fastening surface than just those metal ribs or it'd just un-bend/buckle out between them.

Why not kill a few birds with one stone and make a squared-off soffit along both sides? That would give you a perfect chase for any wires front-to-back, be a nice location for recessed medallion LED lights, and provide a top mounting surface for upper storage cabinets.

A PVC pipe run along top would also make for a good wire chase...it'd make adding or replacing any wires in the future much easier...
 
SternWake said:
Since ceiling height on the very edges of the ceiling is not as important, you could leave an air gap and not have the luan or similar tightly to the ribs close to the walls.  
I tried that with a piece of luan and it looks pretty darn good - kind of a caravan bowed roof look . I'm liking that option - might even sping for birch ply and stain it
 
BradKW said:
Why not kill a few birds with one stone and make a squared-off soffit along both sides? That would give you a perfect chase for any wires front-to-back, be a nice location for recessed medallion LED lights, and provide a top mounting surface for upper storage cabinets.  
Yes indeed. Although I am going to have cabinets running the length of one wall, I won't be losing much space cutting off the curve. The other side will be a closet and fold down table , so no space lost there. I'll probably leave the ceiling until last, after the  cabinets are in. Thanks - great idea !
 
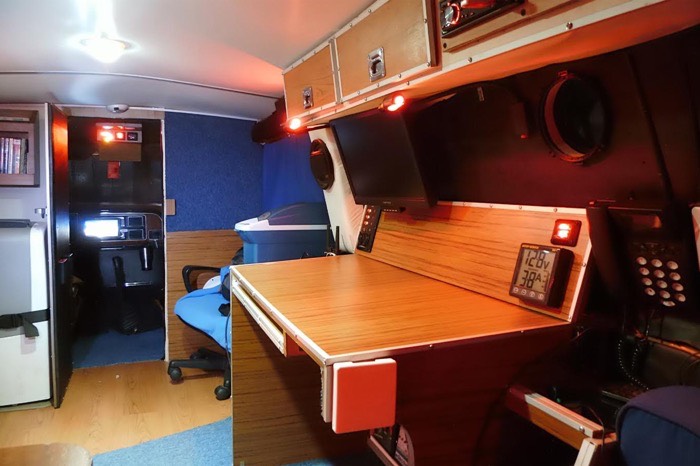
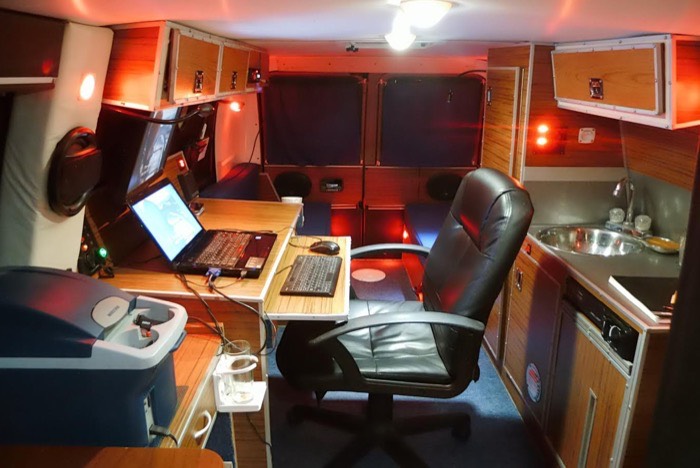
Here's some pics of a build I was looking at the other day. I found both the simplicity of the construct and the appearance to be worth bookmarking...the metal corner bead (might be bullnose found in flooring depts) looks clean and hides any sins...

Mans-DIY-Micro-Office-and-Camper-Van-006.jpg
Mans-DIY-Micro-Office-and-Camper-Van-0012.jpg
 
I used luan and I hated that stuff but I'm use to working with wood were I can sand out imperfections and straighten the edges by sanding , the luan also really annoyed me when it would chip as I was cutting it , again doing the same cuts with wood is so much easier to work with for me , I have to do the additional step of staining or paint but I kinda like doing that anyways so I can choose the color and it goes on easy anyways .
Note :  I'm not a perfectionist to where I stain sand ,  stain sand ,  stain sand and multiple coats of poly or however the pros do it  , I only put one coat of varnish and I'm done.
I think without the shiny poly , it probably hides some imperfections too.
 
BradKW said:
Here's some pics of a build I was looking at the other day. I found both the simplicity of the construct and the appearance to be worth bookmarking...the metal corner bead (might be bullnose found in flooring depts) looks clean and hides any sins...

Mans-DIY-Micro-Office-and-Camper-Van-006.jpg
Mans-DIY-Micro-Office-and-Camper-Van-0012.jpg

Has the look of a yacht cabin. When I was a kid my dad used to subscribe to yachting magazines. I used to spend hours looking at the cabnitry and how everything fit in place. I've been designing small spaces ever since, so this is a chance to actually do it. I even considered doing the interior in mahogany plywood  and marine varnish - I still might.

Was that a standard size van? Whoever did that did a great job, didn't they ?
 
Mobilesport said:
I think without the shiny poly , it probably hides some imperfections too.

One option I thought of is covering the walls and ceiling with that heavy bathroom vinyl wallpaper (not the flower kind) like the travel trailer companies do, then it wouldn't matter how your cuts are (like the travel trailer companies do)
 
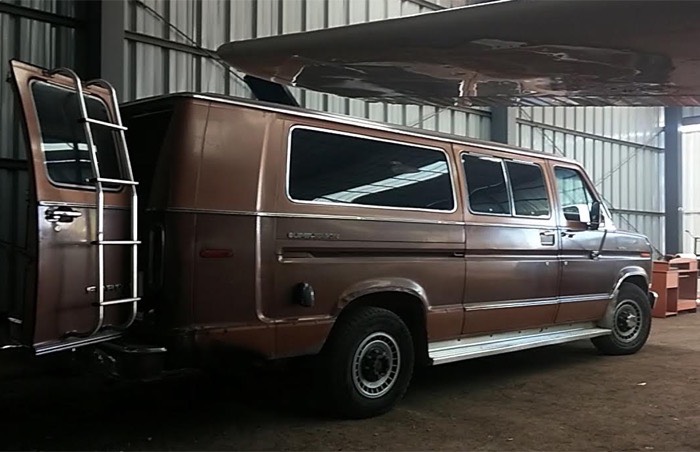
It's an old, extended Ford...think it's pre-1980 iirc from watching his youtube. Really not much to look at from the exterior...

Mans-DIY-Micro-Office-and-Camper-Van-001.jpg


Tinyhouse article: http://tinyhousetalk.com/mans-diy-mobile-office-and-campervan/
YouTube channel: 

I really like mahogany too...just built some bar tops from it and did a poured resin finish, came out beautiful. I tend to favor the deep, rich woods, but find that my favorite builds for both conversions and tiny homes always use very light/blond woods. I think its because of the small space that I find the lightest tones most appealing.

The exceptions are the schemes that combine deep-polish dark woods/burl as trim, accent and doors with upholstered panels in the light buff to beige range. If you haven't come across it, making upholstered panels is pretty easy...spray adhesive + 1/4" ply + foam + fabric... marine "leather" is nice stuff too. Or any low-nap carpet. Check out David Galddin, halfway through this vid:

IMG_8380.jpg
 
BradKW said:
It's an old, extended Ford...think it's pre-1980 iirc from watching his youtube. Really not much to look at from the exterior...


Tinyhouse article: http://tinyhousetalk.com/mans-diy-mobile-office-and-campervan/
YouTube channel: 

I really like mahogany too...just built some bar tops from it and did a poured resin finish, came out beautiful. I tend to favor the deep, rich woods, but find that my favorite builds for both conversions and tiny homes always use very light/blond woods. I think its because of the small space that I find the lightest tones most appealing.

The exceptions are the schemes that combine deep-polish dark woods/burl as trim, accent and doors with upholstered panels in the light buff to beige range. If you haven't come across it, making upholstered panels is pretty easy...spray adhesive + 1/4" ply + foam + fabric... marine "leather" is nice stuff too. Or any low-nap carpet.  Check out David Galddin, halfway through this vid:  

Now you've got my wheels turning I like the bartop finish idea too . One advantage in this area that I have is that I have a leather shop and do upholstery jobs when they come along. Also awnings and boat seats so I'll be able to put some of that to use. Next door to my shop is a guy who builds cabinets and since there aren't that many to do  I might have the face frames and doors made. My carpentry is almost passable but since I'm selling a whole freaking house to move into  6x10, I might as well do it up.
Yes, I like burl veneer too and blond maple _ actually there isn't any wood I don't like - maybe redwood . Back in the days when custom vans were big burl was the primo option. Still is on private aircraft.
 
IanC said:
Then , I've been looking for something to finish the ceiling after I insulate, that will take the bend into the curve of the roof struts. Luan won't bend that much. Next I considered flexible plywood (bendy board ) It would look awesome since it's furniture grade, but pretty expensive. So I'm left with the thin shower wall liner-not my favorite option at all. Any suggestions on that ? I had heard that luan will bend more if you dampen it but I don't want to trap any moisture or risk delamination.

I looked at this at Lowes today. Decent price and very flexible but it would need painted... or something.

http://www.patriottimber.com/RevolutionPly-Plywood.php
 
On my trailer I used luan on the gentle curve part of the ceiling, then used a piece of 1x8 Poplar to cover the sharp curve. that left me a small gap for my 3/4'' electrical conduit to run behind. I liked the Poplar there for the strength, as I have 1'' EMT conduit attached on the surface with eye bolts witch I hang stuff from.

I cut the luan with a very fine blade in a circular saw set to barely cut through. I had very little chip out and the poplar covers the edges. I also painted my ceiling so differences in wood color were not an issue for me.
 
I've decided to use pre-finished maple plywood for the walls and ceiling of the trailer. There's a specialty plywood supplier right in my neighborhood - some of what they have is incredible. Anyway , I'm trying to think of options for concealing the screw heads. One option for the walls would be to re-attach the 1/2 inch that's there now, countersinking the screws and then cover that with 1/4 maple ply using construction adhesive so there would be no visible screws - but that makes the walls a heavy  3/4". Since the plywood has a really nice semi gloss finish I don't want to do anything requiring sanding (like wood filler ). If I replace the walls with 1/2 inch maple, countersinking the screws then I'm left with exposed screw heads. I saw some little circular adhesive dots made for the purpose that come in different wood finishes but I wonder what rows of them would look like - might not be good.
The ceiling is another story. 1/4" ply doesn't leave a lot of room for counter sinking, so I almost have to have exposed screws.
One advantage of replacing the current ply walls with maple is that I can use the current ply where it isnt visible and just use the expensive stuff where it shows .
Since there seems to be a huge range of skills represented on the forum I thought perhaps there might be someone who has an idea on the topic.
 
I used plastic screw cap covers that I got from a marine upholstery shop over the vinyl that I used for a lot of my interior. I believe they may come in woodgrain as well as colored to match/contrast with various vinyls.
 
If going the adhesive route, you could use veneer instead of ply, much less weight.

On 1/4" you can countersink to flush, then dab paint on heads. Or make upholstered strips that go over them maybe...
 
you could use real brass screws. then take clear fingernail polish and paint just the screw heads. imo brass screws look great on wood. highdesertranger
 
highdesertranger said:
you could use real brass screws. then take clear fingernail polish and paint just the screw heads. imo brass screws look great on wood. highdesertranger

Will brass screws affix wood to the metal ribs?
 
Top