T.he I.nvisible M.an
Well-known member
- Joined
- Aug 28, 2015
- Messages
- 104
- Reaction score
- 0
I am seriously considering a propane fired Hydronic Heating Design that is also tied into the main cooling/heating system of my Step Van.
The Design is something like this:
The area I wish to heat is approximately 4ft x 7ft x 7ft high or 28 sq ft or 196 cubic feet.
<b>A.) ... 12v Thermostat for a single heating loop that turns a 12v circulator pump on and off (for temperature control) This would be with a direct pass through that is 12v or connected to a 12v solenoid </b>
<b>B.) ... 12v circulator pump (preferable one that also works well with solar) with a low G.P.M. Flow rate 2 to 5 g.p.m. and a low amp usage rate. Circulator pump must also be rated for Glycol (anti-freeze from main system) And should allow for run dry with no damage.</b>
This looks like an interesting Circulator pump that also does solar:
3.5 Watt El SID Pump Models
3.5
Maximum Head in Feet
1.8
Maximum Flow in GPM
2.0
Operating Voltage (DC)
8 to 20
<b>C.) ... 12v A.B.V.s (automatic ball valves) that can connect or isolate the main cooling/heating system from the propane heating system (propane heating system is switched off when the ignition is on and the engine is running).</b>
Something like this:
1/2" Electric Brass Motorized Ball Valve 12v DC Air Water Gas Diesel Fuel DN15
http://cdn2.bigcommerce.com/server5.../IMG_2254__93323.1388947378.1280.1280.JPG?c=2

$28.99
Weight:
1.50 LBS
Shipping:
Calculated at checkout
Quantity
Share on facebookShare on emailShare on print
Product Description
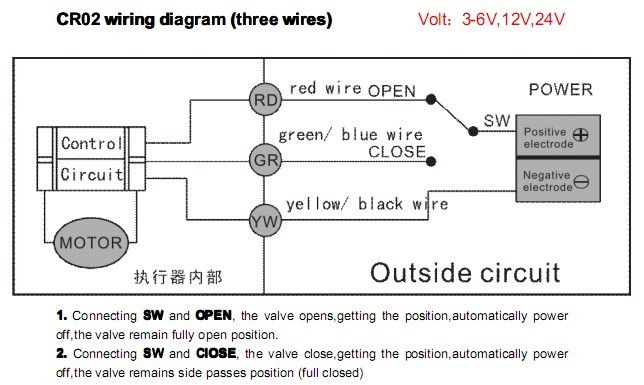 Wiring Diagram
Description
SpecificationsVoltage
12volt DC Volts
Current
4 Watts
Wiring Version
CR02
Valve Type
Ball Valve
Inlet/Outlet
1/2" NPT Threads
Max Pressure
Air: 145 PSI Water: 120 PSI Other Liquids: 80 PSI
Suitable Applications
Air, Water, Oils, Vacuum
Orifice Size
1/2
Max Temp
212 F
Valve Response
Slow
Duty Rating
100% (rated for continuous use)
Materials
Valve Body
Brass
Ball Valve
Stainless Steel
Housing
Plastic
Seal
Viton
<b>D.) ... A propane tankless water heater (most likely a camping type and again the smallest one available).</b>
Something like this:
Description
Enjoy a hot outdoor shower anywhere with a portable tankless water heater.
The Eccotemp L5 Portable Tankless Water Heater is the best selling outdoor portable tankless heater. Don't be left with a cold shower, get a never ending supply of hot water anywhere you are. The Eccotemp L5 portable tankless water heater is great for taking camping, to the beach or family vacations. Use it when going on hunting trips, weekend getaways or even at home.
Not only is the Eccotemp L5 for taking a hot shower, but can also be used for washing your car, boat or even your pets. You can even use the water heater to rinse off sand from a long day at the beach. Keep your whole family happy and clean with an endless supply of hot water. Hooks up easily to a pressure washer for better cleaning for those deep dirty stains. Turn the ignition on with 2 "D" batteries whenever electricity is not accessible. Never be left with freezing cold water again! Get a comfortable supply of hot water for all uses.
Comes with all hoses and adapters needed to get started. Included is the adapter to attach to garden hose and propane tank. (tank is not included). However, Camping World does offer a selection of propane tanks.
Simple to setup and use. The Eccotemp L5 can be ready to produce hot water in seconds. Shower head is already included. Just hook the hoses up to water and propane, set the desired temperature and water pressure and enjoy your shower!
Ideal operating range is between 20 and 80 PSI. Also works with a 12 volt pump to get the desired pressure. Dimensions are 14.5" tall, 11.5" wide, 4.5" deep and weighs roughly 12 pounds. Small enough to make it easily portable from one location to another. The unit requires a 2 inch clearance from a wall and 1 foot side to side from anything flammable. It should also be 3 foot from a window or overhang and 18 inches from the ground. This unit will offer a 30 to 35 degree rise at 1.3 gallons per minute.
Features and Specifications
[img=560x315]http://embed-a.wistia.com/deliverie...26d3838d.jpg?image_crop_resized=640x360[/img]
Read Eccotemp L5 Portable Tankless Water Heater Reviews
What's in the Box
Comes with heater body, gas regulator, shower nozzle, hardware, garden hose and lp tank adapter, instruction manual, vent shield, stainless steel shower hose, and quick connectors.
The Eccotemp L5 portable tankless water heater is ready to setup and use within minutes. Give the tankless water heater a supply of water from a garden hose, 2 "D" batteries and propane. Now you have instant and quick hot water!
More about this water heater:
Congratulations, you're preparing to connect the world's easiest way to heat water on the go. Before we start, let's take a look at what comes with the heater. Included is a CSA listed regulator for use on a standard propane tank, on/off shower head and hose, garden hose adapter, and instruction manual, heat shield, and, of course, the water heater itself. You will need to provide two D cell batteries for ignition. Connecting your Eccotemp L5 portable water heater is not difficult, and should be completed in less than 15 minutes.
Let's take a look at the installation from start to finish. Look first at the connections. We have a gas input. A compression fitting for attachment of the hose is already attached. The water input, water output. Teflon tape should always be used on water connections to ensure a tight seal. A small roll is included in the hardware package with the heater. Next you will attached the shower hose to the output connection in the middle of the bottom. We will find a convenient location to hang the water heater. Weighing only about 12 pounds, the L5 can be hung virtually anywhere.
Next we will attach the propane hose to the water heater and to the propane tank. Never over-tighten the gas connections, as this can cause damage to the water heater and leaking of gas. Always check for gas leaks before operation. Soapy water gives a good way of detecting any gas leaks. Now we will attach the garden hose adapter and the garden hose. Be sure that the adapter has the rubber washers in it to assure a water-tight fit. The on/off switch on the bottom of the heater should be turned into the on position. Turn on your shower head and, within seconds, you will have all the hot water you need.
Shower temperature is adjusted by using the water and gas regulator knobs on the front of the heater. For higher temperatures, turn the gas knob towards the larger marks and the water adjustment knob to the smaller marks. Conversely, for lower temperatures, the gas knob should be to the smaller marks, and the water knob to the larger marks. The nice thing about Eccotemp water heaters is they provide convenient and portable hot water. Warm showers at camp, cottage, washing horses, dogs, RVs, arenas. Anywhere you need hot water. Eccotemp, hot water where and when needed. Heating water for the world.
- See more at: http://www.campingworld.com/shoppin...kless-water-heater/37786#sthash.XR7QeU2s.dpuf
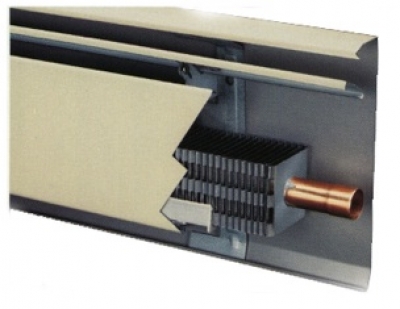
<b>E.) ... A Hydronic heating core (probably a marine product) with a low amp fan.</b>
A single heating core something like this:

<b>F.) ... An Under board radiant heating coil (probably a pex tubing system).</b>
Something like this: (except a MUCH smaller system of course ... lol).
Under Floor PEX Radiant Heat "How To Install" Examples
This time it's pex under floor radiant heat. One of the most popular retrofits and new construction pex radiant applications is placing PEX under the main living space of a home or business.
Skill Level: Moderate Tools Required: Right angle drill, hole saw, PEX un-coiler (can be homemade or use an extra set of hands) and staple gun Time: four hours plus, depending upon the size of the floor
Under floor radiant install - heat circulation paths
A pex radiant floor heating system can be the most comfortable, efficient and often may be installed for less than other heat delivery hydronic systems. Radiant floor heat stratifies the heat from the feet to the head. The feet are always warmer than the head; this is what feels naturally comfortable to our bodies. Objects that rest on the floor become charged as well, magnifying the effect. This allows us to run lower temperatures when compared to a forced air system or hydronic baseboard heaters.
Under floor radiant install - heat circulation paths
Installing PEX Tubing Under Flooring; for hung PEX Tube or heat transfer plates
You should always check with your builder or architect for a suggested drilling location, for your floor. The process begins by drilling the necessary holes, positioning the manifold in a central location and attaching the first run to the manifold. A PEX un-coiler can make this process much easier. It is critical to uncoil the PEX in a linear fashion, to prevent kinking.
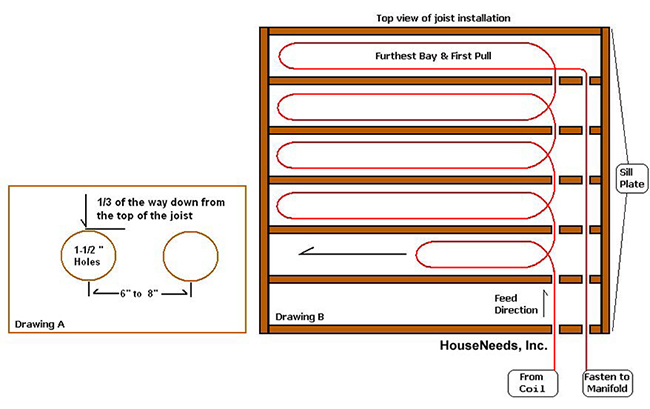
Installing PEX Tubing Under Flooring; for hung PEX Tube or heat transfer plates
4 Loops of an under floor radiant application
This floor layout shows 4 loops attached to one manifold. Here the manifold is placed in the center of the floor, making it easy to keep our loop lengths even. Typical loop lengths are set at 200’ to 300’ maximum, keeping the distance to the circulator as part of the maximum loop length. At HouseNeeds we can specify the tubing needed for a particular application.
4 Loops of an under floor radiant application
PEX Tubing Heat Transfer Plates
There are several ways to attach the PEX to the sub floor. Here are two examples of heat transfer plates. The top is an extruded plate, very thick and positively holds the PEX in a crescent shaped track. The heat transfer plate on the bottom is a stamped plate, where the plate is positioned over the PEX and stapled up. Both plates quicken the response times for the floor and distribute the heat evenly across the floor. The extruded heat transfer plates will transfer heat a little better due to the mass of the extruded plates. Also, the PEX tubing will be held in place better and thus will be quieter.


PEX Tubing Heat Transfer Plates
PEX Tubing Slide Brackets
Slide brackets are ideal for retrofits where nails protrude down or there is a concern about heat transfer plate noise. Slide brackets cost less than heat transfer plates and allow higher water temps. The PEX tubing is positioned under the floor on slide brackets, 8 Inches on center with in 16 Inches on center joists. The brackets allow the PEX to be placed just below the floor, so it does not touch and then zip ties hold things firmly in place.
Other methods of attachment include PEX clips, talon clamps and ultra fin. Noise is always a consideration. Many installers either firmly mount transfer plates or use a clip with a stand off, to avoid noise.
PEX Tubing Protection Sleeve and other PEX Accessories
Protection sleeve should be used to prevent chafing of the oxygen barrier on the PEX. The sleeve is split and is positioned after the PEX is installed. Here we see the back run of the first loop and two joist bays with in one loop.
PEX Tubing Protection Sleeve and other PEX Accessories
PEX Tubing Foil Insulation and Slab Shield
The PEX is in place and insulation is stapled below the tubing. We recommend Low-e Foil Insulation
PEX Tubing Foil Insulation and Slab Shield
Radiant Floor Foil Insulation
Radiant Floor Foil Insulation is highly recommended with under floor radiant. The insulation should be placed at least 4 inches below. The goal is air stagnation, allowing heat to rise. Placing the foil faced foam closes the space and send the heat up. Note: The homeowner has kept all wiring below, preventing the heating of the wires.
Radiant Floor Foil Insulation
PEX Tubing Radiant Heating Manifolds
The PEX manifold feeding the floor is in the center span in this house. Placing the manifolds in a central location allow the loops to stay with in recommended lengths and reach all parts of the house. Typical loop lengths are set at 200’ to 250’, keeping the distance to the circulator as part of the maximum loop length.
PEX Tubing Radiant Heating Manifolds
Under floor radiant install with Heat Transfer Plates
The PEX manifold feeding the floor is in the center span in this house. Placing the manifolds in a central location allow the loops to stay with in recommended lengths and reach all parts of the house. Typical loop lengths are set at 200’ to 250’, keeping the distance to the circulator as part of the maximum loop length.

Under floor radiant install with Heat Transfer Plates
<b>G.) ... A mixing Valve to switch to the Hydronic heating core or switch to the Under board radiant heating coil or have a mix between the two.</b>
Probably something like this:
[img=250x250]http://s3.supplyhouse.com/images/products/large/40642-3.jpg[/img] Zoom
1/2" Threaded 3-Way Full Port Brass Ball Valve w/ L-Port
SKU:40642
Brand: Webstone
Read 1 Review
Write a Review
Qty
Price
$6.95
/ each
Do not use this item for any installation or repair of potable water applications. This product does not comply with the "Safe Drinking Water Act," which requires that products meet low-lead standards in order to be used in systems providing water for human consumption (drinking or cooking). This item is for non-potable (non-human consumption) water applications only.
1
Specs
Size:
1/2"
Connection Type:
Threaded
Material:
Brass
Handle Style:
Lever
Valve Construction:
1 piece
Features:
Standard
Description for Webstone 40642
Note: This item does not comply with the 2014 Lead Free Act. It may not be used in potable water applications as of January 4, 2014.
1/2" Threaded 3-Way Full Port Brass Ball Valve w/ L-Port
<b>H.) ... A horizontal Propane tank (maybe a way to fill this without dismounting each fill) that I could mount under the Step Van at the rear. If that doesn't work then build a propane locker on the inside of the van to marine specifications for one of my upright 100 lb tanks. </b>
<b>THESE ARE THE BENEFITS I CAN IDENTIFY SO FAR:</b>
1.) I chose this design because I will have no combustibles to deal with inside my sleeping area.
2.) Hydronic heat is fairly even and doesn't create additional water moisture to deal with.
3.) The system can run 100% on propane.
4.) The "fill" of the systems coolant/heating fluid is done through the main engine radiator so there is no need for a top off tank or external fill.
5.) The system uses the same cooling mixture as the main engine (so if your antifreeze is up to date the hydronic system will not freeze either.
6.) If the propane runs out. This design can run 100% off the engine heat.
7.) It is possible to put the small tankless water heater on the outside of the vehicle which would require no combustibles inside what so ever.
8.) If the tankless water heater is mounted on the inside (in my cargo/tool area) It is possible to vent the unit to the outside with passive induction venting or 12v power venting.
9.) If I can mount a horizontal tank under the rear of my van and provide a rock guard (collision protection) this would be ideal.
10.) If I cannot mount a horizontal tank or find it is unfeasible then I would need to build a propane tank locker. (on the inside of my Step Van (in the cargo tools area).
<b>CONS SO FAR I CAN IDENTIFY.</b>
1.) The need to drill holes to route any fluid lines.
2.) If the tankless water heater is mounted on the outside can it still be "stealth" as I am now.
3.) I really don't like the idea of have the tank on the inside or the water heater on the inside (but these may not be deal busters)
4.) The need to secure the tankless water heater (probably on the back of my van) so that it can't be stolen.
5.) If the tankless water heater is mounted on the inside then the need to again drill or cut holes for venting.
I am fairly familiar with residential and commercial heating design but truthfully I have never designed anything this small (or mobile)")
I am currently looking at all the water heater, coil, thermostat, pex (or other tubing), A.B.V.s (automatic ball valves), propane tanks, etc for design possibilities.
I'm guessing that the pex is either 1/2" or 3/4" for my design purpose with all the fittings matching accordingly.
I have already started on a small raised floor (2x4 covered with 3/4 plywood (removable of course)). And plan to put 3-1/2" rigid foam board inbetween the floor joist with the Pex and thermal plates attached to the underside of the Plywood. I also plan for the pex to be removable with quick disconnects (not yet specified). The plywood floor, joists and rigid foam are also planned to be removable to convert the van (if necessary) back to full cargo mode.
Comments and suggestions are welcome.
Thanks in advance,
T.I.M.
The Design is something like this:
The area I wish to heat is approximately 4ft x 7ft x 7ft high or 28 sq ft or 196 cubic feet.
<b>A.) ... 12v Thermostat for a single heating loop that turns a 12v circulator pump on and off (for temperature control) This would be with a direct pass through that is 12v or connected to a 12v solenoid </b>
<b>B.) ... 12v circulator pump (preferable one that also works well with solar) with a low G.P.M. Flow rate 2 to 5 g.p.m. and a low amp usage rate. Circulator pump must also be rated for Glycol (anti-freeze from main system) And should allow for run dry with no damage.</b>
This looks like an interesting Circulator pump that also does solar:
3.5 Watt El SID Pump Models
Ivan Labs El Sid SID3.5PV DC Circulating Pump (2W2RD341500)
[img=200x169]http://solarhomestead.com/wp-content/uploads/2013/03/el-sid.jpg[/img]The SID3.5PV is a 3.5 watt 12 volt PV (solar module) direct pump capable of circulating up to 2.0 gallons per minute of water. It operates directly from a solar module with an input voltage up to 20 volts. The SID3.5PV starts to operate at 8 volts with as little power as 1 watt. This pump is designed to be used with a 3.5 watt module for circulating water and 5 watt module for glycol. It can be wired direct to the module in a solar hot water system eliminating the need for controls. When the sun shines the SID3.5PV turns on circulating water or glycol through a hot water collector. When the sun goes down the pump turns off. It’s that simple!
You may also use a 2W2DELTA/12 temperature controller for more accurate and efficient operation.
The SID3.5PV is large enough to circulate a system with one 4X10 foot collector. For a system with a larger collector, multiple collectors or a volume more than 2.0 gallons per minute, a larger pump is required.
Specifications:
Watts3.5
Maximum Head in Feet
1.8
Maximum Flow in GPM
2.0
Operating Voltage (DC)
8 to 20
<b>C.) ... 12v A.B.V.s (automatic ball valves) that can connect or isolate the main cooling/heating system from the propane heating system (propane heating system is switched off when the ignition is on and the engine is running).</b>
Something like this:
1/2" Electric Brass Motorized Ball Valve 12v DC Air Water Gas Diesel Fuel DN15
http://cdn2.bigcommerce.com/server5.../IMG_2254__93323.1388947378.1280.1280.JPG?c=2
$28.99
Weight:
1.50 LBS
Shipping:
Calculated at checkout
Quantity
Share on facebookShare on emailShare on print
Product Description
1/2 Inch Brass General Use Motorized Ball Valve
This motorized ball valve is perfect for thousands of applications. Its a full port 1/2 valve rated at 145PSI for air and slightly lower rating for liquids. If you need to mover large amounts of something this is the perfect valve. It has a built in back up that closes the valve automatically when power is lost. The ball valve has a high tolerance for dirt build up and the seals are rated for a million cycles. Its lower power consumption makes it ideal for project that utilize batteries to power the valve. It has a wide range of chemical compatibility as well. The 3 wire wiring system makes for easy and problem free installation.
This valve is great for compressed air control and can also be used with oils, water and other liquids that flow well.
 Wiring Diagram
Description
SpecificationsVoltage
12volt DC Volts
Current
4 Watts
Wiring Version
CR02
Valve Type
Ball Valve
Inlet/Outlet
1/2" NPT Threads
Max Pressure
Air: 145 PSI Water: 120 PSI Other Liquids: 80 PSI
Suitable Applications
Air, Water, Oils, Vacuum
Orifice Size
1/2
Max Temp
212 F
Valve Response
Slow
Duty Rating
100% (rated for continuous use)
Materials
Valve Body
Brass
Ball Valve
Stainless Steel
Housing
Plastic
Seal
Viton
<b>D.) ... A propane tankless water heater (most likely a camping type and again the smallest one available).</b>
Something like this:
Description
Enjoy a hot outdoor shower anywhere with a portable tankless water heater.
The Eccotemp L5 Portable Tankless Water Heater is the best selling outdoor portable tankless heater. Don't be left with a cold shower, get a never ending supply of hot water anywhere you are. The Eccotemp L5 portable tankless water heater is great for taking camping, to the beach or family vacations. Use it when going on hunting trips, weekend getaways or even at home.
Not only is the Eccotemp L5 for taking a hot shower, but can also be used for washing your car, boat or even your pets. You can even use the water heater to rinse off sand from a long day at the beach. Keep your whole family happy and clean with an endless supply of hot water. Hooks up easily to a pressure washer for better cleaning for those deep dirty stains. Turn the ignition on with 2 "D" batteries whenever electricity is not accessible. Never be left with freezing cold water again! Get a comfortable supply of hot water for all uses.
Comes with all hoses and adapters needed to get started. Included is the adapter to attach to garden hose and propane tank. (tank is not included). However, Camping World does offer a selection of propane tanks.
Simple to setup and use. The Eccotemp L5 can be ready to produce hot water in seconds. Shower head is already included. Just hook the hoses up to water and propane, set the desired temperature and water pressure and enjoy your shower!
Ideal operating range is between 20 and 80 PSI. Also works with a 12 volt pump to get the desired pressure. Dimensions are 14.5" tall, 11.5" wide, 4.5" deep and weighs roughly 12 pounds. Small enough to make it easily portable from one location to another. The unit requires a 2 inch clearance from a wall and 1 foot side to side from anything flammable. It should also be 3 foot from a window or overhang and 18 inches from the ground. This unit will offer a 30 to 35 degree rise at 1.3 gallons per minute.
Features and Specifications
- Adjustable water temperature from 80-150 degrees F
- 1.4 gallons of hot water per minute!
- Includes hose and CSA regulator for attaching to standard LP tank
- Garden hose adapter included
- Shower head included
- Battery ignition starts automatically
- Outdoor use only
- 37,500 BTU
- 2 "D" cell battery ignition
- Adapter attaches to any standard garden house style nozzle
- Shower nozzle with on/off control
- Needs 20-80 PSI of water pressure
- Low flow rate start (0.5 GPM / 1.3LPM)
- Up to 18 hours of use on a 20 pound tank
- 20 minute auto safety shut off timer
[img=560x315]http://embed-a.wistia.com/deliverie...26d3838d.jpg?image_crop_resized=640x360[/img]
Read Eccotemp L5 Portable Tankless Water Heater Reviews
What's in the Box
Comes with heater body, gas regulator, shower nozzle, hardware, garden hose and lp tank adapter, instruction manual, vent shield, stainless steel shower hose, and quick connectors.
The Eccotemp L5 portable tankless water heater is ready to setup and use within minutes. Give the tankless water heater a supply of water from a garden hose, 2 "D" batteries and propane. Now you have instant and quick hot water!
More about this water heater:
Congratulations, you're preparing to connect the world's easiest way to heat water on the go. Before we start, let's take a look at what comes with the heater. Included is a CSA listed regulator for use on a standard propane tank, on/off shower head and hose, garden hose adapter, and instruction manual, heat shield, and, of course, the water heater itself. You will need to provide two D cell batteries for ignition. Connecting your Eccotemp L5 portable water heater is not difficult, and should be completed in less than 15 minutes.
Let's take a look at the installation from start to finish. Look first at the connections. We have a gas input. A compression fitting for attachment of the hose is already attached. The water input, water output. Teflon tape should always be used on water connections to ensure a tight seal. A small roll is included in the hardware package with the heater. Next you will attached the shower hose to the output connection in the middle of the bottom. We will find a convenient location to hang the water heater. Weighing only about 12 pounds, the L5 can be hung virtually anywhere.
Next we will attach the propane hose to the water heater and to the propane tank. Never over-tighten the gas connections, as this can cause damage to the water heater and leaking of gas. Always check for gas leaks before operation. Soapy water gives a good way of detecting any gas leaks. Now we will attach the garden hose adapter and the garden hose. Be sure that the adapter has the rubber washers in it to assure a water-tight fit. The on/off switch on the bottom of the heater should be turned into the on position. Turn on your shower head and, within seconds, you will have all the hot water you need.
Shower temperature is adjusted by using the water and gas regulator knobs on the front of the heater. For higher temperatures, turn the gas knob towards the larger marks and the water adjustment knob to the smaller marks. Conversely, for lower temperatures, the gas knob should be to the smaller marks, and the water knob to the larger marks. The nice thing about Eccotemp water heaters is they provide convenient and portable hot water. Warm showers at camp, cottage, washing horses, dogs, RVs, arenas. Anywhere you need hot water. Eccotemp, hot water where and when needed. Heating water for the world.
- See more at: http://www.campingworld.com/shoppin...kless-water-heater/37786#sthash.XR7QeU2s.dpuf
<b>E.) ... A Hydronic heating core (probably a marine product) with a low amp fan.</b>
A single heating core something like this:
<b>F.) ... An Under board radiant heating coil (probably a pex tubing system).</b>
Something like this: (except a MUCH smaller system of course ... lol).
Under Floor PEX Radiant Heat "How To Install" Examples
This time it's pex under floor radiant heat. One of the most popular retrofits and new construction pex radiant applications is placing PEX under the main living space of a home or business.
Skill Level: Moderate Tools Required: Right angle drill, hole saw, PEX un-coiler (can be homemade or use an extra set of hands) and staple gun Time: four hours plus, depending upon the size of the floor
Under floor radiant install - heat circulation paths
A pex radiant floor heating system can be the most comfortable, efficient and often may be installed for less than other heat delivery hydronic systems. Radiant floor heat stratifies the heat from the feet to the head. The feet are always warmer than the head; this is what feels naturally comfortable to our bodies. Objects that rest on the floor become charged as well, magnifying the effect. This allows us to run lower temperatures when compared to a forced air system or hydronic baseboard heaters.
Under floor radiant install - heat circulation paths
Installing PEX Tubing Under Flooring; for hung PEX Tube or heat transfer plates
You should always check with your builder or architect for a suggested drilling location, for your floor. The process begins by drilling the necessary holes, positioning the manifold in a central location and attaching the first run to the manifold. A PEX un-coiler can make this process much easier. It is critical to uncoil the PEX in a linear fashion, to prevent kinking.
Installing PEX Tubing Under Flooring; for hung PEX Tube or heat transfer plates
4 Loops of an under floor radiant application
This floor layout shows 4 loops attached to one manifold. Here the manifold is placed in the center of the floor, making it easy to keep our loop lengths even. Typical loop lengths are set at 200’ to 300’ maximum, keeping the distance to the circulator as part of the maximum loop length. At HouseNeeds we can specify the tubing needed for a particular application.
4 Loops of an under floor radiant application
PEX Tubing Heat Transfer Plates
There are several ways to attach the PEX to the sub floor. Here are two examples of heat transfer plates. The top is an extruded plate, very thick and positively holds the PEX in a crescent shaped track. The heat transfer plate on the bottom is a stamped plate, where the plate is positioned over the PEX and stapled up. Both plates quicken the response times for the floor and distribute the heat evenly across the floor. The extruded heat transfer plates will transfer heat a little better due to the mass of the extruded plates. Also, the PEX tubing will be held in place better and thus will be quieter.
PEX Tubing Heat Transfer Plates
PEX Tubing Slide Brackets
Slide brackets are ideal for retrofits where nails protrude down or there is a concern about heat transfer plate noise. Slide brackets cost less than heat transfer plates and allow higher water temps. The PEX tubing is positioned under the floor on slide brackets, 8 Inches on center with in 16 Inches on center joists. The brackets allow the PEX to be placed just below the floor, so it does not touch and then zip ties hold things firmly in place.
Other methods of attachment include PEX clips, talon clamps and ultra fin. Noise is always a consideration. Many installers either firmly mount transfer plates or use a clip with a stand off, to avoid noise.
PEX Tubing Protection Sleeve and other PEX Accessories
Protection sleeve should be used to prevent chafing of the oxygen barrier on the PEX. The sleeve is split and is positioned after the PEX is installed. Here we see the back run of the first loop and two joist bays with in one loop.
PEX Tubing Protection Sleeve and other PEX Accessories
PEX Tubing Foil Insulation and Slab Shield
The PEX is in place and insulation is stapled below the tubing. We recommend Low-e Foil Insulation
PEX Tubing Foil Insulation and Slab Shield
Radiant Floor Foil Insulation
Radiant Floor Foil Insulation is highly recommended with under floor radiant. The insulation should be placed at least 4 inches below. The goal is air stagnation, allowing heat to rise. Placing the foil faced foam closes the space and send the heat up. Note: The homeowner has kept all wiring below, preventing the heating of the wires.
Radiant Floor Foil Insulation
PEX Tubing Radiant Heating Manifolds
The PEX manifold feeding the floor is in the center span in this house. Placing the manifolds in a central location allow the loops to stay with in recommended lengths and reach all parts of the house. Typical loop lengths are set at 200’ to 250’, keeping the distance to the circulator as part of the maximum loop length.
PEX Tubing Radiant Heating Manifolds
Under floor radiant install with Heat Transfer Plates
The PEX manifold feeding the floor is in the center span in this house. Placing the manifolds in a central location allow the loops to stay with in recommended lengths and reach all parts of the house. Typical loop lengths are set at 200’ to 250’, keeping the distance to the circulator as part of the maximum loop length.
Under floor radiant install with Heat Transfer Plates
<b>G.) ... A mixing Valve to switch to the Hydronic heating core or switch to the Under board radiant heating coil or have a mix between the two.</b>
Probably something like this:
[img=250x250]http://s3.supplyhouse.com/images/products/large/40642-3.jpg[/img] Zoom
1/2" Threaded 3-Way Full Port Brass Ball Valve w/ L-Port
SKU:40642
Brand: Webstone
Read 1 Review
Write a Review
Qty
Price
$6.95
/ each
Do not use this item for any installation or repair of potable water applications. This product does not comply with the "Safe Drinking Water Act," which requires that products meet low-lead standards in order to be used in systems providing water for human consumption (drinking or cooking). This item is for non-potable (non-human consumption) water applications only.
1
- Overview
- Reviews
- Product Q & A
Specs
Size:
1/2"
Connection Type:
Threaded
Material:
Brass
Handle Style:
Lever
Valve Construction:
1 piece
Features:
Standard
Description for Webstone 40642
Note: This item does not comply with the 2014 Lead Free Act. It may not be used in potable water applications as of January 4, 2014.
1/2" Threaded 3-Way Full Port Brass Ball Valve w/ L-Port
<b>H.) ... A horizontal Propane tank (maybe a way to fill this without dismounting each fill) that I could mount under the Step Van at the rear. If that doesn't work then build a propane locker on the inside of the van to marine specifications for one of my upright 100 lb tanks. </b>
<b>THESE ARE THE BENEFITS I CAN IDENTIFY SO FAR:</b>
1.) I chose this design because I will have no combustibles to deal with inside my sleeping area.
2.) Hydronic heat is fairly even and doesn't create additional water moisture to deal with.
3.) The system can run 100% on propane.
4.) The "fill" of the systems coolant/heating fluid is done through the main engine radiator so there is no need for a top off tank or external fill.
5.) The system uses the same cooling mixture as the main engine (so if your antifreeze is up to date the hydronic system will not freeze either.
6.) If the propane runs out. This design can run 100% off the engine heat.
7.) It is possible to put the small tankless water heater on the outside of the vehicle which would require no combustibles inside what so ever.
8.) If the tankless water heater is mounted on the inside (in my cargo/tool area) It is possible to vent the unit to the outside with passive induction venting or 12v power venting.
9.) If I can mount a horizontal tank under the rear of my van and provide a rock guard (collision protection) this would be ideal.
10.) If I cannot mount a horizontal tank or find it is unfeasible then I would need to build a propane tank locker. (on the inside of my Step Van (in the cargo tools area).
<b>CONS SO FAR I CAN IDENTIFY.</b>
1.) The need to drill holes to route any fluid lines.
2.) If the tankless water heater is mounted on the outside can it still be "stealth" as I am now.
3.) I really don't like the idea of have the tank on the inside or the water heater on the inside (but these may not be deal busters)
4.) The need to secure the tankless water heater (probably on the back of my van) so that it can't be stolen.
5.) If the tankless water heater is mounted on the inside then the need to again drill or cut holes for venting.
I am fairly familiar with residential and commercial heating design but truthfully I have never designed anything this small (or mobile)
I am currently looking at all the water heater, coil, thermostat, pex (or other tubing), A.B.V.s (automatic ball valves), propane tanks, etc for design possibilities.
I'm guessing that the pex is either 1/2" or 3/4" for my design purpose with all the fittings matching accordingly.
I have already started on a small raised floor (2x4 covered with 3/4 plywood (removable of course)). And plan to put 3-1/2" rigid foam board inbetween the floor joist with the Pex and thermal plates attached to the underside of the Plywood. I also plan for the pex to be removable with quick disconnects (not yet specified). The plywood floor, joists and rigid foam are also planned to be removable to convert the van (if necessary) back to full cargo mode.
Comments and suggestions are welcome.
Thanks in advance,
T.I.M.