Rainbow Previa Build

Van Living Forum

Help Support Van Living Forum:

This site may earn a commission from merchant affiliate links, including eBay, Amazon, and others.

loess

Well-known member
Joined
Sep 25, 2012
Messages
60
Reaction score
0
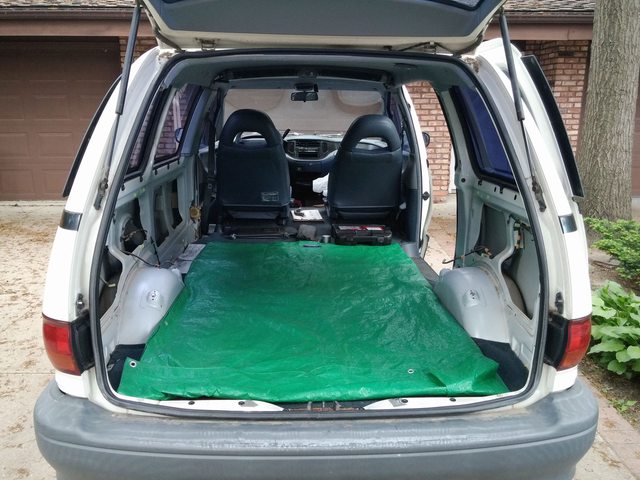
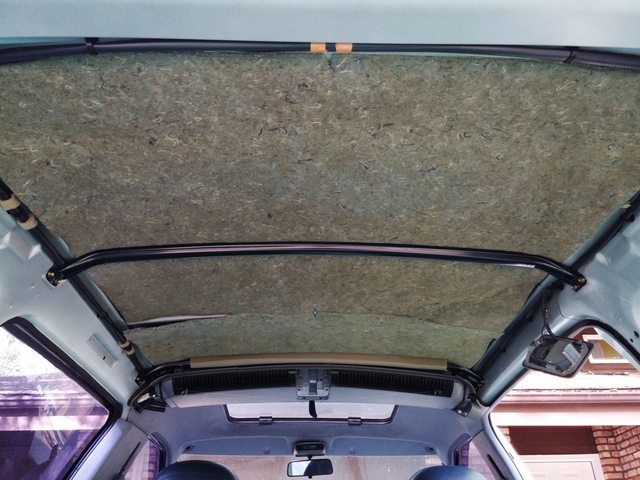
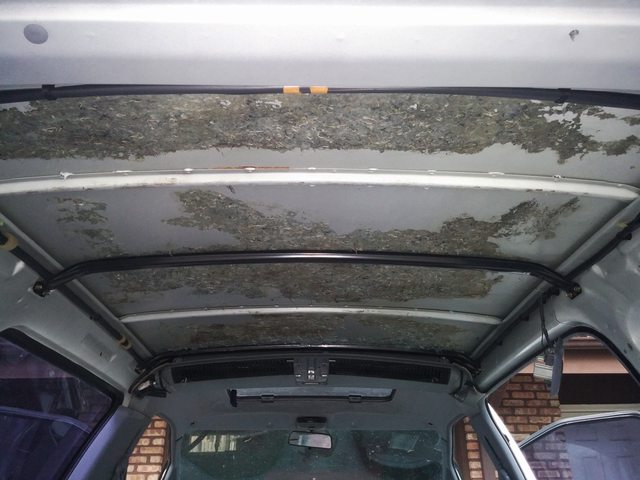
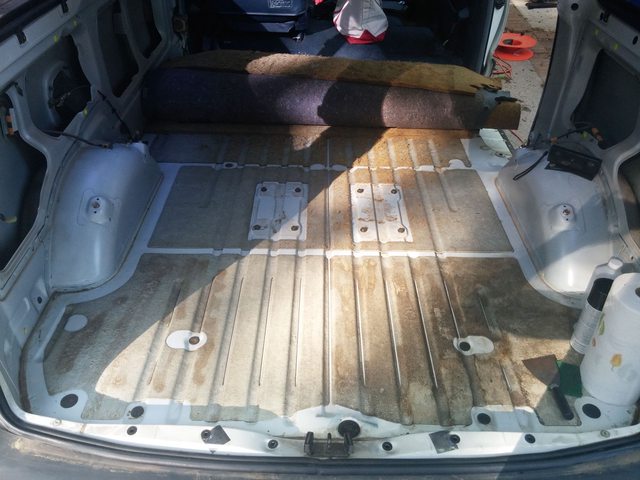
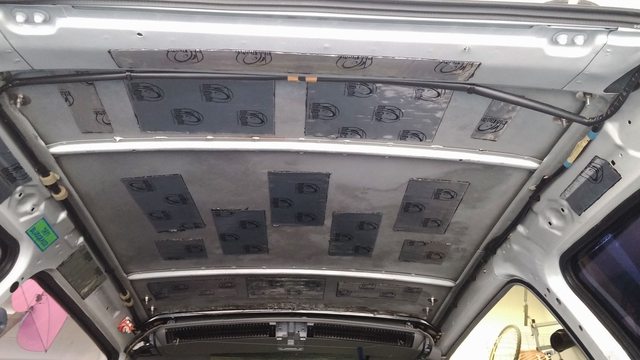
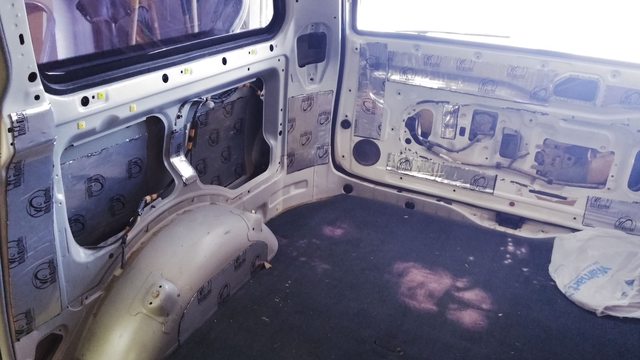
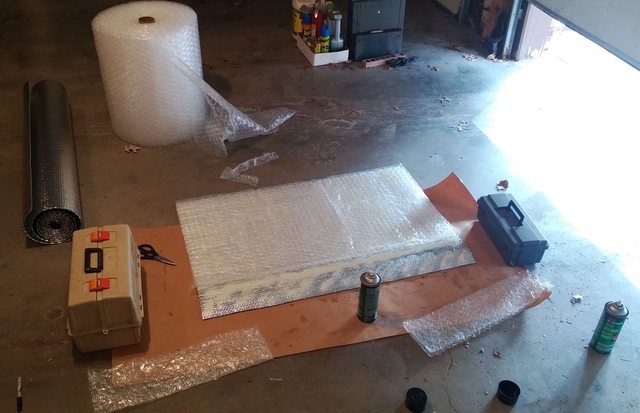
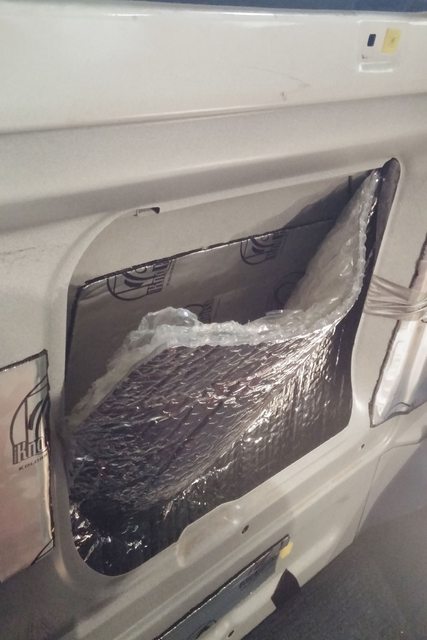
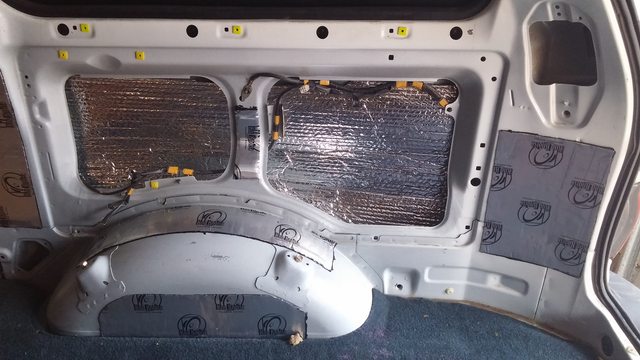
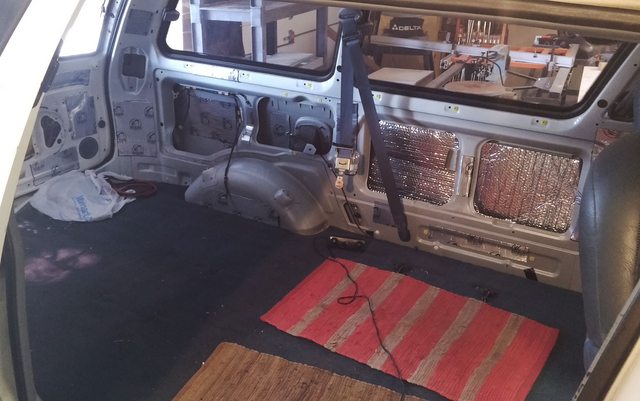
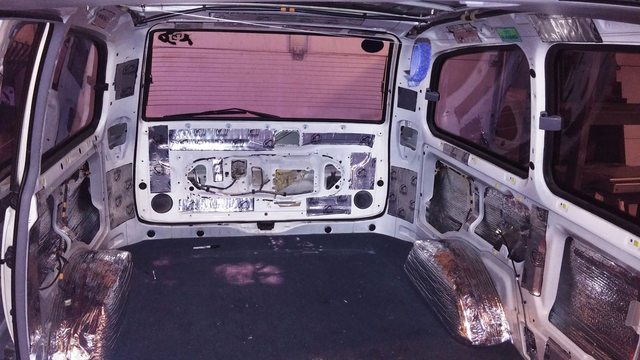
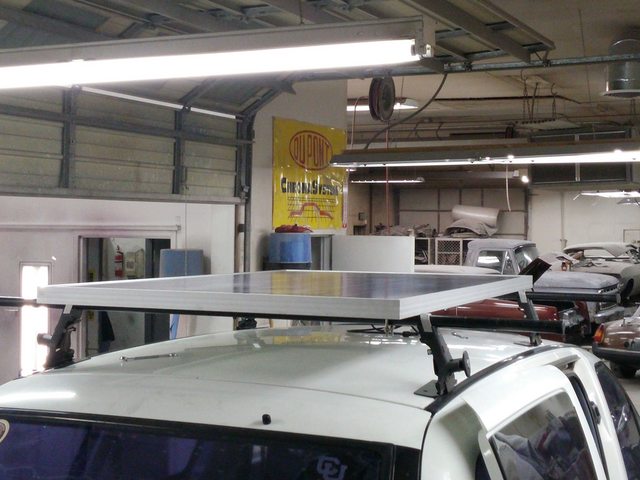
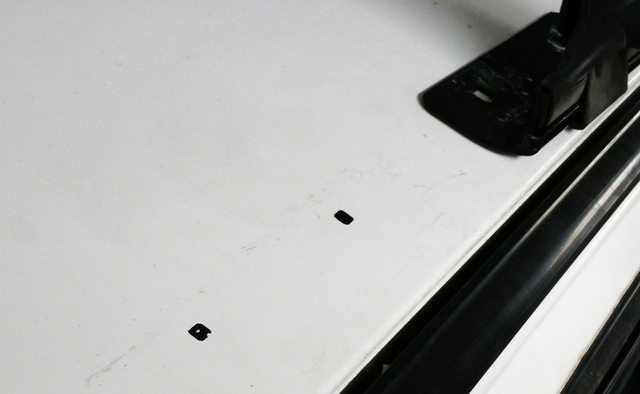
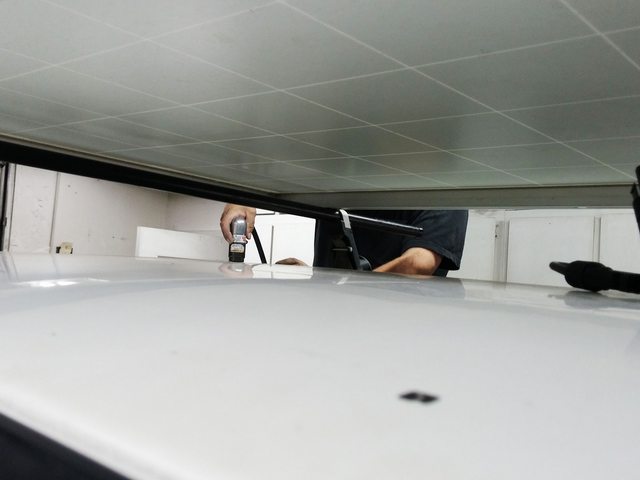
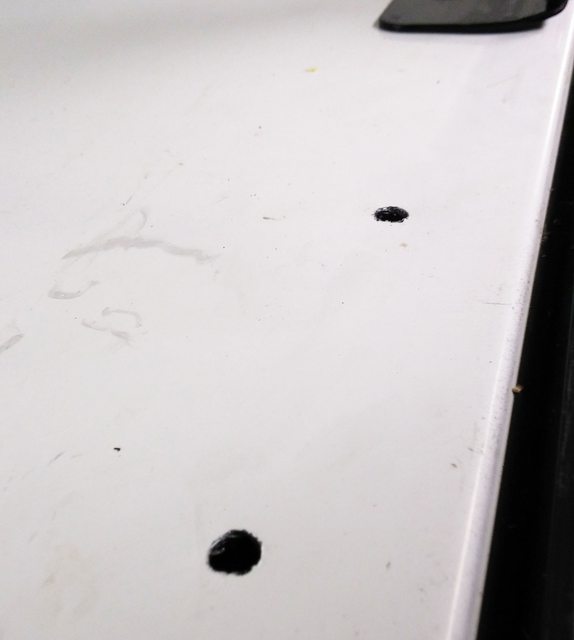
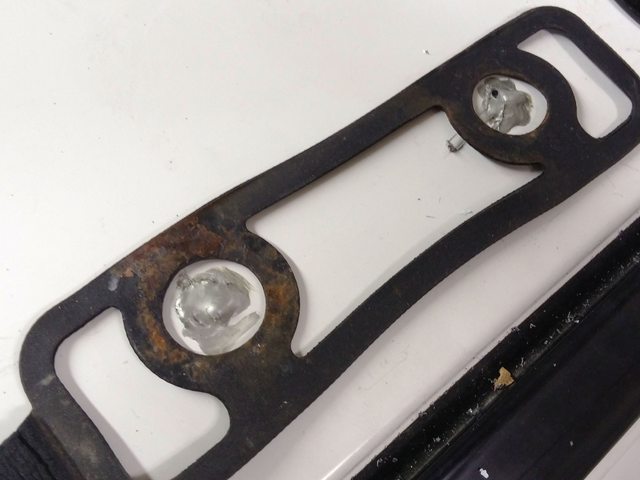
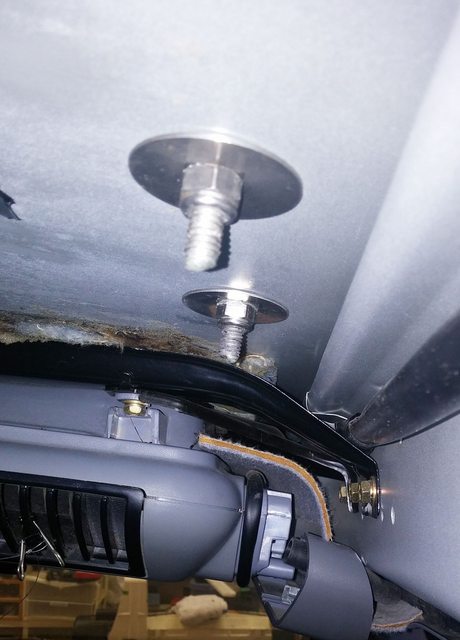
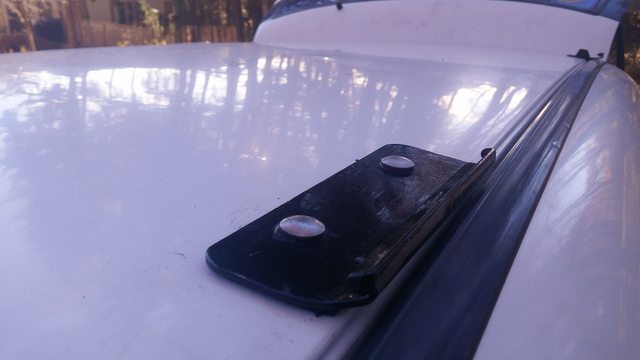
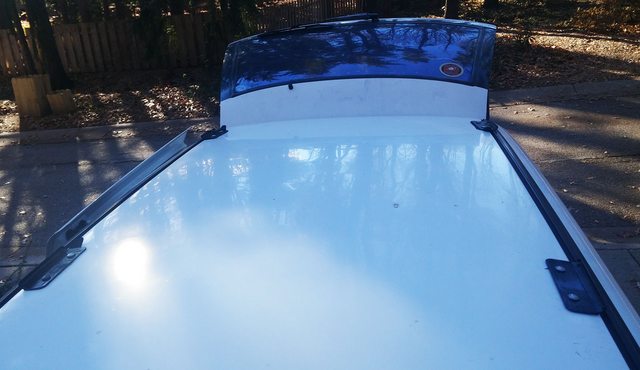
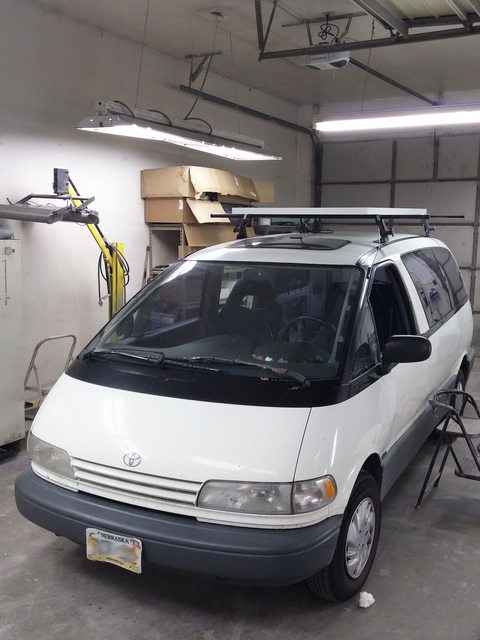
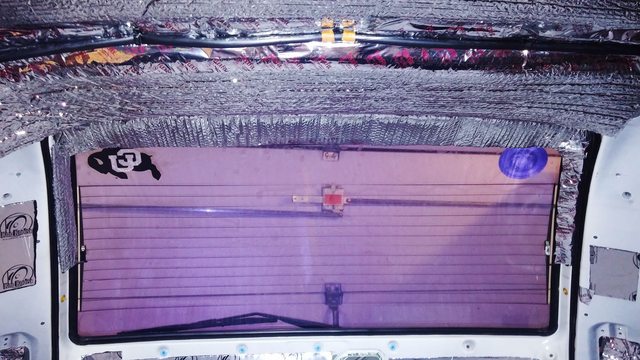
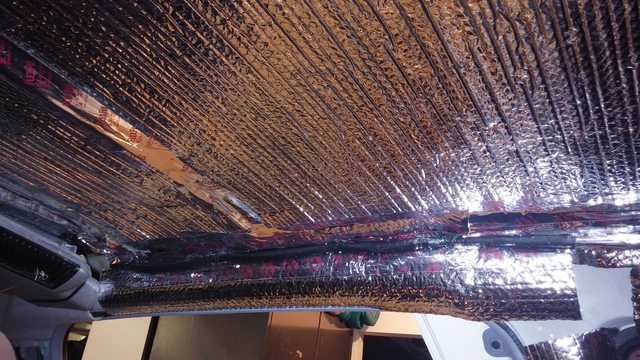
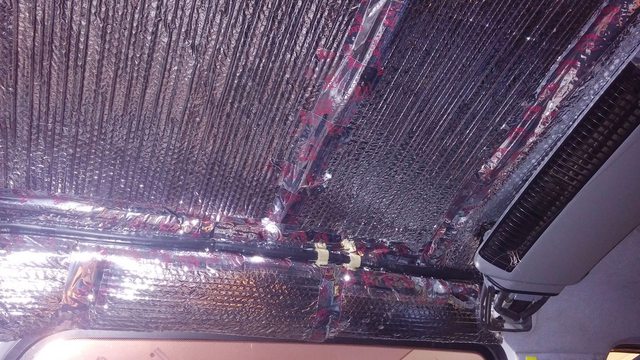
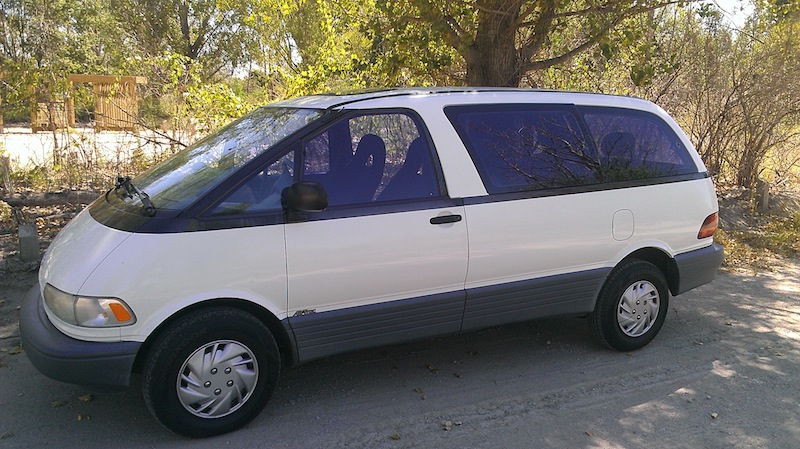
A few years ago, I decided that I was done dumping time and money into my little Volkswagen Rabbit pickup truck, and I knew I wanted something bigger that I could potentially travel in for longer periods. Somehow I got turned on to the Toyota Previa with its quirky spaceship egg shape, its reputation for handling pretty darn well in adverse road conditions, its spaciousness relative to other minivans, and its reputation for all-around mechanical reliability. So I set out to find me a good one. I hunted around for a while and as part of my search I posted a "wanted" ad on my local Craigslist, which lead to meeting my now good friend who is more or less a certified Previa-holic. Ended up traveling to Colorado with him where I found my dream van. I bought it from an older couple who had owned it for most of its life and they took very good care of it. When I was heading over to their house to meet them and look at the vehicle, there was a giant rainbow that was arc'd over their neighborhood. I knew right then that this was gonna be the one! So even though it's a plain white minivan, she is really the Rainbow Previa. I have traveled extensively with her over the past two summers and have spent a lot of time planning and preparing to transform the cargo area into a cozy little home for longer periods of traveling. Now that I have stripped it down to bare metal, it is time to get into the thick of the conversion process. Lots to do but have a nice chunk of free time between now and the new year, so I'm shooting to have the basics finished by January when I will head west for warmer and sunnier places!

HTOfcHt.jpg
 
After removing the trim I was left with the puzzle of how to remove the headliner. You see the Previa has a rear A/C unit just behind the front seats that spans the width of the interior. Removing it is necessary to getting the headliner out in one piece, and was my initial plan anyway, as I don't need rear A/C back there. But I soon discovered that there is no way to get it out of there without cutting or disconnecting the refrigerant hoses that feed into it. Well, that would leak all of the refrigerant out, leaving me with no A/C at all (front or rear). So unfortunately, until I can figure out how to remove it without losing A/C, it stays, taking up valuable headroom in an already small space.

WPG5UnBl.jpg


So I took a box cutter to the headliner and chopped it off just shy of that A/C unit, revealing the original batting and metal roof support ribs.

LaVkyvql.jpg


Old gunky glue and batting fibers on the ceiling and floor. It might not look like much, but it took me 2 full days tackling it inch by inch with a paint scraper, heat gun, scouring pads and rubbing alcohol to get it off of there!

2OKk9Hel.jpg


FBi5NLLl.jpg


Yes exactly, Patrick! Except, needs more Wizards. And Dragons.
 
First order of business is to do a bit of sound deadening. I went with Kno-Knoise Kolossus as a CLD (constrained layer dampener), after reading about several different products on the forums at DIYMobileAudio.com (seems like there is a forum for just about every obsession out there, and treatment of your vehicle for the purposes of sound manipulation is no exception!). I also gathered from there that it is not always necessary to cover 100% of every single inch of surface when it comes to this kind of thing, so in an effort to save materials and weight (this stuff is actually pretty heavy, cumulatively), I cut out various squares and shapes and applied them strategically, making around 35% coverage or so.

UwMJfJ0l.jpg


2kUoSpXl.jpg


This week I started on the insulation phase. Starting from the outer metal skin and going inwards, the plan is to go with: double-layer of bubble wrap > Reflectix > bubble wrap > 1/2" Polyiso board > Coroplast for the walls.

So the last couple days I have been diligently assembling bubble wrap+Reflectix sandwiches using 3M Hi-Strength 90 spray adhesive. It works great.

Naev1xml.jpg


R8WGSN2l.jpg


There are a whole lot of miscellaneous cavities and crevices in my van's frame, and I am still pondering on the best way to insulate them. I've stuffed bubble wrap+Reflectix in some of the narrower vertical columns, but there are other areas and ribs where the only access are tiny holes. I am thinking about stuffing fiberglass batting in there and taping off the holes with aluminum tape, but I have to admit I am a little wary about the possibility of moisture showing up in there, so I have not decided either way yet.

For the larger square shaped areas I have cut the bubble wrap+Reflectix to size, and will do the same with the Polyiso on top of it. Right now they are wedged in there nicely with a friction fit. If I can leave them like that without gluing, that would be a lot less messy...not sure if gluing them will make a difference or not in the effectiveness of the vapor barrier and insulative value?

UnmBkd0l.jpg


IN04tNol.jpg


lRVB9vgl.jpg
 
Just to clarify, the bubble wrap and Reflectix are sandwiched and glued together. What I am referring to is whether or not that sandwich has to be glued to the metal frame if they already fit tightly in there.
 
Your Previa looks great!! I think you are doing an amazing job. Some thoughts on the insulation:

My concern for the Reflectix is it will sag over the long run if you don't glue. It's pretty stiff but with the added weight of the bubble wrap it might. I'm not saying it will or won't, just that it might. For that reason I think I would use glue.

If you stuff with fiberglass batts, don't compress it. It drastically loses R value if it's compressed. I'd also have the same concerns about sagging.
Bob
 
Loess, you are doing a great job with this!

Regarding fiberglass, I read that used in a vehicle setting it can quickly attract and hold moisture. I found in doing my own insulation job there was fiberglass in the back doors that looked like it had been through more than a few cycles of being wet so out it came. And a sidenote, I read similar stuff about foam spray insulation so I avoided that, too.

I stuck to reflectix and polyiso. I used a variety of foamboard thicknesses to achieve relatively smooth and flat walls. Like you, I used aluminum tape as I read duct tape loses its hold. I was generous with it and it did a great job attaching one thing to another (and to the frame in many spots as like Bob says sagging could be an issue) and finally sealing everything. I covered that with a thin white vinyl wall covering that is lightweight, flexible and washable. I keep saying I'm gonna post a build thread but then I get sidetracked LOL.

Good you are documenting the bare walls with photos so you'll know where you can screw things in later if you want to.
 
Thanks for the encouragement y'all!

Unity Gain, 8 feet x 5 feet is about right on the money. Maybe a couple inches more if measuring from the bare metal without the trim. And of course you lose some width at the wheel wells. From floor to ceiling is just over 4 feet. BTW the engine on a Previa is actually mounted underneath the front passenger seat so there floor makes a big "hump" up in the cockpit so there's a little less room from floor to ceiling up there.

sassypickins, I'd like to see your vinyl wall covering whenever you get around to documenting your build. Coroplast is bendable to an extent, but not by much. Something like the vinyl might be better for my van since I am anticipating some irregularity once the polyiso goes up and it would be nice to get a tight fit for both aesthetic and spatial reasons. I am not going to do the fiberglass, I can already tell that I would just end up worrying about it all the time. I will do my best to stuff pieces of bubble wrap+Reflectix sandwich in the hard to access areas but I am also realizing that there are inevitably going to be a few gaps here and there that I simply can't get to and that's OK, doesn't have to be perfect. It is a small enough space that some heat loss in those areas shouldn't be a huge problem.

Bob, really appreciate your chiming in on the possibility of the Reflectix to sag. I hadn't thought of that. So with that in mind I've been applying the Reflectix+bubble wrap with aluminum tape and also the 3M in some spots. Last night I got the wheel wells done and some of the bigger openings. It's a slow process but that's OK since I get to groove to a lot of great music while I work.

ENU1DkEl.jpg


Yesterday I scored a pretty good deal on a used Exped Mega Mat which I am considering as a mattress. It is a little wider than I need, but it has an advantage over a traditional mattress or block of memory foam, which is that I can roll it up and stow it when not in use, allowing me to use the flat surface of the bed (which I have not built yet) as a desk/workspace.
 
loess-thanks for all the great documentation. Your van looks great.

I was also thinking of using bubble wrap but I was going to add the flat alum roll to the bubble to make my own reflectix. Just looking at it as a cost savings maybe. I haven't worked it all out yet. Did you use large bubbles or small bubbles? I never thought of using the bubble wrap with the Reflectix. That would add the space that reflectix needs to have the better R value if my understanding is accurate.

As far as where you strategically put the sound deadening material, were those places intentional based on what you read in the forums or random? Could you point me in the direction of one of those forums you found helpful. I am also concerned about sound and have been doing my own research of it but apparently nothing like you have done.

Looking forward to seeing the rest of your work.

GypsyChic
 
gypsychic, That is my understanding as well, that the more air space you provide, the better the R-value (to a certain point). There are a few sizes of bubble wrap that are widely available: 3/16" (small), 5/16" (medium), and 1/2" (large). I decided on the 5/16" "medium" bubbles and was initially just going to go with the single layer. But after I brought it home I read this Reflectix Air Space pdf that someone here had posted and decided to double up on it to achieve a bigger air space. So, I just roll out the twice the length that I need, fold it over and glue the two layers together, then glue that onto the Reflectix and bam you're ready to go.

I would recommend looking on eBay for large quantities of bubble wrap. It is marked up quite a bit at the big chain office supply stores. I bought mine from ESupplyStore.com who I initially found on eBay but they happen to be local to me so I just drove over and picked up the bubble wrap to save on shipping costs. I spent $23 for a roll of 188 feet x 24" wide. You might try searching eBay for "bubble wrap" then narrow down the searches to within 25 miles or so of your zip code. But even if you can't find someone local you can get a better deal than buying it from a chain store.

I am glad you asked about the sound deadening because I spent a ridiculous amount of time reading about the ins and outs on DIYMobileAudio.com. Also there is a very helpful and informative site SoundDeadenerShowdown.com that gives a detailed overview of the physics of sound deadening and the different strategies and materials used.

Much of that world is aimed at quieting a vehicle for the purposes of a high quality stereo experience. At some point I am going to upgrade the speakers and stereo in the cockpit of my van and go the whole 9 yards with regard to sound deadening, as music is very important to me especially when driving long distances. But for the purposes of the living space in the cargo area, I just wanted to find out how to quiet some of the road noise and the resonance and rattles in the frame of the vehicle. So that is where the CLD (constrained layer dampener) material comes in, plus our insulation layers should help a little bit more. There are many products out there, as I said I ended up going with the Kno Knoise . I used their product that is 100mil thick which I linked above in the thread. They also make a basic one that is 80mil thick, it's thinner and therefore cheaper, and for all intents and purposes really is not that big of a difference performance wise. If I could do it over I would have ordered that stuff to save a bit of $.

To figure out where to place the CLD tiles, I went around knocking on the panels of the frame and listened for resonance. Anywhere I heard resonance was an area that I knew needed to be treated, but you don't necessarily need to cover 100% of that area...anywhere from 35-50% should cover it. Also, is is my experience that anywhere that there is a bend in the metal, it will not resonate so there is no sense wasting material on there. I think probably as with thermal insulating of a vehicle, it is difficult to achieve an all-encompassing sound deadening unless you want to spent a lot of change and drive yourself bonkers. But you can certainly make a big improvement with a small investment and a little forethought!
 
Excellent info on the sound deadening. I was planning to research that. have you noticed a distinguishable reduction in noise since installing those pieces?
 
Bitty, when I first stripped out everything it was like an echoey cave back there and you could hear it up front while driving. The CLD tiles made a noticeable difference in slightly "muffling" some of that and also reduced some of the road noise as well after I put some of that stuff on the wheel wells. I do want to again emphasize that the material does not completely silence the noise as that is not their intended purpose. But if one has the budget to include them, I think they are worth experimenting with. Especially on large panels such as the ceiling.
 
After a long process of deliberation about how to mount my solar panel (and helpful advice from fellow forum members), I finally got my roof brackets and racks installed!

With the solar setup, I knew that I wanted to be able to remove and replace the panel at my discretion, so rather than mount it directly to the roof, I would need to build or install some sort of rack. This way I can arrange to haul things like a kayak, surfboards, and other fun outdoorsy stuff when I am not using the solar panel. As luck would have it, I discovered that my parents had an old set of Yakima crossbars and rack accessories in storage, so all I had to do was figure out how to attach them to the van. My van did not come equipped with rain gutters, so the solution was to go with the Yakima Bolt TopLoader brackets which integrate nicely with the Yakima 1A towers.

I found a set of the brackets used on a non-local Craigslist site and the seller was nice enough to agree to ship them to me. They had a fair bit of rust on the surface so I sanded them down, treated the metal with Ospho and painted them. I read up on drilling holes in the roof, even practiced on a few junkyard cars, but I couldn't get confident with the drill and couldn't seem to find a drill bit that wouldn't walk all over the place. I really didn't want to leave any chance for a drilling error on my roof, so I asked my friend Chris (who owns a local body shop) about it, and he said he could help me out. Went down there earlier this week and got 'er done. Very grateful for my friend's assistance!

First we measured everything out and laid out the brackets with the rack attached and put the solar panel on top, then marked where the holes were to be drilled.

vEopDkol.jpg


oGwPoWtl.jpg


The moment of truth...here is Chris drilling the holes:

gqGiKAhl.jpg


Looking good from above and underneath!

cckkH6pl.jpg


AD3yw2gl.jpg


Here are the pads that go between the metal brackets and the roof. We put a dab of goop around the holes we drilled to prevent future rust and water seepage.

yLdLkuul.jpg


Bolts and lock-nut washers get a little goop as well. We later went back and chopped off the excess length protruding from the ceiling. A fun little fireworks show that was with all the sparks.

kWOdNLvl.jpg


Brackets installed. I covered over everything with some silicone in an attempt to further protect from the elements.

1iaEIIwl.jpg


9Qdw7N6l.jpg


Here's what it all looks like with the solar panel on top. I will be attaching the panel to the crossbars with U-bolts. I am mildly concerned about potential thievery of the rack and panel, and it is admittedly not the stealthiest of looks. I need to come up with some kind additional system of theft deterrence hardware, but overall I am very happy with the way everything turned out.

Yjfd3Knl.jpg
 
Ceiling is all done. I went around just below the ceiling, wedging pieces in between the wiring harness and frame on either side of the vehicle. I also spent the last couple of days stuffing Reflectix+bubble wrap in as much of the sliding door cavities as I could reach. Still need to do that to the back hatch door.

I am starting to feel like adding the polyiso would just be redundant in some spots. As you can see the Reflectix bulges out quite a bit in some places, and polyiso is not very bendy so I don't know if covering every inch of surface with it is necessarily a good idea. I anticipated losing a good amount of space due to insulation, so it's no surprise...but even so, I may elect to only do polyiso on just the ceiling, sliding door, hatch door, and the larger panels down lower near the floor. Anyhow, the first insulation layer is nearing completion!

Looking ahead to the next phase: somewhere I read that the 3M 90 adhesive eats through polyiso? I wonder if 3M 77 is OK to use with it or maybe I should be looking at a completely different product. Also, once I cut the polyiso panels and glue them to the Reflectix, I hope they will stay up there. It seems like the weight of them could potentially cause the Reflectix layer to sag...we shall see!

DAoA1zvl.jpg


PJ2GWsRl.jpg


bCCv8Fdl.jpg


ooMzegYl.jpg
 
I think you are putting way too much faith in the Reflectix and much too little in the Poyiso. The Refectix wil be good to keep the heat out (heat from the sun is radiant so Reflectix works), but do little to keep the heat in. Keeping heat in is the job of R value and the Polyiso is R-6 and the Reflectix is R-1 because the heat that's coming from the inside is not radiant heat.
Bob
 
Bob, that makes a lot of sense. Sometimes with projects it is easy for me to lose track of the big picture and forge on just for the sake of getting to the finish line.

I think that both approaches (keeping heat out in the summer as well as retaining it in cold temperatures) are useful enough to me to make it worth using both Reflectix and Polyiso at the expense of a bit of living space, but perhaps I should consider a more strategic approach in where to apply them.

The van has gotten extremely uncomfortably hot and muggy at times over the past two summers. I did install a retractable windshield shade and cracked the sunroof + windows most nights, but I still woke up pretty hot most days, especially in the southwest when that sun starts beating down on you early in the day. I will be building some sort of fan contraption for the sunroof (was experimenting with computer fans and acrylic this summer), as well as small intake fans for the two rear windows which tilt out slightly, so that should help. And window coverings will help too. Anyway, with regard to the Reflectix: instead of covering over everything, maybe I should just focus on the areas where it was easiest, where it gets the most sun exposure, and overall makes the most sense to apply -- the ceiling, side panels and the doors. Those are all the largest surface areas and are also mostly flat so it really doesn't take up much space.

On the flip side, while I do plan to stay away from cold climates for the most part, I do want to have some ability to travel and live in the van in the cold if it comes to that. So the effort to use Polyiso in my build feels like a good "insurance policy", for when I am in situations where that additional layer will help when I need to retain heat.
 
If heat is your main concern and cold is only a minor secondary concern, then I think your idea of putting in Reflectix everywhere but Polyiso only in part of the van is a good one. The Reflectix is the best thing to keep the heat out but then should let it cool off fairly well after dark. The Polyiso would hold in more heat which just makes it hotter longer.

Knowing more about your travel plans I think you were right and should stick to your original insulation plan, it's a very good one!
Bob
 
Thank you Loess for your outstanding documentation. Nothing short of excellent. If I may, I would suggest going to an automotive paint store and getting a can(s) of 3m super weatherstrip adhesive and using that instead of the super77. Same type product but much stonger and aimed at the professional market. I used it for 35 years in the auto body biz replacing trim after repairs. That stuff will glue anything to anything, almost lol. The baffles were loose on my garage speakers so I took them off and glued them back on. Never have come loose and its been ten years anyway, and those things vibrate massively all the time they are in use. Try it......you'll like it!
 
Top