Ideas for mounting a solar panel to minivan roof

Van Living Forum

Help Support Van Living Forum:

This site may earn a commission from merchant affiliate links, including eBay, Amazon, and others.

loess

Well-known member
Joined
Sep 25, 2012
Messages
60
Reaction score
0
I've started to gather components for a solar rig for use this summer while traveling in my van (1991 Toyota Previa). So far I've got a Rogue MPPT charge controller and Tri-Metric battery monitor, and once I save a bit more $ I'll start hunting for a battery bank and wires/other accessories. While I was in Colorado last month I found a nice deal on a barely used 235 watt solar panel and brought it home.

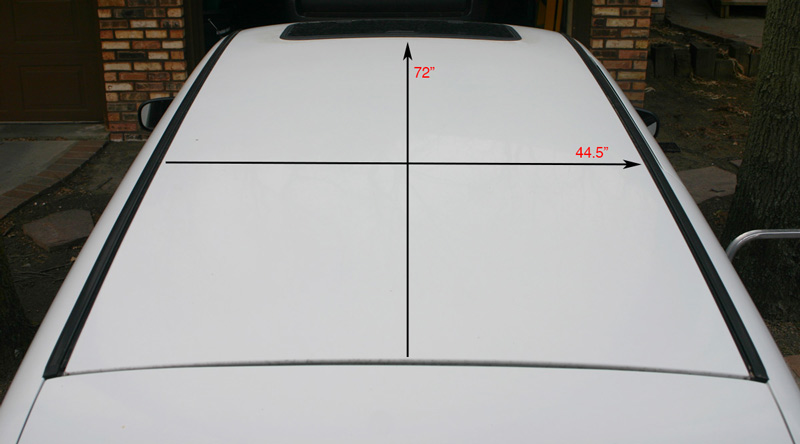
The solar panel weighs 44 lbs, and is 39" x 65". Area on my van's roof (basically everything behind the moonroof) that it will sit on top of is roughly 44.5" x 72". A fairly close fit but I think it will work out OK.

I have hunted around doing some research on this but don't know a whole lot about roof racks and would welcome any thoughts and ideas you folks might have in terms of getting it mounted up on the roof of the Previa. I like the looks of Brad's setup which appears to be a pretty secure mounting system on his cargo van.

However, I'm a little afraid to drill into the van's body because once you do it there is no going back. That said I think drilling might be inevitable in terms of running the wires from the panel to the rest of the setup (though it might be possible to run them down the side of the van and then come inside from underneath?). Anyway, if there's a way to avoid drilling and still get the panel secured in a way that leaves me feeling just as confident driving it at 70 mph into the wind, that would be pretty swell. I would also like to be able to remove and re-install the panel as needed (the van is my daily driver as well so there's not much sense rolling around town with the big panel when I am at home).

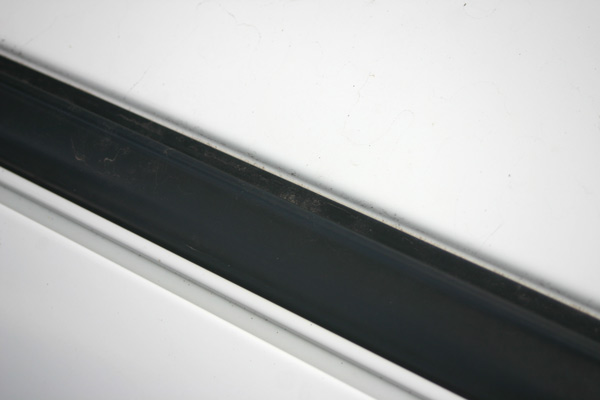
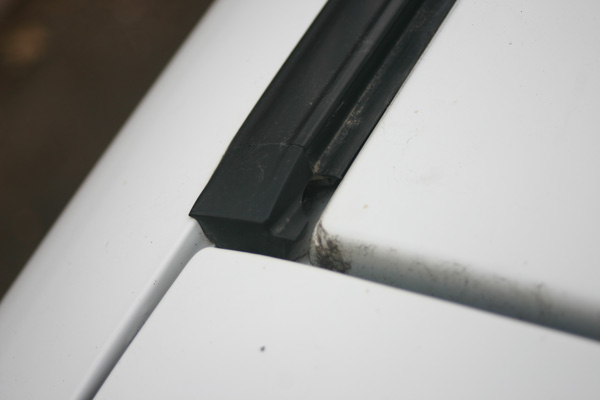
It has been suggested to me that a non-drilling solution could be to use these "Quik-N-Easy" rain gutter clamps, then use a couple of crossmembers to build a custom rack that fits the Astronergy solar panel. Sounds simple enough, but figured I would throw it out here to bounce the idea off of you guys first.

Pics of my van and the roof are below. Love to hear any thoughts or bright ideas!

oCfETPF.jpg


z4roEFk.jpg


NkpGxoz.jpg


\
rIpCS1x.jpg
 
I was going to say that you likely have little slides on the black rails that are set up from factory for roof rack mounts but when I enlarge you photos I don't see any. My Rav4 has them, it is like a little sliding door that exposes a mount point, four of them on those black rails on the roof.
It is a nice looking van so if it was me I would go down to your "Thule" or "Pro Rack" dealer or another roof rack manufacturer in your area and buy the roof rack that fits onto that model (they are not cheap) and mount the panel onto it either by screwing it, using brackets or U bolts or with plastic tie downs.
 
I have roughly the same size panel on my 89 Toyota van and it fits just fine with room to spare in the back for my roof vent.

A Yakima-type rack will work fine. I'd recommend getting something made specifically for your van rather than a generic fits-all rack. It will be more secure and has less chance of damaging anything. I'd probably just run U-bolts around the bar and up into holes in the panel's frame, assuming there is enough metal on the frame to grab onto.

As far as drilling holes in the van goes, I'd recommend getting over that fear. Holes can be temporarily patched up very easily with a little silicone glue (and a penny to cover larger holes) or "properly" with bondo and touch-up paint. If drilling a hole is the best solution, I say go for it especially with vehicles like ours that have fully depreciated.

Since this sounds like something you won't need all year the rack might be the best solution, but just for fun here is what I did. I found some L-brackets at the hardware store and screwed them down with self-tapping screws. I cleaned the area and put down lots of silicone glue first to prevent leaks and keep the screws from working loose. It's held just fine for the last 2 years. 4 brackets at the front, 2 close to the back.
 

Attachments

  • panelmounts.jpg
    panelmounts.jpg
    183.9 KB · Views: 128
  • clothesline.jpg
    clothesline.jpg
    171.1 KB · Views: 131
Some Previas came with a factory rack but finding them these days can be difficult. I do keep an eye out in the scrap yards when I visit them, but no luck yet. I think I can probably come up with a solution if I score one of those.

fk2, there are no slides on those black rails like the RAV4, but I don't know, there might be something under there to bolt into. I'm not yet certain how to get those rails off without breaking something so will have to investigate tomorrow.

Reducto, your van looks great, I've always been curious about those older Toyota vans...never have been inside of one. Thanks for posting pics of the L-brackets. Man I'd like to have a roof vent like that, with a fan. Even with my moonroof open (unfortunately only tilts open a crack) I was sweating buckets in there on a trip through Arizona last June.

I'm not completely against drilling holes, just get nervous about getting it right the first time. Anyway it appears that I do have additional options though they could get pricey.
 
Finally making some progress on this. As luck would have it, I was helping my dad clean out his storage unit and discovered that my parents had an old Yakima roof rack with 66" cross bars in there that they hadn't used in years. Perfect for my solar panel. I went hunting on Craigslist and found a used set of Yakima Bolt TopLoader brackets that will permanently mount on the roof of my van. So from there I will attach the Yakima towers to the brackets, and plan to use U-bolts to attach the panel to the crossbars.

The brackets I bought were pretty rusted in some areas so I sanded those down and got as much rust off as I could. Along the way I discovered that molasses is also a simple and inexpensive way to remove rust. So I got to experimenting and let them sit in a mixture of 5 parts water : 1 part molasses in a slow cooker on low for a few days. Worked great and ate most of the rust, all I had to do was sand down further on some of the areas where the metal had started to pit.

I am ready to repaint the brackets with rustoleum but it's hot and quite humid today (65% humidity) and will continue to be all week, so hopefully the paint will cure OK. Either way I am gonna have to go for it as I'm anxious to get this done and don't want to wait until the weather cools down.
 
Rustoluem is actually not very good at preventing rust, despite the spiffy name and claims. I have had good luck with their Topside yacht paints though. Very much superior to their regular line, but I do not believe they come in rattle can.

For Future reference, Ospho, is a great product for addressing rust and preps surfaces, painted, rusty or clean metal, nicely to accept paint.
 
So with Ospho (which apparently is mostly phosphoric acid), you don't need to prime the surface at all, you can just paint over it? If so, maybe I will return the Rustoleum primer and black enamel spray paint and get the Ospho and topside yacht paint instead, even though it will come out a little more expensive than the rattlecans. I've already spent way too much time prepping these brackets as it is, I might as well go all the way. Plus these brackets will be out in the open permanently affixed to the roof so I would like to rustproof them as much as possible.
 
Not sure about skipping the primer, but basically you only have to remove loose rust, paint on the Oshpo twice, let it dry 24 hours, wipe off any white residue which might have risen during the drying stage and paint it.

Ospho is carried by Ace hardware. I ordered my rustoleum topside yacht enamel from Amazon

http://www.amazon.com/Rust-Oleum-206999-Marine-Topside-1-Quart/dp/B000BZTJT2.

I rolled mine onto my Van, and then smoothed it with a foam brush. A rattle can paint job would certainly look smoother.

The Topside paint is very hard when dried fully, Scratch resistant, and I can wax it so that it stays cleaner longer. The regular rustoluem would abrade when waxed with a marine polish.

Do note the 24 hours between recoating. It goes on thick and might dry to the touch in a few hours but refrain from applying that second coat prematurely.
 
Not terribly concerned about final textural look so I don't mind hand-painting them as opposed to spray. It's black paint anyway, and those brackets won't be very visible once the rack and panel are on top of them. Hardware store where I bought the Rustoleum carries the yacht stuff so that is an easy exchange, and hopefully I can find the Ospho locally at Ace. Thanks for the good info, will update when I get everything painted.
 
stern thanks for the tip on topside. I am going to look into this. highdesertranger
 
Finally got around to re-painting the Yakima brackets last week. This morning I set up the crossbars and panel on my van's roof to get a visual on what it will all look like when it is installed (not pictured are the Yakima Bolt Toploader brackets which will be permanently installed on the roof, or the U-bolts that I will use to attach the panel to the crossbars. Also, I will likely cut off a portion of each crossbar, as you can see they jut out pretty far on either side of the car. Though I suppose I could simply align them length wise instead.


What I like about this design is that I have the ability to freely remove and re-install the crossbars and panel at will. That is pretty much a requirement, I would rather not have the panel living permanently on the roof.

I have to say though, I am not too keen on the high profile of this setup. The racks + panel add a good 9" of height to the van. Do I need to be concerned about the security of the solar panel sitting way up there when pitted against wind resistance at highway speeds? As opposed to other builds that I have seen where the panel is basically flush against the flat roof of the vehicle.
 
I don't think you have to worry. Just make sure the panels are mounted securely to the crossbars, and they'll be fine on the highway. My panels are mounted in somewhat the same manner (mounted to two angle iron bars, on top of a Thule rack, which is mounted to a high top) and it's held up fine for several months.
 
You may get some noise from that setup but it should hold just fine.
 
The one thing I would give some thought to is since you don't have the factory sunroof but an aftermarket one that I'm assuming is removable, make another one out of a metal using the glass one as a template, install fans, run your wiring and so on via that and you can go back to stock quickly that way.

The rack looks good, panel looks good, high enough up to keep it from baking your roof.

Another thought would be more distance between the crossbars, fix some c channel one or both sides and make for easy slide in and out of the panel locked in place for security with something like a hitch pin lock or something. Just a thought and it would make things pretty easy and less wind drag I would assume.
 
Thanks y'all, that makes me feel better about moving forward. I am going to go ahead and mount the panel on top as pictured for now since it is simple and I have all of the parts I need.

TucsonAZ, that's an excellent suggestion about the sunroof, and one I have been pondering heavily for a while now. I am not very enthusastic about that sunroof; it is kind of cool I guess to be able to tilt it up on a nice day but mostly I never use it. In fact for the past few months I have kept a piece of reflectix taped over it because when you are driving under the hot sun all day it really heats up the van to the point of major discomfort. SternWake got me going on computer fans so a while back I found some very cheap large pieces of scrap acrylic from a sign shop and was playing around cutting it and mounting fans on it. It is notoriously brittle and cracks easily when cutting/drilling it if you are not careful. Anyway, rather than disassemble it completely, ideally I would like to somehow swap out that piece of glass with a piece of acrylic+fans and adapt it to the existing rubber molding and hinges that hold the glass in place. But if that is not possible I might just take the whole thing apart and build some sort of fan contraption with acrylic or with a piece of metal as you mentioned.
 

Attachments

  • sunroof-fans.jpg
    sunroof-fans.jpg
    99 KB · Views: 21

Latest posts

Top