Ford E450 Box Truck RV Conversion

Van Living Forum

Help Support Van Living Forum:

This site may earn a commission from merchant affiliate links, including eBay, Amazon, and others.
Wow, that roof is nothing short of a work of art. And you now get to enjoy the fruits well more like pains of your labor for years to come!
 
heh...that's 2 more months just on electric and plumbing...lot longer than that for cabinetry, flooring, etc. Thinking that 2017 Summer RTR might be reasonable for first big trip...
 
BradKW said:
Managed to get all the panels installed...the 3 big ones are the 975 watts for the 24v bank, and the two small ones are 200 watts for the 12v bank

The combination of size, weight, and low profile installation definitely created some challenges. All the panels needed to have their frames notched out at each bolt head, the bolts being what attaches the Z-brackets to the rack. If I didn't do this, the panels would have just rested only on the bolt heads, not seating down onto the rack. That was really a PITA.

But they are up, wired, and wires passed through to interior:
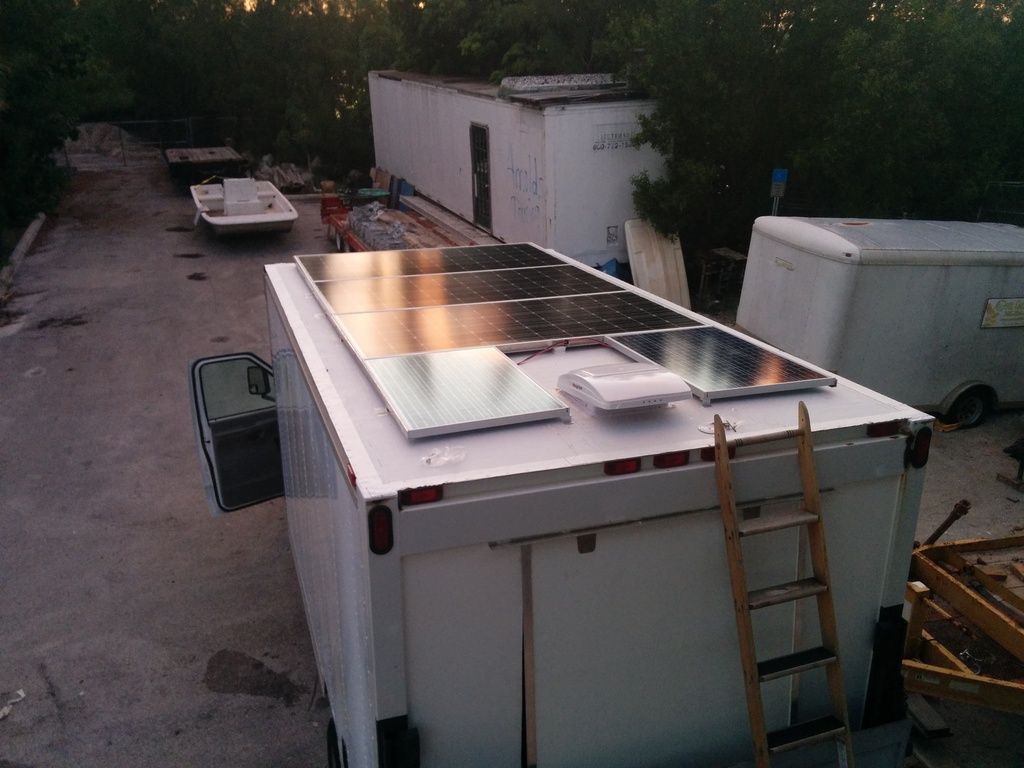
IMG_20160821_200257_zpskijuthwd.jpg

Just curious , what are you gonna power with all them solar panels ? desktop computer? Mig welder?
I ask because most stuff dont draw much juice these days.
Looks like your going to have alot of electric.
 
Been a bit since I updated this thread, partly because I br So-I-swallowed-a-b oke off the AC/'fridge/ductwork into another thread found here: So-I-swallowed-a-bird-to-catch-the-spider

I've also been slowly breaking out all the electrical components, reading instructions, etc etc...

[img=300x400]http://i465.photobucket.com/albums/...ads/IMG_20161106_121846_zpsprwtic4r.jpg[/img]

Getting the battery boxes made for below-box install took some time, but finally got them done... 1/4" diamond plate for $500 total:

[img=300x400]http://i465.photobucket.com/albums/...ads/IMG_20161125_141302_zpsodn9fyex.jpg[/img]

Cleaned them up to remove surface rust with rust remover, primed with Zinc, and finish coated with Marcropoxy...

[img=400x275]http://i465.photobucket.com/albums/...ads/IMG_20161127_100028_zps8atu1kty.jpg[/img]

Routered out floor so boxes set flush:

[img=275x400]http://i465.photobucket.com/albums/...ads/IMG_20161204_114551_zpsiunoeii6.jpg[/img]

Boxes measure 16 x 13 x 18" deep, holes drilled for ventilation:

[img=400x325]http://i465.photobucket.com/albums/...ads/IMG_20161203_101742_zpsuzbdskyq.jpg[/img]

[img=400x325]http://i465.photobucket.com/albums/...ads/IMG_20161203_111556_zpszyz05zq2.jpg[/img]
 
sweet,except for the $$$,any plans on an insulator? 1/4" rubber pad?
 
Yeah, I left enough space for about 1/2" gap between all walls. I think I'm going to use a dense workshop bench mat for the bottom, and then use some pour-foam into ziplocks to make custom spacers around the sides that shouldn't block airflow...
 
Got my primary wiring to/from batteries/CC/Inverter done. Decided to use pvc conduit because there's tons of it laying around. In hindsight, due to the difficulty of pulling 4 pieces of 1 awg through the conduit bends, I'd probably use carflex if had to do it again. Took a fair bit of cussing, but finally got it all mounted underside of box...

[img=275x400]http://i465.photobucket.com/albums/...ads/IMG_20161210_083418_zpsjhtfkmmm.jpg[/img]

Made some cables using 2/0 and my new crimper:

[img=200x300]http://i465.photobucket.com/albums/...ads/IMG_20161211_105001_zpshg3bdvhq.jpg[/img]

Got the batteries into boxes and cables on...next week I'll do the pour-foam spacers and hook up the wiring leads:

[img=300x400]http://i465.photobucket.com/albums/...ads/IMG_20161211_160559_zpsbctoglkz.jpg[/img]
 
Just looked through the whole thread, great job, very impressive.
 
First project this weekend was getting the batteries secured in their box so they don't move around. I decided to use Pour Foam because, well, it sounded like a neat idea. It's nasty stuff, you NEED a real respirator with fresh cartridges and gloves. You have maybe 30 seconds to mix A + B before it starts foaming, maybe another few seconds for a last "oh shit" adjustment, but after that it's either Git-R-Done or drop it in the grenade chute.

This is what I used and you see a couple experiments in bags there too:

[img=400x350]http://i465.photobucket.com/albums/...ads/IMG_20161217_141803_zpshzygho5k.jpg[/img]

This is 8# (8 pound) foam which is an indicator of how soft or rigid it is. I was initially going to use 2# or 4# but saw on another website the # rating up over 20...so I figured 8# seemed low. In reality, the cured product is very rigid...you could sand it. I'd probably try 2# if I were to do it again, but 8# did the job.

I poured it into ziplock baggies that were suspended, sometimes folded in half...air circulation will still be very good:

[img=500x400]http://i465.photobucket.com/albums/...ads/IMG_20161217_141722_zpsjdfbewuz.jpg[/img]

Trimmed it back in a couple places, then all done. Left a side free of foam that I'll shim tight...little shifting around and I can pop the foam bags out to remove batteries as needed:

[img=400x400]http://i465.photobucket.com/albums/...ads/IMG_20161217_143651_zpsbreunbki.jpg[/img]
 
Next was figuring out how to make a cover for batteries that doesn't allow gas inside, is easily removable, easy to secure, and flush with the finished floor. Don't mind saying that I walked away from figuring this out with a headache more than once over past few weeks. Here's what I came up with:

This is a scrap of StarBoard that's been kicking around forever...stuff is stupid-expensive and something else coulda worked. I liked it's strength and uniformity for a base plate that will hold the gasket and even out the irregularities on floor/boxes. I used a router to indent where foam gasket will go:

 [img=300x425]http://i465.photobucket.com/albums/...ads/IMG_20161218_152359_zps1lwcejqn.jpg[/img]
[img=300x425]http://i465.photobucket.com/albums/...ads/IMG_20161218_153737_zpseozhl3yp.jpg[/img]

[img=350x500]http://i465.photobucket.com/albums/...ads/IMG_20161218_153937_zpsgnhuxr94.jpg[/img]

I got two compression latches...they pull lid tight about 3/16, so getting the spacing right and the back lever secured took a lot of fiddling and bumblefkery:

[img=300x300]http://cdn3.volusion.com/bhwrf.xsszk/v/vspfiles/photos/M5-81-000-x-2.jpg?1427292869[/img]

Couldn't use backside mounting hardware due to spacing, so had to invent the repurposed joist hanger. 

[img=300x400]http://i465.photobucket.com/albums/...ads/IMG_20161218_160459_zpsb9yffhwe.jpg[/img]

Installed lid...the brown squares are just temporary spacers until flooring and such:

[img=325x500]http://i465.photobucket.com/albums/...ads/IMG_20161218_160725_zpsbmqi7ipr.jpg[/img]
 
Where's your propane tank going to be?
I was thinking that if you had one more box in your 
 floor exactly like your battery box you could fit a 
standard 20# propane tank in there , or you going with
one of those under vehichle mounted horizontal tanks?
 
Going to start out with a swappable 20# tank just sitting in back, but plan to do an underside horizontal tank in the future. They ain't cheap and it won't be a priority until I actually start traveling and working, and will want the storage space.
 
Brad just a tip, you are paying about 5 bucks a gallon for those swappable tanks. highdesertranger
 
Nice job on the thru floor battery mount.

I had thought of doing something similar, but I would have had to pump heat down in there as I'm in a fairly cold climate 6 months of the year.
 
You are going custom first class !
Nice looking job .
You should be proud of the finished rig!
 
Top