You are using an out of date browser. It may not display this or other websites correctly.
You should upgrade or use an alternative browser.
You should upgrade or use an alternative browser.
Cummins Canoe (A Stepvan Story)
- Thread starter PlethoraOfGuns
- Start date


Help Support Van Living Forum:
This site may earn a commission from merchant affiliate
links, including eBay, Amazon, and others.
PlethoraOfGuns
Well-known member
If I was younger I wouldn't have used the come along, I would have just tried to lift the whole thing up with my back!


PlethoraOfGuns
Well-known member
I had to order a bunch of parts. In the meantime, there is many odd projects to work on.
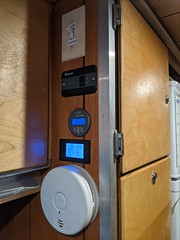
Installed this neat little 120v power monitor. Now I can accurately measure both 12v and 120v power usage.
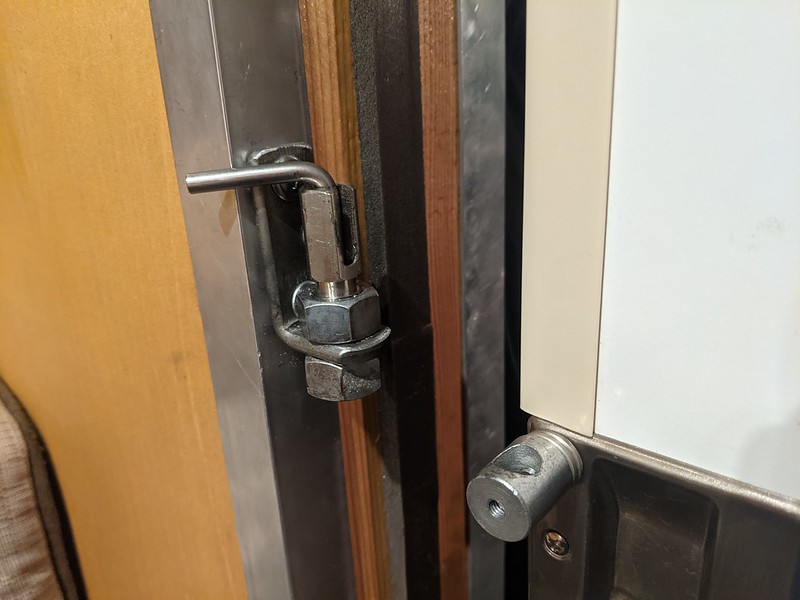
For like a year I have been toying with the idea of a lock for the pocket door into the cab. Needed something low profile and simple. Would have liked to lock it from both sides, but I had these parts laying around and made it work. Had some extra stainless steel spring powered locking pin things from the adjustable solar panel adjusters I had in my last rig. Made some brackets and screwed some things to other things and bam.
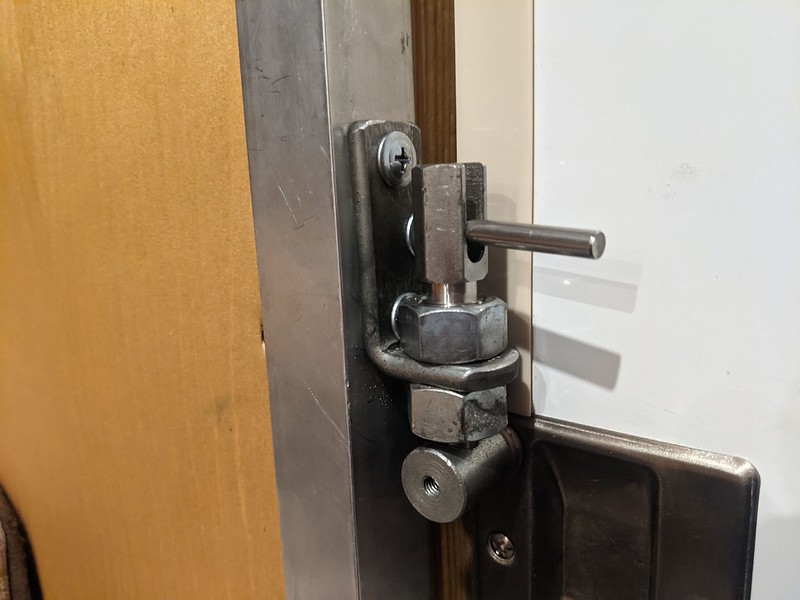
Close the door, slide the pin over and down into slot, locked door. Unfortunately, I can only lock it from the inside, and will have to go out the rear exterior door if I wanted the pocket door locked and completely leave the vehicle. It's minimal security, but it's better than nothing and now I can comfortable leave the cab doors open like when running the hot tub and no worries about riffraff going fully into my house randomly and who knows what else.
Installed this neat little 120v power monitor. Now I can accurately measure both 12v and 120v power usage.
For like a year I have been toying with the idea of a lock for the pocket door into the cab. Needed something low profile and simple. Would have liked to lock it from both sides, but I had these parts laying around and made it work. Had some extra stainless steel spring powered locking pin things from the adjustable solar panel adjusters I had in my last rig. Made some brackets and screwed some things to other things and bam.
Close the door, slide the pin over and down into slot, locked door. Unfortunately, I can only lock it from the inside, and will have to go out the rear exterior door if I wanted the pocket door locked and completely leave the vehicle. It's minimal security, but it's better than nothing and now I can comfortable leave the cab doors open like when running the hot tub and no worries about riffraff going fully into my house randomly and who knows what else.
I’ve been thinking about how to secure the van better. The front door is pretty easy to unlock and slide open. The back the latch or lever is bent and you really have to check if it catches. But I had the same snag of how to open from outside without making it easy for anyone else to figure out. We need like a Ironman or James Bond secret reveal system.
PlethoraOfGuns
Well-known member
Don't go crazy trying to make things secure. I think the best way to deter thieves is to make them think there is nothing of value to steal in the first place. Locks only keep honest people out...


$30.59
$40.00
The Van Conversion Bible: The Ultimate Guide to Converting a Campervan
Amazon.com


$17.00
$19.95
The Van Life Cookbook: Delicious Recipes, Simple Techniques and Easy Meal Prep for the Road Trip Lifestyle
Amazon.com


$36.16
$39.90
Van Build: A complete DIY guide to designing, converting and self-building your campervan or motorhome
Amazon.com


$33.65
$52.99
Augason Farms Freeze Dried Whole Blueberries Can, Emergency Food Supply, Everyday Meals, 26 Servings
Amazon.com


$19.97 ($2.00 / Ounce)
Harmony House Premium Vegetable Soup Mix - Dehydrated Vegetables for Cooking, Camping, Emergency Supply and More (9 oz, Quart Size Jar)
Harmony House Foods, Inc.


PlethoraOfGuns
Well-known member
Waiting on parts is the worst. Have some down time, so what better to do than chill in your mobile hot tub! But the worst part about the hot tub is the lack of accurate, automatic temperature control. Only way to control temperature while you're in the tub is to open the valve at the end of the inlet hose and allow the pump to circulate water, which takes heat from the boiler coolant loop, which has another temperature probe built in that turns the boiler on when it senses too low of a temperature. Boy, van life is rough, even during break downs...
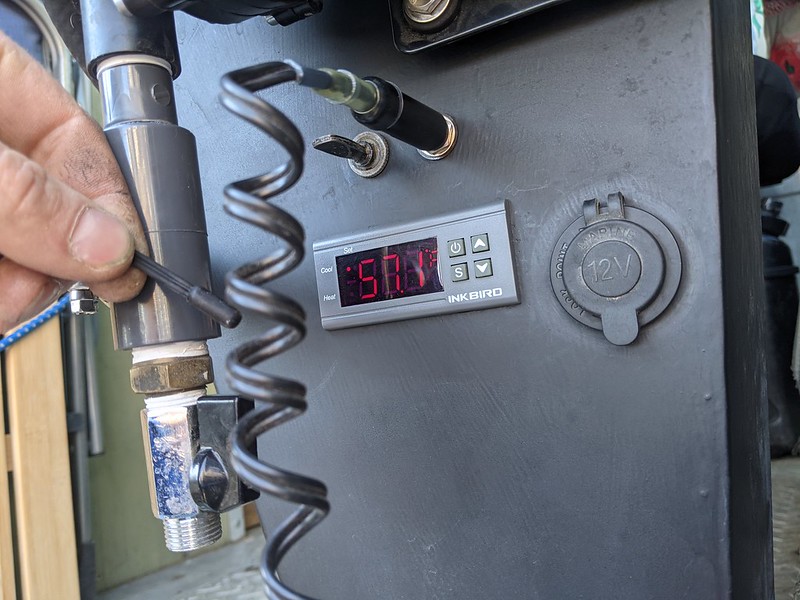
Brainstormed for a bit and came up with this semi simple solution. Got this 12v temperature control box and cut it into the passenger seat where all the other hot tub controls are. This box will operate a relay which activates the hot tub circulating pump. Throw the temperature probe into the hot tub water and the control box will turn on the pump automatically until the temperature probe senses the set temperature and then kicks the pump off. I have it set so the pump kicks back on when the temperature drops one degree below the set temperature. Made my own temperature probe cable plug out of a two wire 1/4" phono plug so it can be unplugged and stored with the other hot tub equipment when not in use.
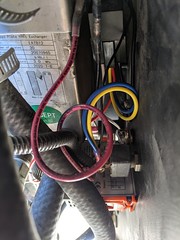
Here you can see the control box with the orange mounting clips and all the relay and plug stuff. It was all wired so the old toggle switch for the pump can still be used to activate the pump for things like pumping water to fill the onboard tank and such. With all this fancy equipment, the hot tub temperature can be set to 80 degrees during the day when not in use and then set to 102 or whatever people want it at when they go to use it. I'm using 80 degrees because on average the boiler takes about an hour to raise the hot tub water temperature 15 degrees. Come back from work or an adventure, set your favorite temperature, make dinner, clean up, and by then the hot tub will be perfect temperature, all by itself!
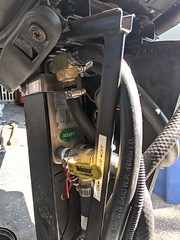
And for anyone wondering, this is the backside of control panel underneath the seat. You can get a good view of the heater exchanger for the hot tub. There is a bypass valve so you can turn the heat exchanger off when you don't need it to heat up the seat while you're driving or it's summer. Hmmm, yes, the van has heated seats! Kind of...
Brainstormed for a bit and came up with this semi simple solution. Got this 12v temperature control box and cut it into the passenger seat where all the other hot tub controls are. This box will operate a relay which activates the hot tub circulating pump. Throw the temperature probe into the hot tub water and the control box will turn on the pump automatically until the temperature probe senses the set temperature and then kicks the pump off. I have it set so the pump kicks back on when the temperature drops one degree below the set temperature. Made my own temperature probe cable plug out of a two wire 1/4" phono plug so it can be unplugged and stored with the other hot tub equipment when not in use.
Here you can see the control box with the orange mounting clips and all the relay and plug stuff. It was all wired so the old toggle switch for the pump can still be used to activate the pump for things like pumping water to fill the onboard tank and such. With all this fancy equipment, the hot tub temperature can be set to 80 degrees during the day when not in use and then set to 102 or whatever people want it at when they go to use it. I'm using 80 degrees because on average the boiler takes about an hour to raise the hot tub water temperature 15 degrees. Come back from work or an adventure, set your favorite temperature, make dinner, clean up, and by then the hot tub will be perfect temperature, all by itself!
And for anyone wondering, this is the backside of control panel underneath the seat. You can get a good view of the heater exchanger for the hot tub. There is a bypass valve so you can turn the heat exchanger off when you don't need it to heat up the seat while you're driving or it's summer. Hmmm, yes, the van has heated seats! Kind of...
PlethoraOfGuns
Well-known member
While the van is missing half the engine, might as well do some other stuff. Recently, the van has been listing to one side. During the build, care was taken to balance things out inside. But looking at the suspension, I think it's past due for replacement.
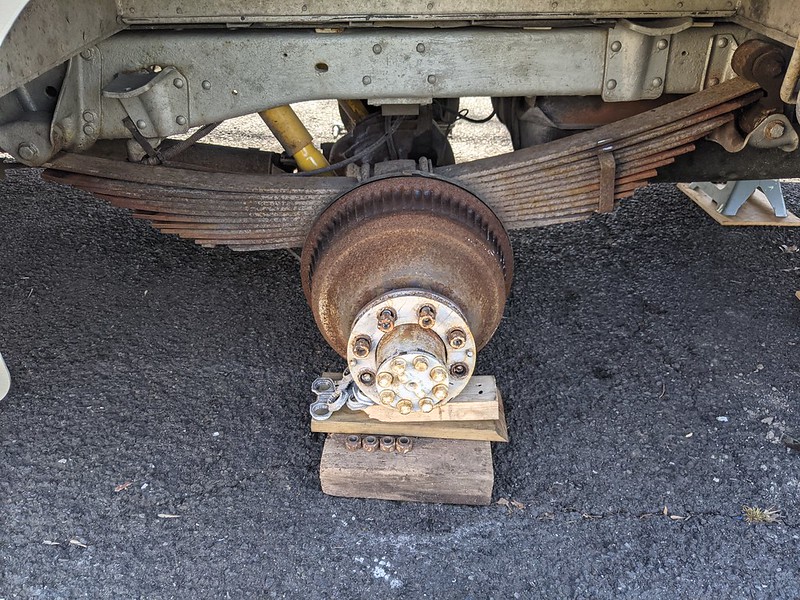
Almost half million miles and these are for sure done.
As things were taken apart, it seems to be worse than originally thought. Good thing you never reuse leaf spring u bolts! Cleaned these plates up and painted them. They were packed pretty good with dirt.
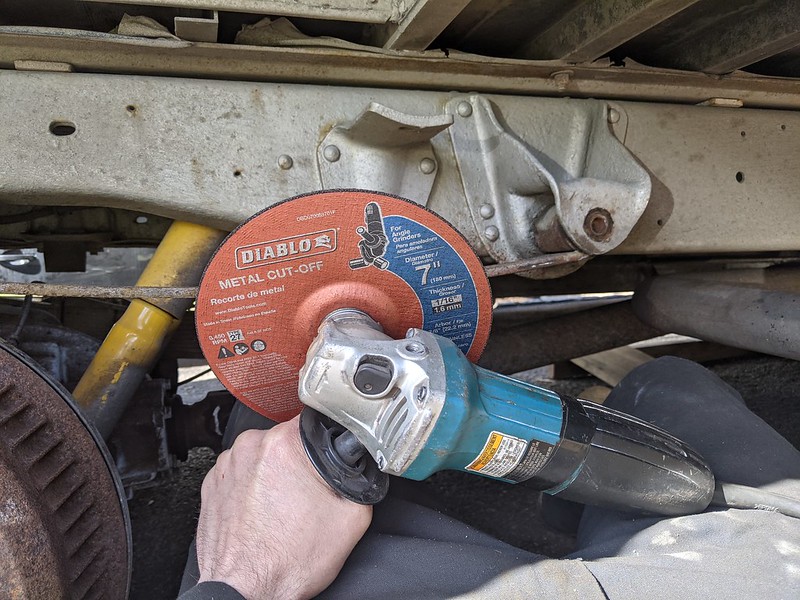
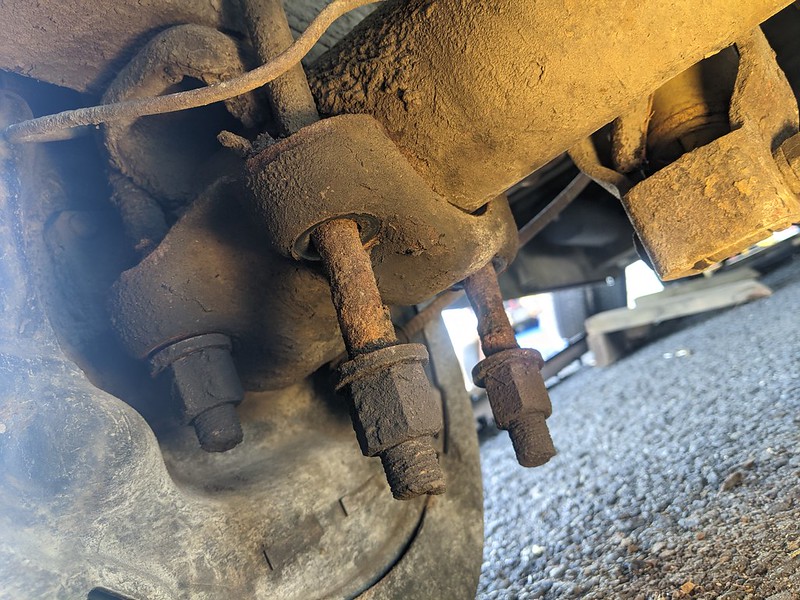
I'm well aware of the reasons women live longer than men. All the old bolts were stubborn. Sawzall could only do so much. Regular angle grinder discs wouldn't cut deep enough in between the leaf spring and hanger. But hey, this worked, and I made it out without a trip to the hospital! Only needed the torch for one nut that the sawzall or grinder couldn't get to.
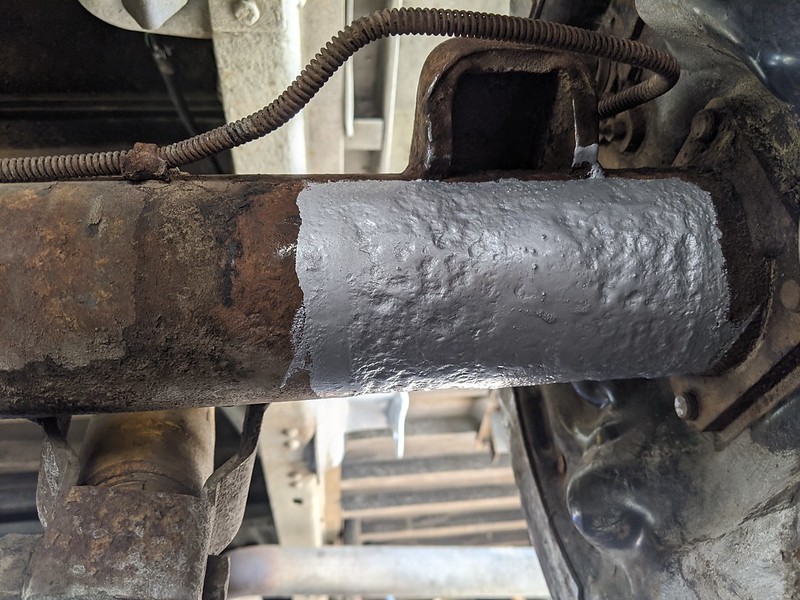
Underneath the axle, where the u bolt plate sits, was lots of rusty pitting. I'm assuming this will happen again down the road. Had some extra chassis paint from two years ago so through that on as extra protection. Also cleaned and painted the spots that I couldn't paint when the leaf springs were installed.
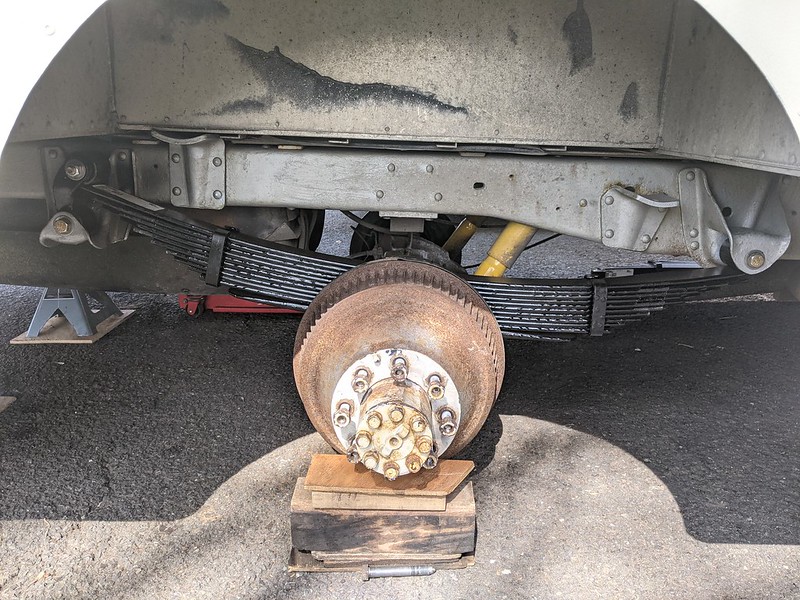
Good as new! All new bolts with lots of anti-seize. Torqued everything down, ready for tires, just need a functioning engine. These were very heavy and awkward. Lots of choice words were spent during this process. But it's done and one more thing that won't have to be done for many more years.
Almost half million miles and these are for sure done.
As things were taken apart, it seems to be worse than originally thought. Good thing you never reuse leaf spring u bolts! Cleaned these plates up and painted them. They were packed pretty good with dirt.
I'm well aware of the reasons women live longer than men. All the old bolts were stubborn. Sawzall could only do so much. Regular angle grinder discs wouldn't cut deep enough in between the leaf spring and hanger. But hey, this worked, and I made it out without a trip to the hospital! Only needed the torch for one nut that the sawzall or grinder couldn't get to.
Underneath the axle, where the u bolt plate sits, was lots of rusty pitting. I'm assuming this will happen again down the road. Had some extra chassis paint from two years ago so through that on as extra protection. Also cleaned and painted the spots that I couldn't paint when the leaf springs were installed.
Good as new! All new bolts with lots of anti-seize. Torqued everything down, ready for tires, just need a functioning engine. These were very heavy and awkward. Lots of choice words were spent during this process. But it's done and one more thing that won't have to be done for many more years.
The lower plates the U bolts pass through sometimes have a slight taper at the top of the hole to make it easier to assemble but almost Impossible to see. Road salt tends to collect there and corrode not only the bolt thin but "welds" the nut to the plate. When doing school bus safety inspections most people check the nut/u bolt by checking the torque with a torque wrench. Watched a school bus that had just been inspected returning to the ready line loose the rear axle at highway speeds. Fortunately the mechanic/driver was not hurt badly. Upon inspection of the lower plate the nut and exposed u bolt end were still solidly attached even though the u bolt had broken even with the top of the plate. U bolts are now replaced on a time in service schedule in that school district! I wonder how many converted school buses continue to get them replaced?
Last edited:
PlethoraOfGuns
Well-known member
Oh geez, that's scary! And you would never know if they are bad unless you took it apart or they failed. Skoolies are driven hard. I'd guess most people who convert them don't do much in the way of mechanical maintenance and fixing. Those bodies are steel and love to have lots of hidden rust.
PlethoraOfGuns
Well-known member
Yay, parts! It's like Christmas, except Santa stole all my money and then gave me something nice that I needed.
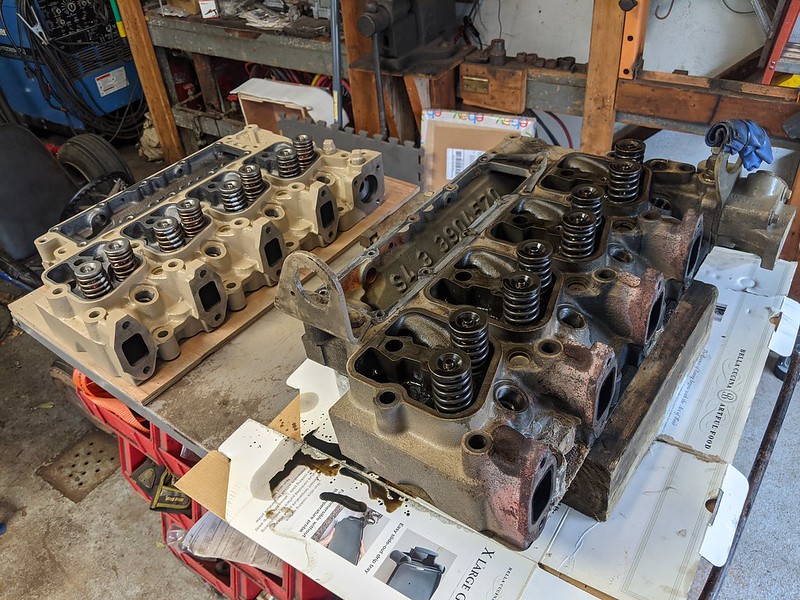
New cylinder head came in. A little bit of touch up paint, swapping some parts over, and in she goes! Out with the old, in with the new!
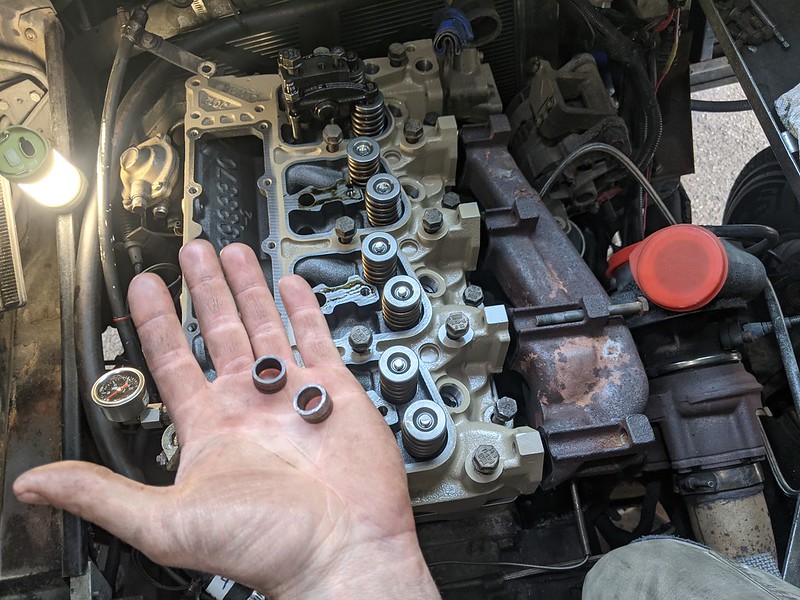
So, got the new cylinder head installed. Started bolting things down, was grabbing fasteners from the pile and noticed these alignment pins, that are kinda probably maybe supposed to go under the cylinder head. I don't really need those right? There are clearly more than enough cylinder head bolts. That cylinder head is heavy!
New cylinder head came in. A little bit of touch up paint, swapping some parts over, and in she goes! Out with the old, in with the new!
So, got the new cylinder head installed. Started bolting things down, was grabbing fasteners from the pile and noticed these alignment pins, that are kinda probably maybe supposed to go under the cylinder head. I don't really need those right? There are clearly more than enough cylinder head bolts. That cylinder head is heavy!
Those also align the head gasket on most engines. I’d be taking it back off and you will need a new head gasket as well. The reason you will have such good results is because you did it twice! Practice makes perfect! Lol!!! I say whoa horse! Whoa horse! Slow down! Take your time and do it once and do it right. You will do a lot of damage if the gasket didn’t align right and you didn’t catch it.
mudbunny
Well-known member
- Joined
- Mar 4, 2016
- Messages
- 148
- Reaction score
- 13
I vote, backtrack. They keep your head and gasket aligned. The bolts just keep the head clamped down to the block. Better to find it now than later. Not like some of us haven't had to do it in the past. Not sure about the gasket. If you tightened bolts, replace it. If you didn't, you should be ok.
Last edited:
PlethoraOfGuns
Well-known member
Hmmm, put in my pocket for a rainy day, or backtrack a few hours and spend more money. Decisions decisions... Lol
Spend less money now and do the work while you still remember where things are or later spend more money possibly checking for damage done due to a leaking head gasket especially with a diesel's high compression metal can erode quickly as in deck the block, plane the head and buy expensive spacers/ thicker head gaskets and wonder if coolant in the oil damaged anything. Feeling lucky? One of my favorite movie lines! Lol!!! Good judgment comes from experience and experience comes from bad judgment. Mechanics is not a cheap skill to learn through experience but is how most people learn best.
mudbunny
Well-known member
- Joined
- Mar 4, 2016
- Messages
- 148
- Reaction score
- 13
I'm with Bullfrog. Just seems easier to do it now than out in BFE along side the road with a long walk for parts.
Last edited:
AmargosaWayne
Well-known member
- Joined
- Dec 22, 2021
- Messages
- 206
- Reaction score
- 129
I just had the same situation with replacing the front brake pads on my Suzuki DR200S. A dust cap on the piston kept falling out as I was reassembling the caliper. Thought I had it all together and there's the dust cap in my magnetic dish. I decided to deal with the next day.
Similar threads
- Replies
- 12
- Views
- 3K