You are using an out of date browser. It may not display this or other websites correctly.
You should upgrade or use an alternative browser.
You should upgrade or use an alternative browser.
Cummins Canoe (A Stepvan Story)
- Thread starter PlethoraOfGuns
- Start date


Help Support Van Living Forum:
This site may earn a commission from merchant affiliate
links, including eBay, Amazon, and others.
PlethoraOfGuns
Well-known member
Finished the diesel boiler heating system and It all works great! After lots of tinkering and design changes of course.
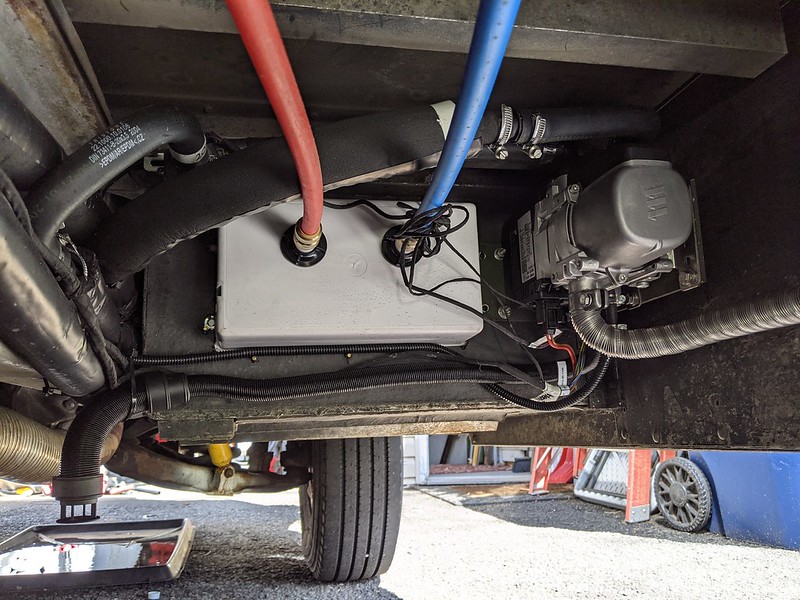
Boiler all wired and plumbed. Air intake is black tube on the left. Exhaust is silver tube on the right. It all looks very messy right now, but we'll get to that.
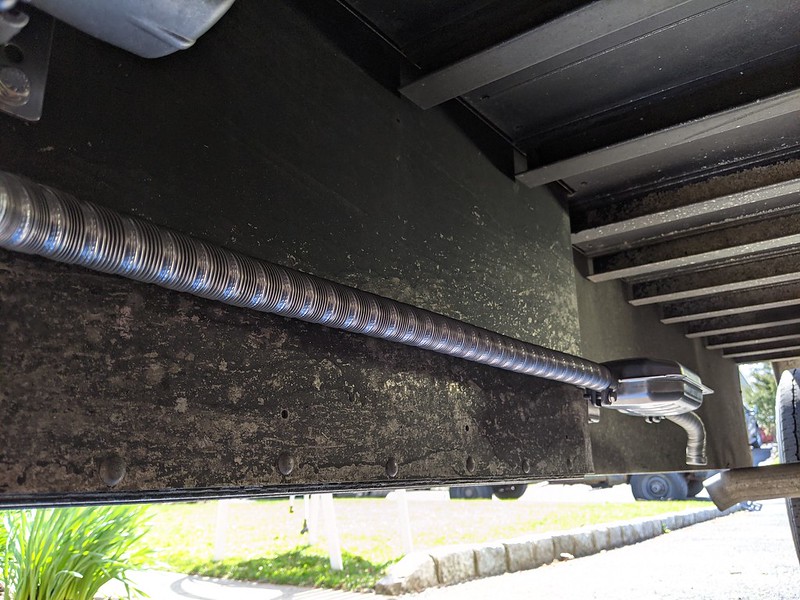
Used up all the exhaust pipe that came with the heater to get it back and away from the side door and shower as possible. It comes out close to the engine exhaust. I read that some people aim their exhaust at their oil pans. Seems like a great idea if I were to mount the unit in front by engine. But I found this spot was much better location, and the exhaust pipe wouldn't reach the engine, so oh well.
Used up all the exhaust pipe that came with the heater to get it back and away from the side door and shower as possible. It comes out close to the engine exhaust. I read that some people aim their exhaust at their oil pans. Seems like a great idea if I were to mount the unit in front by engine. But I found this spot was much better location, and the exhaust pipe wouldn't reach the engine, so oh well.
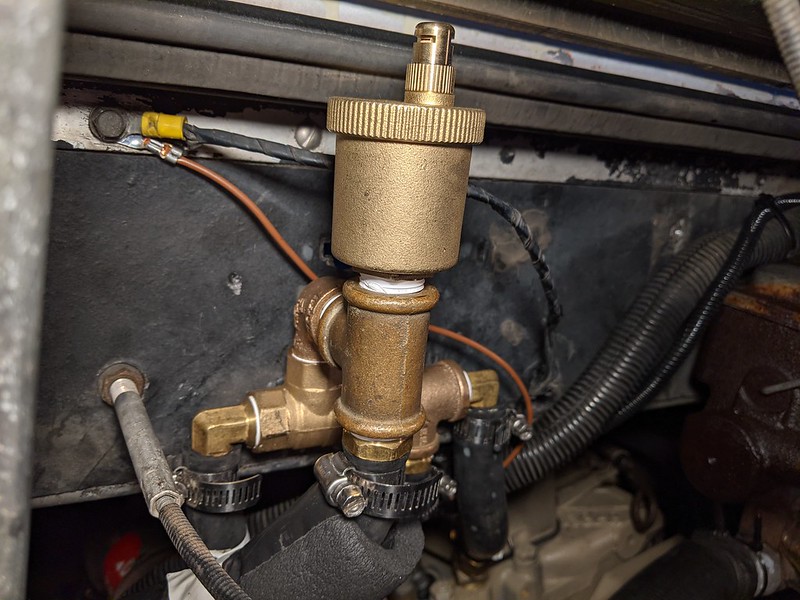
We also had to move the check valve onto the engine block where the old coolant line to the stock heater core was originally located on the water pump housing.
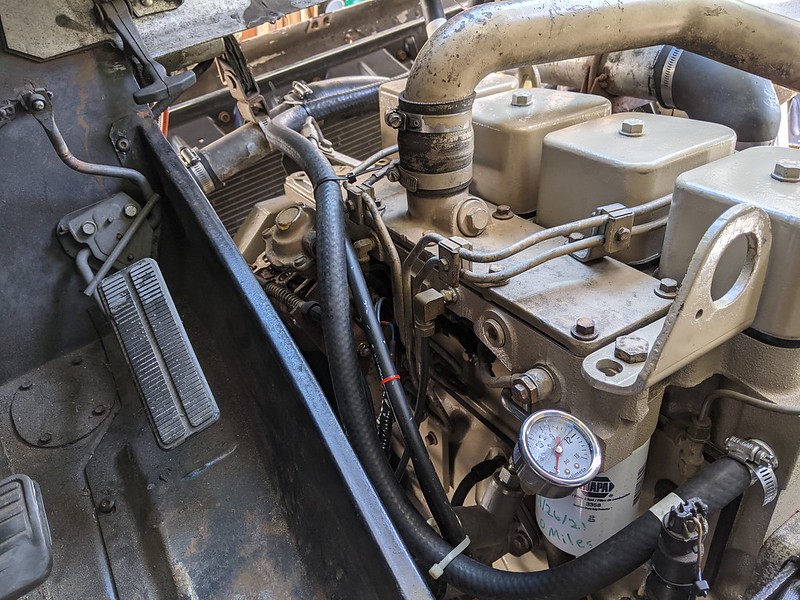
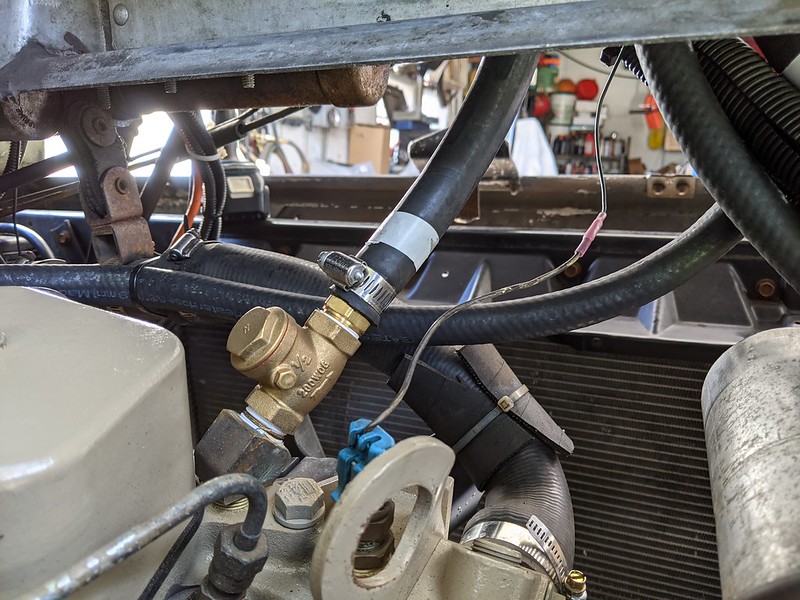
And moved engine coolant feed from the boiler to the back of the engine block. Now, the hot coolant from the boiler will need to travel through the cylinder head, down into the water jacket around the cylinders, and then back out the bottom front of the engine where the pickup hose is located that the circulation pump takes coolant from. All that hurt my brain thinking about it. But it works well, so I can stop thinking about it.

[size=small]Anywho, back to the boiler itself. The Eberspacher units are very well made. The control board and all the electrical connections are waterproofed so they can be mounted outside. But this thing was about the most expensive component to the build, and we mounted it down in the gutter! Where it is is mounted it is kind of protected by the front passenger step well, but no way were we taking chances letting it sit down there unprotected all the way. Had some scrap aluminum sheet laying around from when we did the initial demo of the van interior. Cut that up and bent some stuff.[/size]
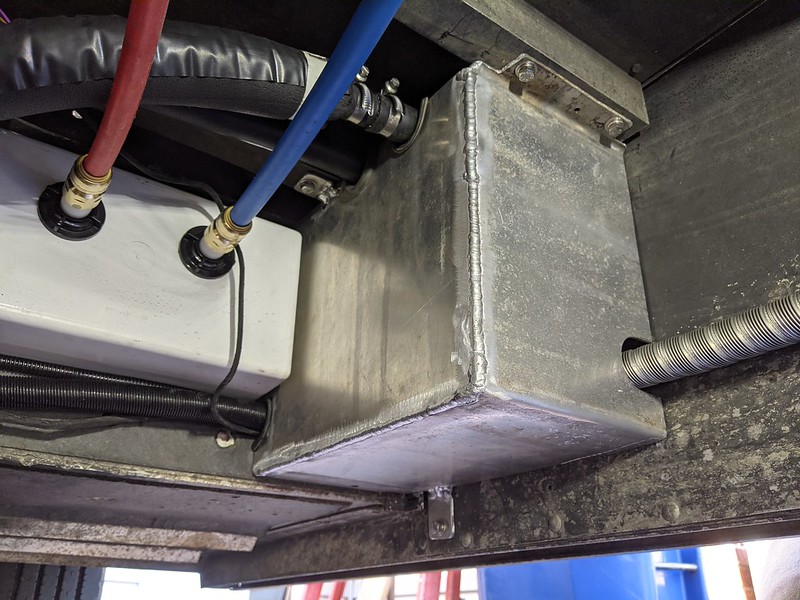
Welded the seams and bam, got a nice little protection box for the boiler. We put rubber protectors on for around all the stuff going in and out of box to protect from edges. Need something for around the exhaust pipe so it doesn't vibrate, that won't melt. Any suggestions?
Boiler all wired and plumbed. Air intake is black tube on the left. Exhaust is silver tube on the right. It all looks very messy right now, but we'll get to that.
Used up all the exhaust pipe that came with the heater to get it back and away from the side door and shower as possible. It comes out close to the engine exhaust. I read that some people aim their exhaust at their oil pans. Seems like a great idea if I were to mount the unit in front by engine. But I found this spot was much better location, and the exhaust pipe wouldn't reach the engine, so oh well.
Used up all the exhaust pipe that came with the heater to get it back and away from the side door and shower as possible. It comes out close to the engine exhaust. I read that some people aim their exhaust at their oil pans. Seems like a great idea if I were to mount the unit in front by engine. But I found this spot was much better location, and the exhaust pipe wouldn't reach the engine, so oh well.
We also had to move the check valve onto the engine block where the old coolant line to the stock heater core was originally located on the water pump housing.
And moved engine coolant feed from the boiler to the back of the engine block. Now, the hot coolant from the boiler will need to travel through the cylinder head, down into the water jacket around the cylinders, and then back out the bottom front of the engine where the pickup hose is located that the circulation pump takes coolant from. All that hurt my brain thinking about it. But it works well, so I can stop thinking about it.
[size=small]Anywho, back to the boiler itself. The Eberspacher units are very well made. The control board and all the electrical connections are waterproofed so they can be mounted outside. But this thing was about the most expensive component to the build, and we mounted it down in the gutter! Where it is is mounted it is kind of protected by the front passenger step well, but no way were we taking chances letting it sit down there unprotected all the way. Had some scrap aluminum sheet laying around from when we did the initial demo of the van interior. Cut that up and bent some stuff.[/size]
Welded the seams and bam, got a nice little protection box for the boiler. We put rubber protectors on for around all the stuff going in and out of box to protect from edges. Need something for around the exhaust pipe so it doesn't vibrate, that won't melt. Any suggestions?
highdesertranger
R.I.P HDR
- Joined
- Apr 4, 2012
- Messages
- 22,892
- Reaction score
- 92
Nice work. question are you concerned at all about bugs crawling up the intake or exhaust and building a nest. Mud dabbers are famous for this.
Highdesertranger
Highdesertranger
PlethoraOfGuns
Well-known member
Oh no, not mud dabbers! Hmmm, good point. Getting the intake clogged up like that would render it useless, and I might not ever figure out why. Now that you mention it, I am concerned! I guess a simple wrap with some old bug screen and some cable ties will do the trick? But then I'd be worried about the screen getting clogged up by mud and stuff.
mudbunny
Well-known member
- Joined
- Mar 4, 2016
- Messages
- 148
- Reaction score
- 13
Try an ell bracket screwed to the box and hose clamp to hold the exhaust to it. Bend a short tab on the end of the bracket to keep the hose clamp from coming off as you probably can't cinch it down real tight. Metal bug screen where needed too.
Sent from my SM-T560NU using Tapatalk
Sent from my SM-T560NU using Tapatalk
PlethoraOfGuns
Well-known member
Good ideas. That tab to keep hose clamp on would be crucial. The exhaust pipe pretty thin stainless steel.


$19.97 ($2.00 / Ounce)
Harmony House Premium Vegetable Soup Mix - Dehydrated Vegetables for Cooking, Camping, Emergency Supply and More (9 oz, Quart Size Jar)
Harmony House Foods, Inc.


$36.16
$39.90
Van Build: A complete DIY guide to designing, converting and self-building your campervan or motorhome
Amazon.com


$30.59
$40.00
The Van Conversion Bible: The Ultimate Guide to Converting a Campervan
Amazon.com

highdesertranger
R.I.P HDR
- Joined
- Apr 4, 2012
- Messages
- 22,892
- Reaction score
- 92
Yeah I shot an email off to my supplier. When I hear back I post up the reply. Highdesertranger
PlethoraOfGuns
Well-known member
Hmmm, maybe, but highly unlikely. It's a pretty small check valve, only 1/2" NPT. Brass plumbing fittings and such have always been used in automotive applications. It's mostly copper and zinc, which ends up to be pretty vibration resistant. I wouldn't worry about it. It's also literally the only place to put that thing. All that drove me crazy trying to figure out!
Vannautical engineer
Well-known member
- Joined
- Feb 5, 2021
- Messages
- 155
- Reaction score
- 16
You could also wrap the exhaust pipe in several layers of header wrap to kind of wedge it into the hole that it goes through in the protection box. The fabric-y nature of the header wrap might also dampen vibrations and transmit less noise than solidly mounting it.
Also I know for my Webasto heater they say to always keep the exhaust pipe sloping downwards to help any condensation drain. Looks like you've got a pretty long horizontal run. Is it possible that could trap condensation in the pipe? If so, would drilling some small holes help? I think that's what Webasto recommends if the exhaust cannot be routed with a downward slope for the whole length.
Also I know for my Webasto heater they say to always keep the exhaust pipe sloping downwards to help any condensation drain. Looks like you've got a pretty long horizontal run. Is it possible that could trap condensation in the pipe? If so, would drilling some small holes help? I think that's what Webasto recommends if the exhaust cannot be routed with a downward slope for the whole length.
PlethoraOfGuns
Well-known member
Yea, a lot of people are saying header pipe wrap. I think we'll go that route. The pipe is at the minimum, flat, maybe slightly pitched down. The way I figure it, car exhausts almost never pitch down all the way, at some point they have to get up over something. And this exhaust is all stainless steel, so how big of a deal is pitch? I'm sure it's fine as long as water can't pool inside of it.
Vannautical engineer
Well-known member
- Joined
- Feb 5, 2021
- Messages
- 155
- Reaction score
- 16
I don't think corrosion is the issue. I mean, it definitely isn't with a stainless pipe. I think the issue is the potential for condensation to build up to a degree where it impedes flow through the pipe.
Anything that impedes airflow in or out of the boiler could lead to a rich burn, which could lead to carbon buildup. And it's true that car exhausts don't follow a nice even pitch downwards, but I also suspect that a car engine is pushing out exhaust with a lot greater pressure than this boiler, with a much larger pipe, and possibly more heat to evaporate out any condensation buildup.
At the end of the day, I would look at what the manual for the boiler suggests for exhaust routing. If it doesn't have any of the requirements of the Webasto like making sure it has a downward pitch, then whatever. But if it does, I wouldn't disregard them. Whoever engineered the system got the installation manual authors to put it in the manual for a reason.
That said, you might get away with it, who knows. At least your exhaust isn't sloping up at any point.
PlethoraOfGuns
Well-known member
The Website and Eberspacher are basically the same units. I would assume what works for one, works for the other. I might just lower the muffler like an inch and give her some more slope. I just want to keep all that stuff above the lowest part of the body.
PlethoraOfGuns
Well-known member
Some odds and ends. Really anything to get us away from that boiler system. I'm still getting headaches from that monstrosity.
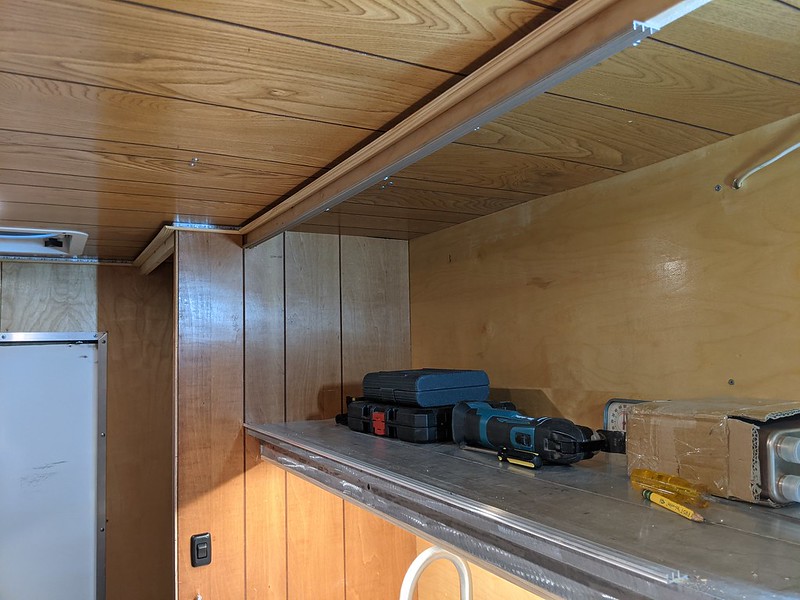
[size=small]Had these very old aluminum sliding door tracks laying around. We have lots of extra wood paneling from when we did the ceiling and stuff. So we figure we can save a lot of weight by not building heavy cabinet doors and framing and using lightweight sliding doors instead.[/size]
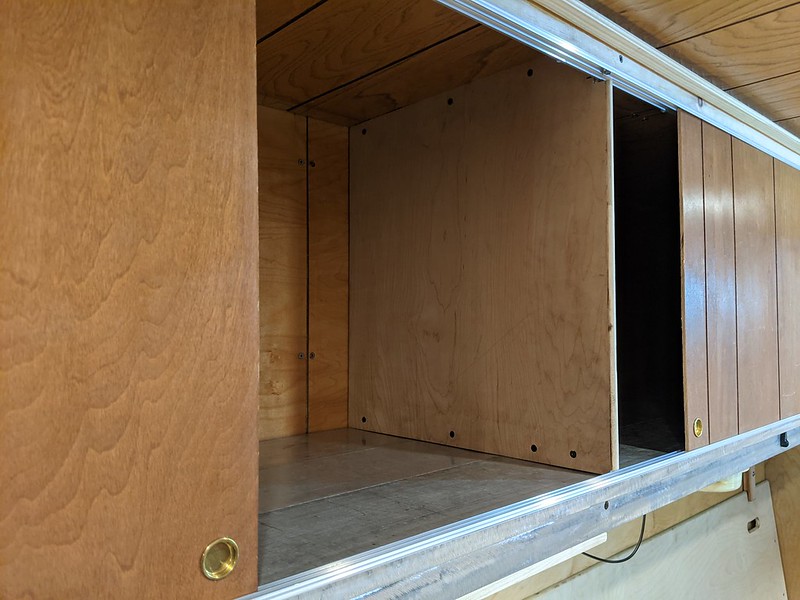
[size=small]Installed a divider in the middle of upper cabinet, so both sections are about 6'. One side will be perfect size for sleeping bags, pads, and other bedding stuff. The other side, who knows. We'll get to figuring out organization for that later.[/size]
[size=small]Installed the old ceiling light that was in the rear area of van when we bought it. It's a very bright LED light, but the outside mounting frame was all cracked and such. So we had to cut all that off, take it all apart to rewire it and make mounting holes in it.[/size]
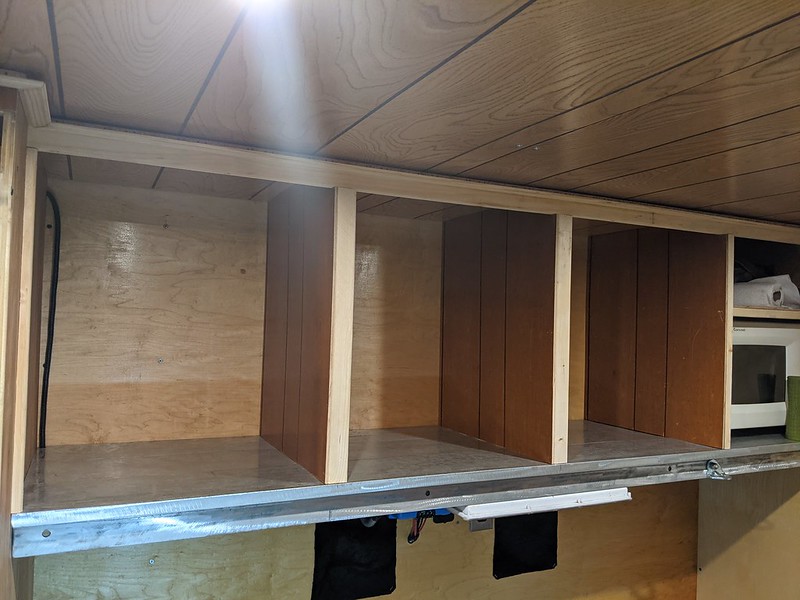
[size=small]Building some cabinet spaces above the dinette area.[/size]
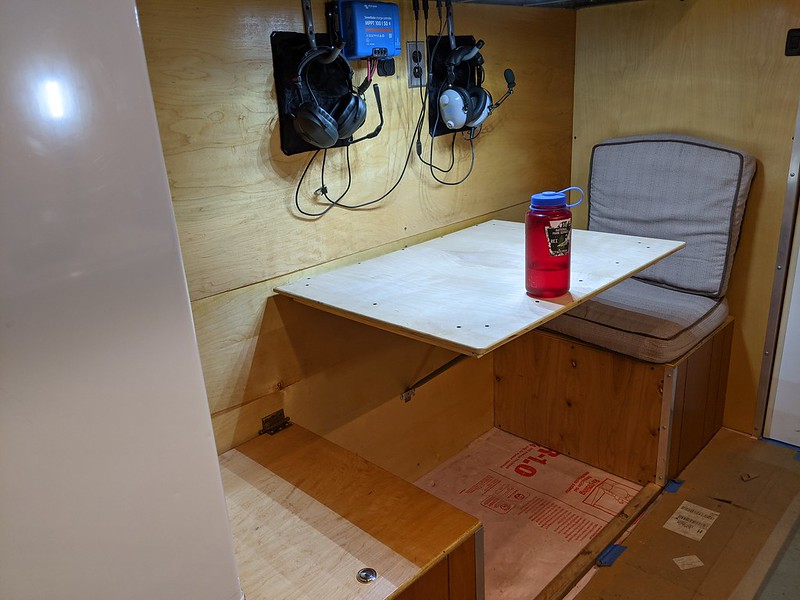
[size=small]And built a table! Future project is to make this table come off and down to seats, so we can have a one person bed there. It's a very simple attaching and detaching method.[/size]
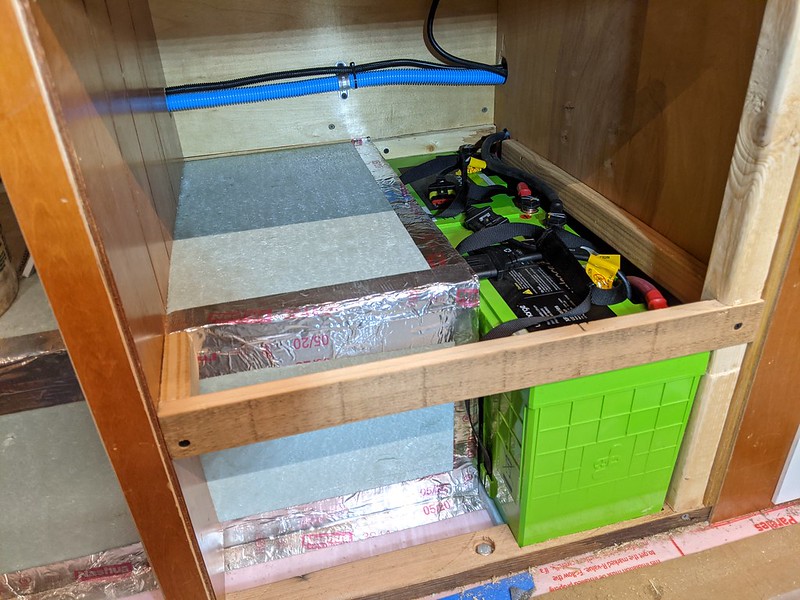
[size=small]Onwards with the cabinet train. Built hold down brackets for the house batteries. We'll get some panel board and utilize the space above the batteries for storage.[/size]
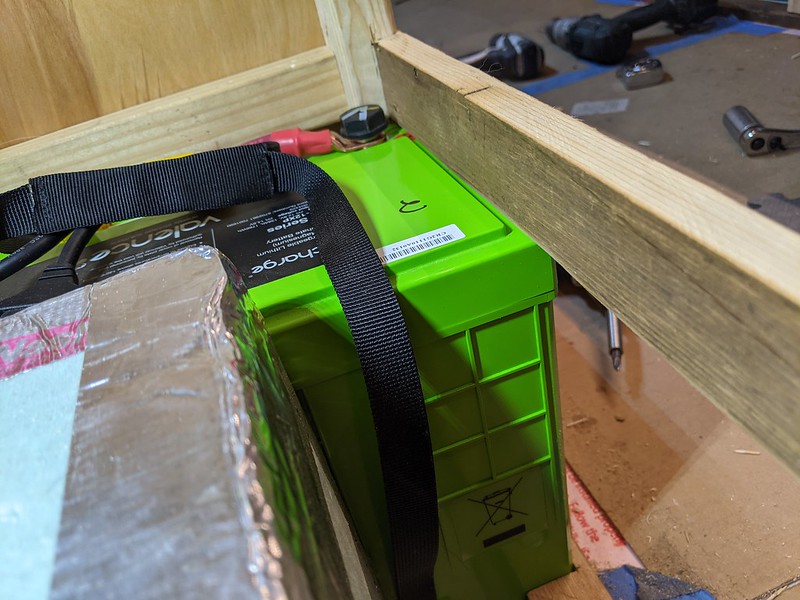
[size=small]Nice and secure brackets, which double as support for shelf.[/size]
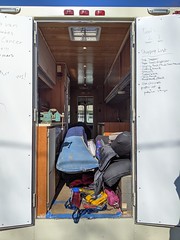
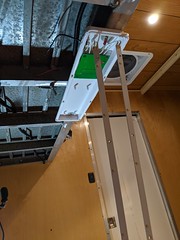
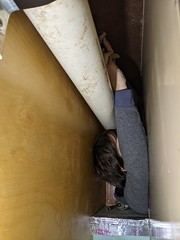
[size=small]Needed a break and went canoeing. Can just fit a canoe in there. Who else can fit a whole canoe completely inside their van?[/size]
[size=small]Only problem is that one can't shift into 4th, 5th, or reverse with canoe in there. :s [/size]
[size=small]Had these very old aluminum sliding door tracks laying around. We have lots of extra wood paneling from when we did the ceiling and stuff. So we figure we can save a lot of weight by not building heavy cabinet doors and framing and using lightweight sliding doors instead.[/size]
[size=small]Installed a divider in the middle of upper cabinet, so both sections are about 6'. One side will be perfect size for sleeping bags, pads, and other bedding stuff. The other side, who knows. We'll get to figuring out organization for that later.[/size]
[size=small]Installed the old ceiling light that was in the rear area of van when we bought it. It's a very bright LED light, but the outside mounting frame was all cracked and such. So we had to cut all that off, take it all apart to rewire it and make mounting holes in it.[/size]
[size=small]Building some cabinet spaces above the dinette area.[/size]
[size=small]And built a table! Future project is to make this table come off and down to seats, so we can have a one person bed there. It's a very simple attaching and detaching method.[/size]
[size=small]Onwards with the cabinet train. Built hold down brackets for the house batteries. We'll get some panel board and utilize the space above the batteries for storage.[/size]
[size=small]Nice and secure brackets, which double as support for shelf.[/size]
[size=small]Needed a break and went canoeing. Can just fit a canoe in there. Who else can fit a whole canoe completely inside their van?[/size]
[size=small]Only problem is that one can't shift into 4th, 5th, or reverse with canoe in there. :s [/size]
PlethoraOfGuns
Well-known member
Got bored, made an upgrade thanks to certain peoples suggestions. Also would like to point out the fact the the canoe in the last post was built by Grumman Aircraft Corp, and it was inside a van built by Grumman Olson! Grumman in a Grumman!
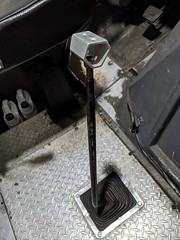
[size=small]Now the shifter is super custom! Rock climbers will appreciate this.[/size]
[size=small]Also went to many parts stores for hard to find parts. No luck though...[/size]
[size=small]Getting desperate trying to locate the inner driver side plastic fender well wheel guard thing for the van. Only came with the passenger one and I'd really like to have the driver side in there.[/size]
PlethoraOfGuns
Well-known member
Definetely don't want nice going in and making a nest in that box...
PlethoraOfGuns
Well-known member
It's getting warm out. Need to get the fridge some proper ventilation. This will be controversial. I have second thoughts about it. Looked at the problems and solutions from many angles, this is just what was done and we're rolling with it.
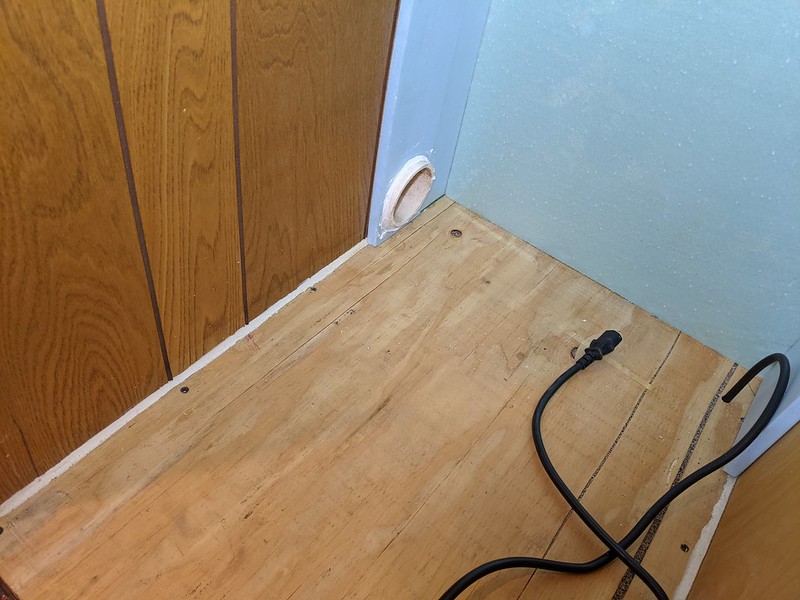
[size=small]Cut a giant hole in the floor, behind the drivers side rear mud flap. This bulkhead fitting needed a full 6.5" of clearance! Had just enough space between the structural beam supports in the aluminum floor.[/size]
[size=small]Removed the toolbox, bench vise, and workbench to fit this pipe in up under there. My biggest gripe was all the storage space that this would screw up. Now, behind this cabinet we'll will have to put soft gear that almost never will be needed. Maybe a tarp, or winter mechanic jumpsuit? Original plan was to cut in a rv fridge access door into the side of van, but didn't want to lose any more stealthiness. And couldn't go straight down with pipe under fridge because the house batteries were there. And couldn't go down any sooner because the pipe would come out in the wheel well.[/size]
[size=small]It was a pain in the giraffes ass working around pipe to reinstall all the stuff we removed in order to install the pipe. Not happy with any of this, but I haven't thought of anything else better other than having a vent out the side of the van. At the point when we realized we'd have exterior air running inside the van like this all the time, it sank in that now we had to insulate this stupid pipe! All that work trying to get this pvc pipe to fit because that's what we had laying around and we should have just went to the store and got flexible insulated duct![/size]
[size=small]And of course removed the fridge. When we originally installed fridge, we installed a vent in the side of the van into the very upper portion of the air space behind the fridge. Now we have a lower vent, which is taking cool air from under van, up past refrigeration coils, and out the upper vent. Not sure if there should be a small 12vdc computer van at the end of this pipe further pushing air, but we can totally do that easily.[/size]
PlethoraOfGuns
Well-known member
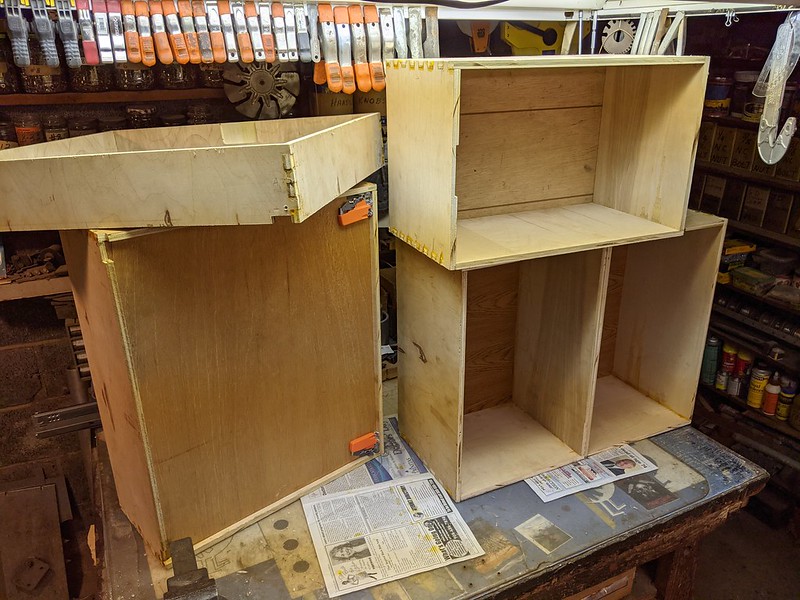
Spent the last few days building cabinet drawers. Some drawer slides were donated to us, so we're going to build around those. They are professional cabinet builder grade hidden drawer slides. Not what I wanted to work with, as they just upped the skill level and time to build these drawers, but it's saving us money and we'll have some pretty awesome drawers.
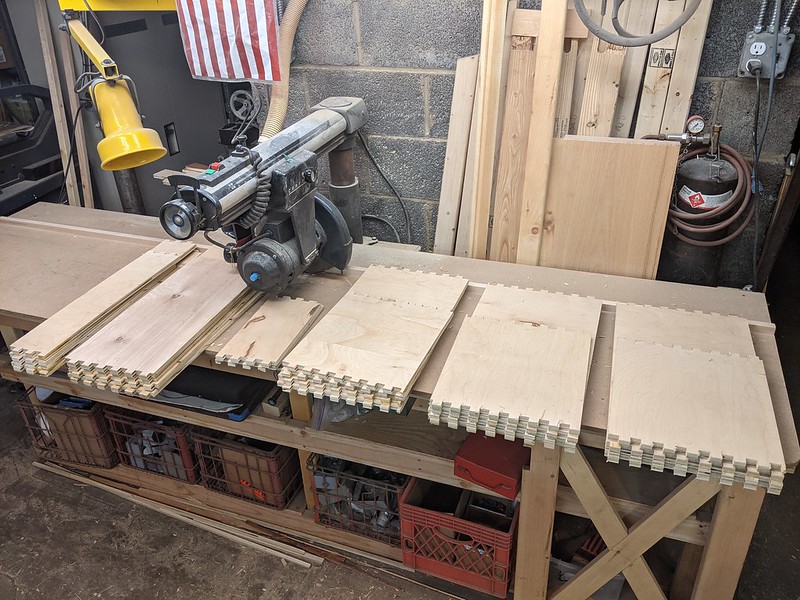
[size=small]All this plywood was leftovers from when we did the van interior many months ago. Thank goodness we kept all those scraps. No way could we afford the lumber prices now with the market what it is! Lots of measuring and planning ahead and this is the best we came up with. Usually drawers are made of solid 0.75" wood, but this is what we got and it will be lighter. Ran these boards through the router on a simple jig. Took many hours, mostly trial and error. It's my first time attempting joints like this.[/size]
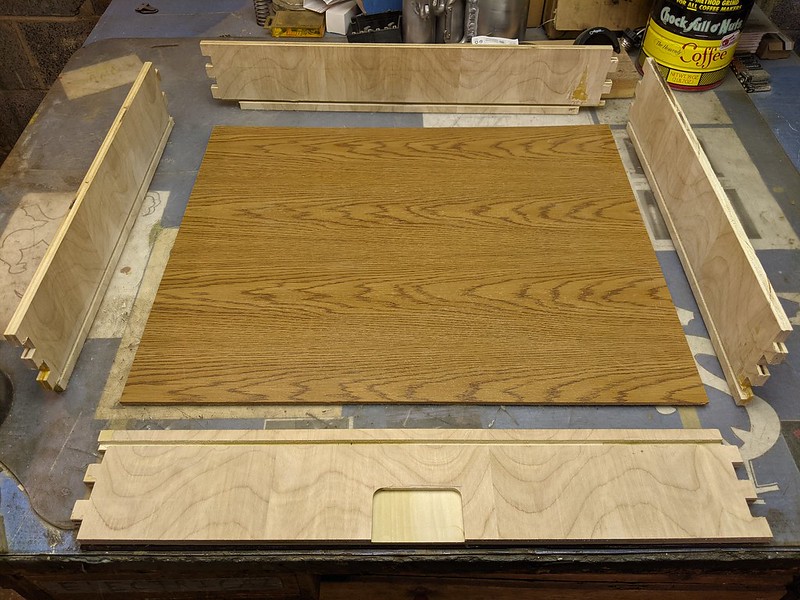
[size=small]So this is the plan we came up with. Figured these simple joints will hold the corners very strong. A groove in the bottom of each side will hold the bottom panel in place. The drawer slides will be mounted under the bottom panel. The lowered relief in the one panel at the bottom is clearance for the push button latch. They are made for 0.75" panels, and since we already have 0.5" here and adding an additional 0.5" front panel later, we had to router out 0.25" so the wood wouldn't be so thick.[/size]
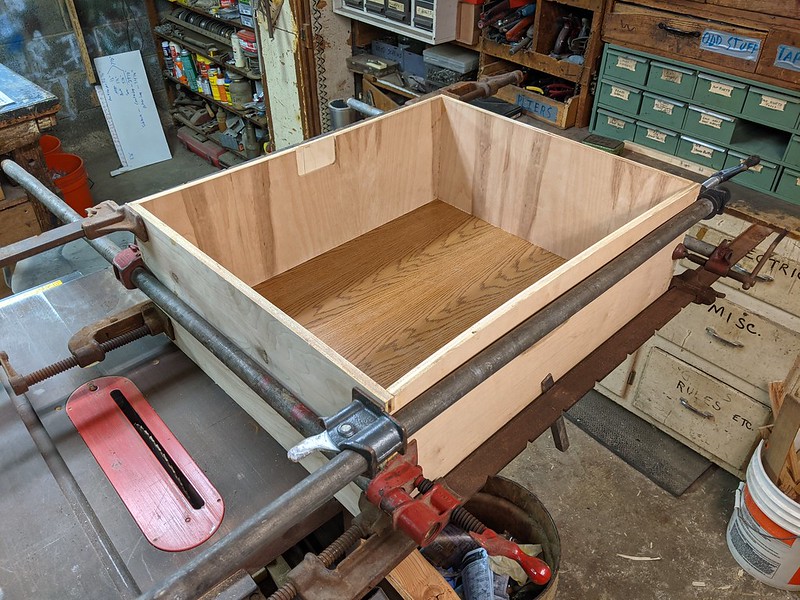
[size=small]Lots of clamps, but didn't have enough. Barely had enough to glue one at a time. No metal fasteners holding these together, all glued joints.[/size]
[size=small]Took several days to get all these done. Under the one drawer you can see the orange handled retainer clips that attach to the drawer slides.[/size]

[size=small]Some sanding and they don't look so bad! Running plywood through the router in the orientation we did was scary. Lots of risk of the ply blowing out. You can see some of that happening if you look closely. Not too bad, I'll live with it. They are very solid and strong, and that's all that matters.[/size]
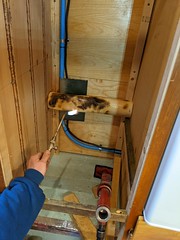
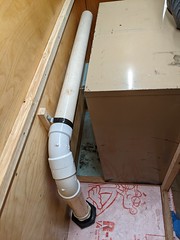
[size=small]But, and there is always a butt, some things we didn't account for. The pipe we ran for the fridge vent last week is in the way of the bottom drawer. We had just enough clearance behind the drawers for the pipe, but never accounted for the 1" offset bend we put in the pipe to get around those electrical lines. Way too much work to move the pipe or rebuild the lower drawer. We have the "appropriate" tools to fix pickles like this.[/size]
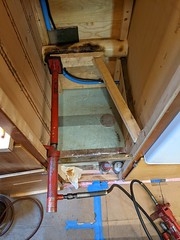
Make the pvc soft and pliable, then use hydraulic ram to gain clearance! Yes, the pipe looks like it was the main course at a barbecue, but it's just an air vent and nobody will see it. Promise not to tell anyone? Wouldn't be an accurate build thread if we didn't show all the oopsies.
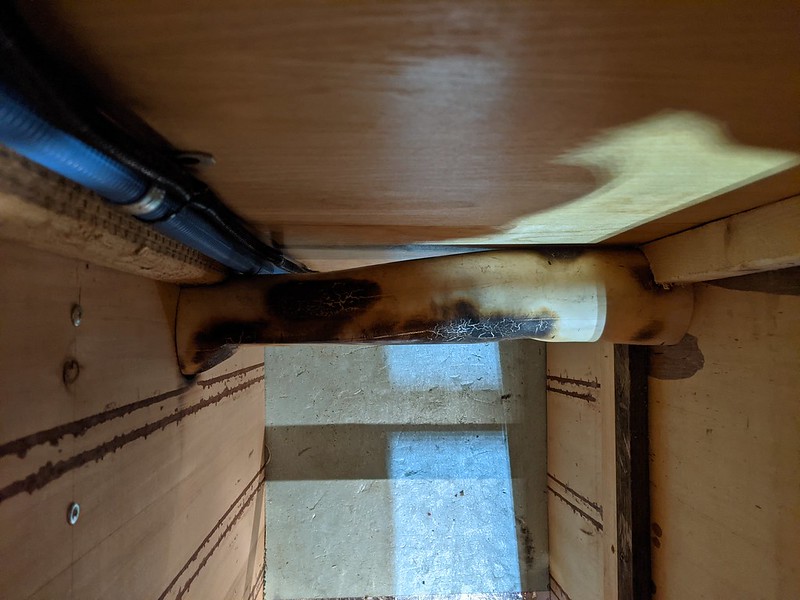
[size=small]We were afraid to share this blunder, but you know what, we're pretty proud of the result![/size]
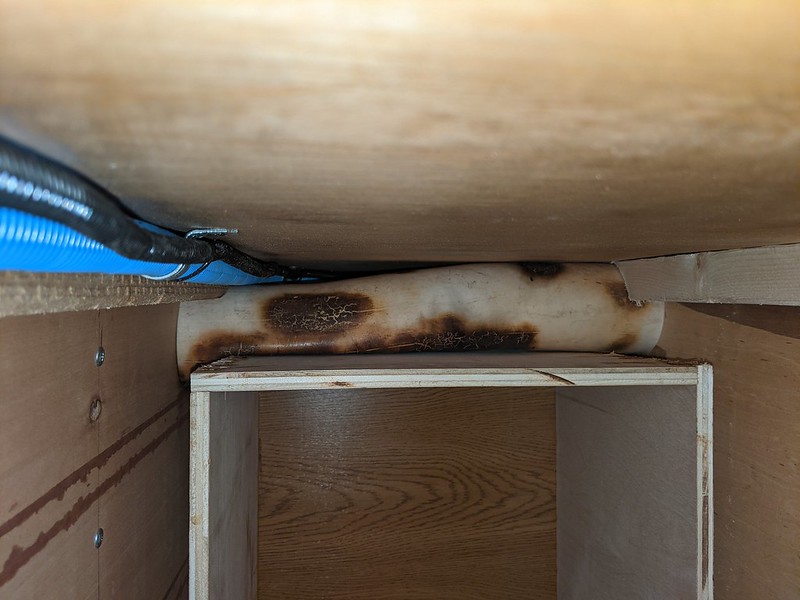
[size=small]If that fit doesn't put a smile on your face...[/size]
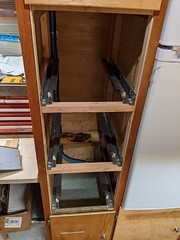
[size=small]And finally drawer slides all installed and ready to accept drawers. But drawers still need more work...[/size]
[size=small]All this plywood was leftovers from when we did the van interior many months ago. Thank goodness we kept all those scraps. No way could we afford the lumber prices now with the market what it is! Lots of measuring and planning ahead and this is the best we came up with. Usually drawers are made of solid 0.75" wood, but this is what we got and it will be lighter. Ran these boards through the router on a simple jig. Took many hours, mostly trial and error. It's my first time attempting joints like this.[/size]
[size=small]So this is the plan we came up with. Figured these simple joints will hold the corners very strong. A groove in the bottom of each side will hold the bottom panel in place. The drawer slides will be mounted under the bottom panel. The lowered relief in the one panel at the bottom is clearance for the push button latch. They are made for 0.75" panels, and since we already have 0.5" here and adding an additional 0.5" front panel later, we had to router out 0.25" so the wood wouldn't be so thick.[/size]
[size=small]Lots of clamps, but didn't have enough. Barely had enough to glue one at a time. No metal fasteners holding these together, all glued joints.[/size]
[size=small]Took several days to get all these done. Under the one drawer you can see the orange handled retainer clips that attach to the drawer slides.[/size]
[size=small]Some sanding and they don't look so bad! Running plywood through the router in the orientation we did was scary. Lots of risk of the ply blowing out. You can see some of that happening if you look closely. Not too bad, I'll live with it. They are very solid and strong, and that's all that matters.[/size]
[size=small]But, and there is always a butt, some things we didn't account for. The pipe we ran for the fridge vent last week is in the way of the bottom drawer. We had just enough clearance behind the drawers for the pipe, but never accounted for the 1" offset bend we put in the pipe to get around those electrical lines. Way too much work to move the pipe or rebuild the lower drawer. We have the "appropriate" tools to fix pickles like this.[/size]
Make the pvc soft and pliable, then use hydraulic ram to gain clearance! Yes, the pipe looks like it was the main course at a barbecue, but it's just an air vent and nobody will see it. Promise not to tell anyone? Wouldn't be an accurate build thread if we didn't show all the oopsies.
[size=small]We were afraid to share this blunder, but you know what, we're pretty proud of the result![/size]
[size=small]If that fit doesn't put a smile on your face...[/size]
[size=small]And finally drawer slides all installed and ready to accept drawers. But drawers still need more work...[/size]
Similar threads
- Replies
- 12
- Views
- 3K