Chevy G10 Conversion

Van Living Forum

Help Support Van Living Forum:

This site may earn a commission from merchant affiliate links, including eBay, Amazon, and others.

VanLifeCrisis

Well-known member
Joined
Aug 1, 2012
Messages
2,157
Reaction score
1
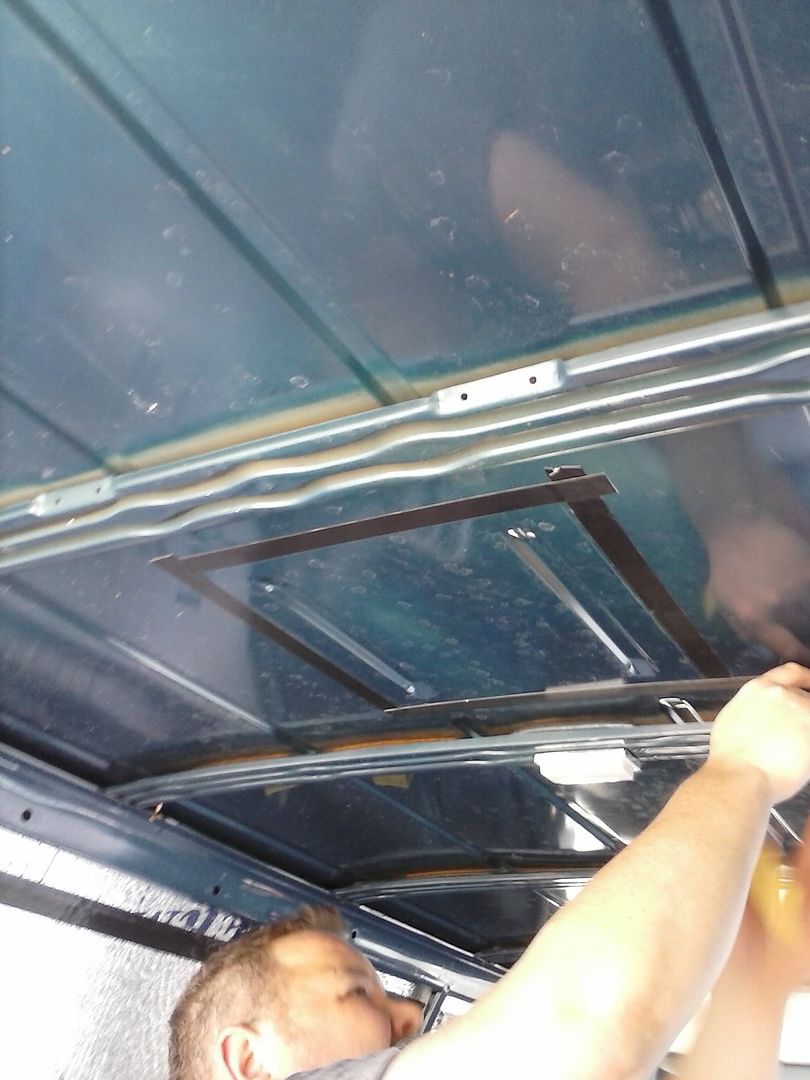
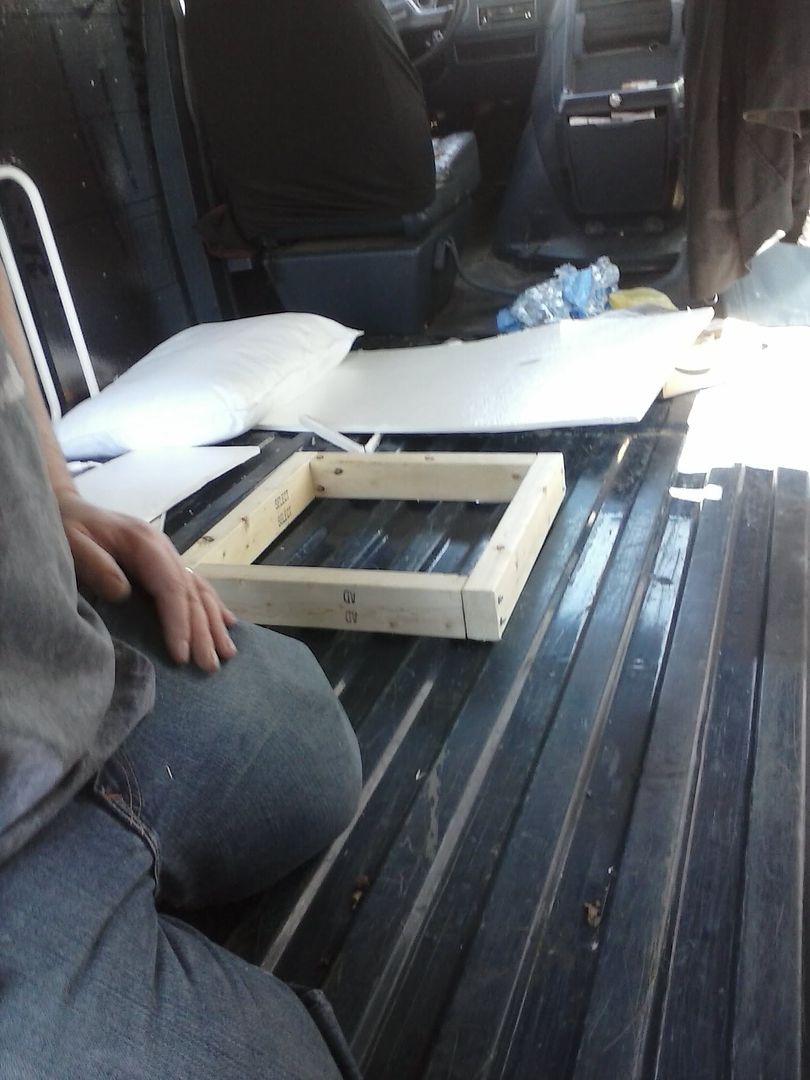
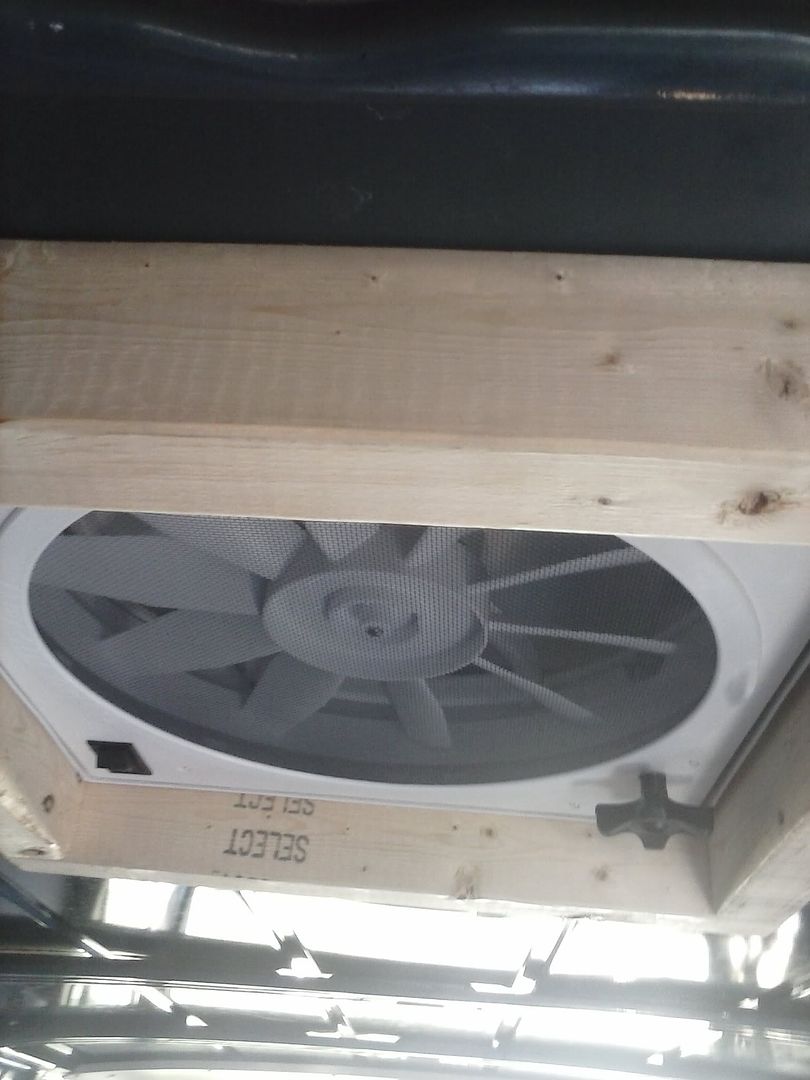
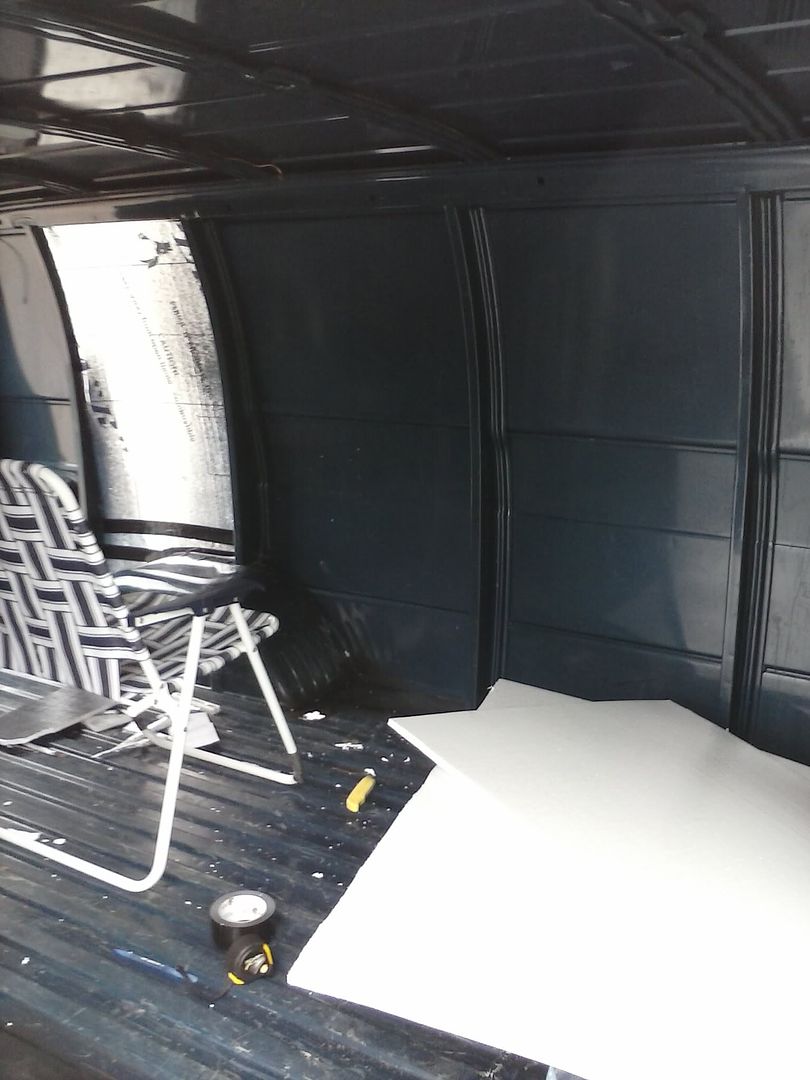
<div><img style="display: block; margin-left: auto; margin-right: auto;" rel="lightbox" src="http://i221.photobucket.com/albums/dd161/DazarGaidin/van/bigbludriver.jpg" class="bbc_img"></div><br>Well the time has finally come to stop thinking about it and start doing it, yeah spring!<br><br>Let me just preface this thread with the disclaimer that I am disaster area when it comes to any sort of mechanical or handy stuff.&nbsp; Most of it is with the help of others, for my safety and the surrounding area <img rel="lightbox" src="/images/boards/smilies/rofl.gif" class="bbc_img"><br><br>I started putting up insulation, styrofoam panels with foil on one side.&nbsp; I got 6 panels 4 x 8 at lowes for 47 dollars or so.&nbsp; I pretty much just cut them and pressed them in between the ribs as best I can.&nbsp;&nbsp; I used duct tape where needed (the walls are 4'3" tall so I made a 3" piece for the top on each one).&nbsp;&nbsp;&nbsp; The one in the picture was my first attempt.&nbsp;&nbsp; Take it from me, you want to just trace the wheel well with a pen on the back side and cut to that on the large piece, rather than guesstimate like i did here and wind up with a bunch of crappy duct taped little pieces.&nbsp; I got better as I went along <img rel="lightbox" src="/images/boards/smilies/biggrin.gif" class="bbc_img"><br><br>Ive got the larger sections done, and will be switching to the offbrand reflectix for the trickier spots and the doors.&nbsp; <br><br>
CAM00040.jpg
<br><br>
 
i used that same insulation, you can buy glue for it, panel board, I think they call it. It looks like, no more nails, or construction adhesive&nbsp;but does not eat the foam. test before using....&nbsp;I found having a can of spray foam close at hand to fill the gaps like the ooops moments was handyl. it also works as a glue.and sets fast. good luck&nbsp;
 
I took a detour from insulating to put in my <a href="http://www.ebay.com/itm/FANTASTIC-F...rtable_Car_Appliances&amp;hash=item3380422367" rel="nofollow" target="_blank">fantastic vent</a>.&nbsp; Man what a headache this turned out to be.&nbsp; I had bought a cutting wheel tool but our air compressor couldnt run it fast enough to cut.&nbsp; So we ended up using a sawzall, which was a nightmare. &nbsp; The guy in the first pic is my brother in law, who is an awesome handy guy, but he is mostly blind from an accident (traumatic cataracts), so cutting a line was tough for him. &nbsp; We eventually got a buddy to climb up top and cut down, which was way better than the rain of metal we got from the inside.&nbsp;&nbsp; Luckily, the fan cover still went over all the cuts by the end <img rel="lightbox" src="/images/boards/smilies/rofl.gif" class="bbc_img">&nbsp; <br><br>Taping for the cut:<br>
CAM00041.jpg
<br><br>We decided to give it something to screw into, this wooden frame.&nbsp; Its too thick we realized, i might half it later.<br>
CAM00042.jpg
<br><br>The results...we used <a href="http://www.amazon.com/gp/product/B001FCB4JS/ref=oh_details_o00_s01_i00?ie=UTF8&amp;psc=1" rel="nofollow" target="_blank">Butyl Tape</a> around the edge between the vent and the fan, and then silicone over screws and around edge.<br>
CAM00044.jpg
<br>
CAM00043.jpg
<br><br>I think I might buy some metal shears, electric, for metal cutting in the future <img rel="lightbox" src="/images/boards/smilies/rofl.gif" class="bbc_img">&nbsp; <br><br>Gonna start framing, probably next week.&nbsp; I think we are going to steal an idea for the bed I saw on bob's blog, just seemed easier than the original idea i had for a slideout.&nbsp; <br><br>
 
@flying kurbmaster:&nbsp; I may use some adhesive in some spots and maybe the roof, depending on if compressing it in there is viable or not.&nbsp; I worry about the spray foam though, I have read it can eat away paint and lead to corrosion over time.&nbsp; I got enough corrosion in this rust bucket <img src="/images/boards/smilies/tongue.gif" border="0" align="absmiddle">&nbsp;
 
Finished all of the panel insulation, just gotta do doors, floor and the nooks.<br><br> <br><br><br>The ceiling was the hardest to do by far, had to cut the piece large enough to wedge down in the side rail things, but that made it difficult to get in there.&nbsp;&nbsp;&nbsp; The back piece especially, and i had to cut it up some then go back with the tape to get it in.<br><br>
 
Started working on the van...my bro couldn't contain his enthusiasm for the prject and wanted to start on the bed <img rel="lightbox" src="/images/boards/smilies/biggrin.gif" class="bbc_img">&nbsp; So here is the stable portion.&nbsp;&nbsp; There is a center section that lifts for storage.&nbsp; <br><br> <br><br> <br><br>We plan to add a hinged extension for more width next.&nbsp; With the thickness of the mattress (and floor...we just stuck it in there its not yet attached) there will be no head room in couch mode&nbsp; <img rel="lightbox" src="/images/boards/smilies/frown.gif" class="bbc_img">&nbsp; Wish i had a high top.
 
If all goes well today I will be buying the exact same van. What luck! I can follow you now. What did you use for paneling on top of the styrofoam? At first I thought it was cardboard, which for me and my skill level wouldn't be that bad, if it's not I may have just given myself an alright idea. I am planning for insulation on using two layers of bubble wrap down first, then a layer of Reflectix, on every wall, side, door etc. except the floor, which I'm thinking of leaving bare and installing a floor vent as well as a solar powered roof vent fan. I will be living with my animals so keeping cool in the summer is a must. I was going to go over that insulation with carpet. I'm afraid of rigid anything, it will be a disaster, so I'm trying to work around that. EDIT: Also what did you do/are planning on doing for your vent fan hookup? I was going to go solar powered because it's easier and will run when I'm away.
 
I plan to have 290 watts solar on the roof, and 2 deep cycle batteries inside.&nbsp;&nbsp; It will run off the batteries. <br><br>I dont have paneling up yet, its just foil backed styrofoam insulation panel from lowes.&nbsp; I have purchased white board paneling that i plan to put up later...about 14 dollar for 4x8 sheets.&nbsp; Since i will only use the paneling wherever things are showing, i can tell you yet exactly how much you'd need till its up.&nbsp; <br><br>Im tracking my major costs and stuff on my blog, since you have the same van you might want to follow it<br><br>http://dazargaidin.blogspot.com/p/vandwelling.html<br><br>Just want to note that i am very tall, so my bed is down one side.&nbsp; If i was shorter, my build would have the bed across the back as most other builds you see here.&nbsp; Since you have 2 pets, a wider bed across the back would probably be beneficial and much easier if you arent 6'4 like me <img rel="lightbox" src="/images/boards/smilies/smile.gif" class="bbc_img">&nbsp; This frees up much more 'floor space' in the rest of the van, which is vital for pets i think.&nbsp; <br><br>I would definitely put down something for the floor, it will be very painful to walk on the ribbed floor, and your pets will be miserable.&nbsp; At the very least put some rubber down.&nbsp; If i were you id put down some plywood, paint it thick or rubberize it (for accidents..) then something soft to lay or step on like an area rug (that can be removed and cleaned)<br><br>Installing a floor vent and roof vent is a good idear, you can get cheaper vents then i got if you are strapped, there is a roof vent from ventline on amazon i considered for like 40 bucks...add a decent computer fan to it for 15 and you will be able to move an ok amount of air i think.
 
Well it turns out we are going with a more traditional style futon, where the back folds down.&nbsp; The base (above) will slide forward and the back will drop.&nbsp; Just waiting to get the floor and dividing wall in first.&nbsp;&nbsp; Lack of funds till payday :\
 
Well, in trying to keep things as inexpensive as possible, I changed the plan from coating the floor in rhinoliner to carpet.&nbsp; I wanted to avoid carpet for various reasons, but this is pretty durable stuff and the tiles were so cheap it was absurd.<br><br> <br>10 dollars for 40 18x18inch tiles.<br><br> <br><br>This is 4 gallons of adhesive for 5 dollars.&nbsp; More than i will ever need but its what they had and its...5 bucks.<br><br>You may notice the rails ($2 for 4 sets), that we plan to attach to the futon for sliding it out about 13 inches.
 
Well, finally got the carpet in.&nbsp;&nbsp; I want to just say that, I would not recommend carpet tiles unless they were your only real choice.&nbsp; They are a pain in the butt to put in, and in the end, no matter how much pushing, pulling and fiddling we did, there were still gaps between the tiles and glue is visible.&nbsp; <br><br>But as mentioned, this cost me 15 bucks glue and all (really less, i had extra tiles left over).&nbsp; Luckily most of the more visible gaps will be under the bed or cabinets.&nbsp; Beats plywood <img rel="lightbox" src="/images/boards/smilies/tongue.gif" class="bbc_img"><br><br> <br><br>2 of the largest gaps here, you can see the brown adhesive came up thru, but they will be under the bed:<br> <br><br><br>I have ordered the mattress, hopefully it will be delivered within the next 10 days or so.&nbsp; I also ordered a battery jump starter, and got the cooler i will be using until i can afford a real dc fridge.<br><br>The jump starter was necessary because my family is moving 40 minutes away from me now, so if i leave the lights on again (this old van doesn't have the beep if you open the door with them on like i'm used too..) I am out of luck!
 
I have accelerated my plans, vandwelling after the end this month!<br><br>Today was hell, worked on the van conversion for like 10 hours.&nbsp; I work a desk job and im out of shape...sun beating down and my lack of skill made it a crawl.&nbsp; But hopefully the payoffs will be worth it.&nbsp; I was just going to shore up the bed and then throw plastic containers in but my bro seemed horrified at the prospect of not getting to turn the van into a roadtrek class B <img rel="lightbox" src="/images/boards/smilies/rofl.gif" class="bbc_img">&nbsp; So anyway, ill quit my bitchin and let you see the fruits.&nbsp; We will finish tomorrow.<br><br>The bulkhead with sliding door:<br> <br><br>Cabinets, counter, closet and sink etc (in progress)<br> <br><br><br>The bed was already done for the most part.<br><br>I just want to reiterate, avoid the carpet squares if you can help it.&nbsp; They are coming up all over, i guess the adhesive wasn't applied right or something.&nbsp; When everything is in i might cover it with something like an area rug.&nbsp;
 
This is the last week until i am a full time vandweller.&nbsp; This weekend I had another horribly long building session but I got most things done except some cosmetic stuff.&nbsp; I also painted the van roof white with some elastostatic roof coating.<br><br>Without further ado, image barrage!<br><br>It was a hard day for everyone <img rel="lightbox" src="/images/boards/smilies/smile.gif" class="bbc_img"><br> <br><br> <br><br>This closet is a little too low for my tall shirts, so will need to be fixed.<br> <br><br>My lugable loo is on the blue bucket..it hold my screws right now<br>
 
<br><br> <br><br>The bed looks like it is buckling, but it is super sturdy...one of the metal hinges is a little bent and we used 2 sizes of boards so it turned out just looking that way.&nbsp; <br> <br><br> <br><br>
 
How is that fan/vent working out?&nbsp; I haven't found one I like and am comfortable dishing $$$ out for.&nbsp; Yours looks low profile.
 
I tested it out using a jump pack and it moves a crap load of air.&nbsp; Hmm it wasnt as 'low profile' as I had hoped (exterior), i call it my little chefs hat <img rel="lightbox" src="/images/boards/smilies/rofl.gif" class="bbc_img">&nbsp; Once i painted the roof white it doesn't stand out nearly as much.&nbsp; On the interior, the wooden frame we made was too big, it could be a lot smaller (probably recessed into or flush with ceiling), and it comes with a white matching garnish ill have to cut down and fit at some point.&nbsp; <br><br>Here is a picture of it from the outside:&nbsp; <br><br> <br><br> <br><br> <br><br> <br><br>@Patrick&nbsp; Thanks!
 

Latest posts

Top