Water damage, the good the bad and other upgrades

Van Living Forum

Help Support Van Living Forum:

This site may earn a commission from merchant affiliate links, including eBay, Amazon, and others.
@shadow: I'd go back to the original owner and give him a piece of your mind. What a mess!
 
introverting said:
@shadow:  I'd go back to the original owner and give him a piece of your mind.  What a mess!

I know what you mean, but it wouldn`t be worth the time or the effort.
 
Did a little more work yesterday, one of the rear side windows had been leaking and causing a little delamination.
So I removed the window, and found the original butyl tape seal was in bad shape.

With the window removed I used a c-clamp and some glue to pull it back together.
resealing%20window%20003_zps0jerjkm7.jpg

While I was letting the glue dry, I cleaned up the exterior wall and the window frame, and put the new
butyl tape on the window frame. After about three hours of letting the glue dry, I reinstalled the window.
resealing%20window%20004_zps44qpyg7j.jpg
 
I don't know if you caught it, but I posted this YouTube link in a thread the other day...I actually thought of your RV when I watched it. They really do an amazing interior remodel with lots of DIY elbow grease and only around $1500. This is link to finished product "tour"...skip through it to get an idea, then go back and look what they started with. Might give you some ideas, or at least some inspiration   :)

Full Time RV Tour
 
BradKW said:
I don't know if you caught it, but I posted this YouTube link in a thread the other day...I actually thought of your RV when I watched it. They really do an amazing interior remodel with lots of DIY elbow grease and only around $1500. This is link to finished product "tour"...skip through it to get an idea, then go back and look what they started with. Might give you some ideas, or at least some inspiration   :)

Full Time RV Tour

I did see your other link, from the beginning to the finished product, and they did a great job.

My rv is twenty six feet long, and compared to other rv`s of the same length, it seems very small on the inside because of the way
its laid out. Once I get done rebuilding the over the cab bed area and resealing the windows, I plan on making some other changes to open things up and give me more usable space.
 
Shadow, you got skills I wish I had, probably I'll have to learn them at some point
 
Yes good job !
Thanks for documenting it here , I'm sure MANY class C owners will get the pleasure of following in your footsteps.
 
ArtW said:
Shadow, you got skills I wish I had, probably I'll have to learn them at some point

Thanks.

But to be honest with you, I have no skills at all when it comes to this kind of stuff.
Resealing the windows is the easiest thing to do out of all of it. You just remove all of the screws from the inside window frame
and go outside and carefully work the window lose and pull it out, then remove the old butyl tape from the side of the rv and window
frame, and then apply new butyl tape to the window frame and reinstall the window.

As for the over the cab rebuild, I really have no skills here at all. What I have found so far is that the demolition takes the longest time.
There are trim pieces that have to be carefully removed because they will be reused, some things were stapled together, so you need a hammer and a crow bar to get them a part. Then there are parts that were put together with special clutch head screws, so you need a special screwdriver bit to get them a part, and the list goes on.

Now keeping in mind that I am no carpenter, there was parts of the original over cab build that had me scratching my head.
Part of the inside trim was screwed in place from the outside, and the screws were hidden under the front clearance lights, so I had to
remove some of the front clearance lights to get those screws out. It will not be going back together like that, that`s for sure.

I still have a little more demolition work to do, I`m in no hurry, and I only have the weekend to work on it, but it will get done and done
right.

I am also doing this all by my self, I have no help.
 
rvpopeye said:
Yes good job !
Thanks for documenting it here , I'm sure MANY class C owners will get the pleasure of following in your footsteps.

Thank You.

I have never done anything like this before, much less document anything before. But if it will help others, then its worth it.
What I`m finding so far, is that its more time consuming than anything else.
 
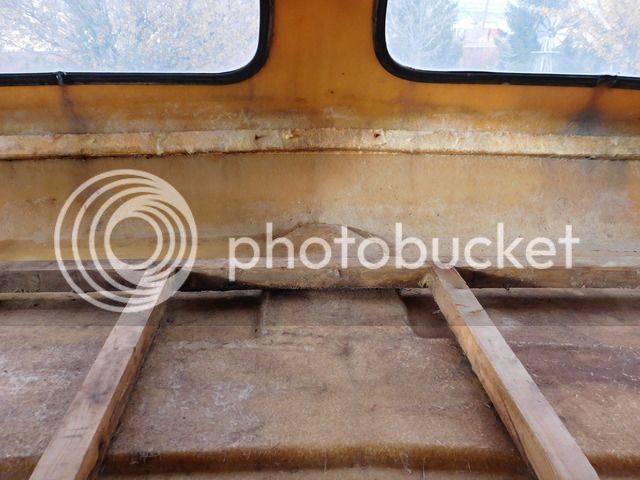
I did a little more demolition tonight, and I discovered some things.

I can`t remove the wood frame over the cab, its screwed to the side walls from inside the walls, so I had to remove the rest
of the water damaged plywood the hard way, with a hammer and a pry bar. Now I have to remove any remaining staples and small
pieces of plywood from the bottom of the frame with it in place. 

So now that means I can`t screw the new piece of plywood to the bottom of the wood frame.
The only thing I have to use now is liquid nails, unless someone has a better way to do it ?.
I could cut part of the frame out and attach the plywood and then piece it back in and use corner
brackets to reattach it to the frame. I am open for ideas here.

Another thing I discovered while taking things a part tonight.
There are about forty screws that screw up into the wood bed frame from the cab. Maybe fifteen of the forty screws
were actually into the wood, the rest were just in the cab metal doing nothing. That will be corrected for sure.
 
Don't use liquid nails, order this Sikaflex-221 ...get a few tubes, you'll want it for other things as well. When I order it from that link it's usually delivered 2 days later...
 
Where the staples were used to hold the 2x2's together, pocket screws should work. A Kreg pocket screw jig set can come in handy. YouTube is full of videos on uses.
 
x10 on the Kreg pocket screws and jig.

It is my most favorite and used tool in the whole building of Lady Arabella... :D 

My first few van builds, from years ago, I used angle brackets. They worked but the ease of joining two pieces of wood together with the Kreg is childs play in comparison.
 
I checked out the Kreg pocket screw jig, and it looks like it would work, but I just can`t afford it right now.
But I do appreciate it being brought to my attention, because I didn`t know about it before now.

Any other ideas are welcome.
 
There's a Kreg Pocket Screw kit, the jig allows you to do 2 screw holes with one set up. It's expensive!

Then there's the Kreg JR that only does one screw hole at a time. Truthfully, I really only ever would have needed 2 screw holes side by side, maybe, once or twice in the whole build.

The JR kit is very affordable.

I did find after using both Kreg screws and standard wood screws that the Kreg were vastly superior for the work...use them if you can.
 
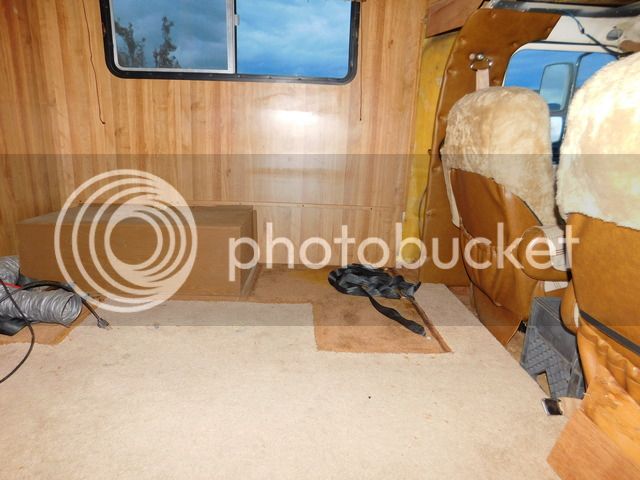
I got some more work done today, I removed the dining area table and seating and that really opened things up.
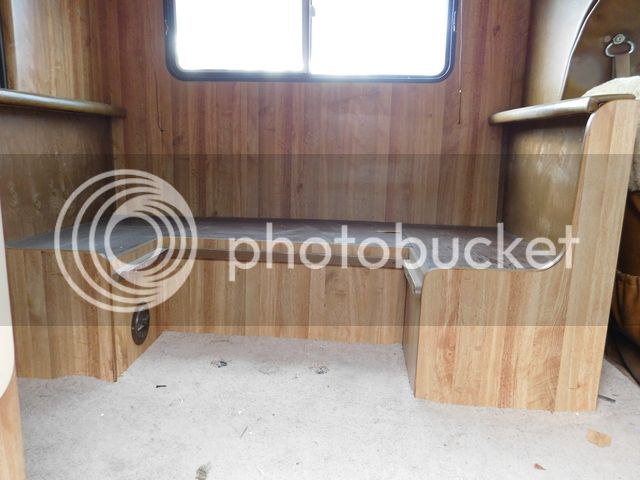
The dining area, the part were you sit just seemed to big for the rv. With the dining area removed I was able to get to the last part of the over head bed trim and insulation, so I could remove it.

After removing the dining area seating, I noticed a small hump in the floor in two separate places.
After lifting up the edge of the carpet, there was a table support mount, and about three feet away there is another one.
They are factory installed and they both have a plug in them and have never been used. I have no idea why they would even be there ?.

I still have a very small water leak on the left side over the bed area. I ran out of Dicor last weekend, so I have ordered some more and it
will be here in a few days.
 
shadow said:
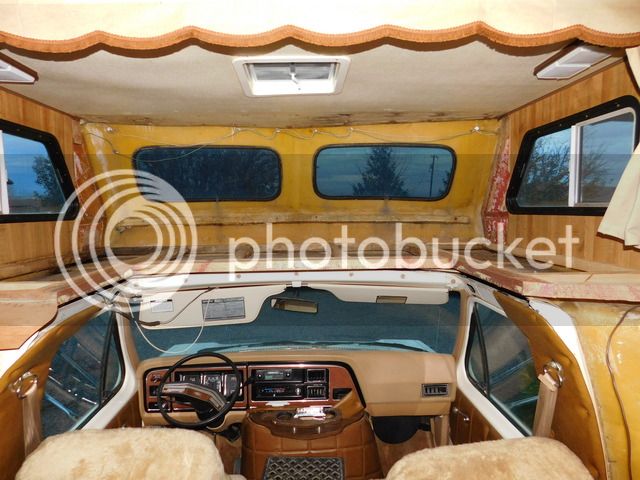
Over the cab area cleaned up.

rv%20repair%20013_zpsh0w9kgdu.jpg


Dining area.

rv%20repair%20002_zpssn8943st.jpg


Dining area removed.

rv%20repair%20014_zpsbx7ppq0j.jpg


Over the cab area cleaned up.

rv%20repair%20010_zpsgsu1pdck.jpg
Thank you for posting this. I am sure I have some damage in the same area. I, also was not told the truth about a lot of things with this Rv, but I have had a few things fixed now and it's home so I'll continue on with it. I don't like the dining area in mine either. I feel like it takes up too much space. I want a table and sitting area. I just don't like the way the one that is in there is done. Please continue to post pics as you finish the repairs.
 

Latest posts

Top