self builds

Van Living Forum

Help Support Van Living Forum:

This site may earn a commission from merchant affiliate links, including eBay, Amazon, and others.
The roof of my van is sheet metal like the rest of the van. That is the reason I had been looking at the truck bed liner. I wanted something to help protect from scratches when I go under tree limbs sometimes. But, yes, the good stuff that I found was too expensive for me at this time. The lesser expensive stuff was not as UV protective and my van sits outside all of the time.

Thanks for the recommendation though. I think Dicor is for rubber roofs. Correct me if I'm wrong about that.

I have bought Rustoleum automotive enamel paint and plan to just paint it for now after sanding and treating the rust spots, which are numerous!
 
Dicor makes different products for different materials. One for rubber roofs, one for fiberglass, and one for metal roofs.

There are other brands as well.

Regards
John
 
Optimistic Paranoid said:
Dicor makes different products for different materials. One for rubber roofs, one for fiberglass, and one for metal roofs.

There are other brands as well.

Regards
John

I didn't know that. I used the Dicor Lap Seal to seal the entry point of the solar panel cables. Seems to stick real well to the fiberglass and I guess only time will tell.

66788
 
OK. Put the phone pic on the computer and reduced the size. I think. Let's see if the tabletop posts. This is first version. He has taken it back apart for changes he wants to make, but the top will remain pretty much the same. It will get trimmed in steam-bent stained alder with a whisper of a lip to catch spills, dropped pins and gadget parts.
 

Attachments

  • tabletop.jpg
    tabletop.jpg
    1.6 MB · Views: 54
Yeah. That up front cost.
 
Self builds take some work but you end up with what you want, and if something is done wrong, you can always reach the person who did it.

Here is step one of ours, nearly finished. We are working on step two (the garage pod) right now.

toosexy.jpg
 
IGBT said:
Self builds take some work but you end up with what you want, and if something is done wrong, you can always reach the person who did it.

Here is step one of ours, nearly finished. We are working on step two (the garage pod) right now.

toosexy.jpg

That is pretty Kool, that rear section could be used for anything, a small machine shop, or an artist's studio, or a cafe, or a massage parlor (as in the classical sense... or the other)...
 
IGBT said:
Self builds take some work but you end up with what you want, and if something is done wrong, you can always reach the person who did it.

Here is step one of ours, nearly finished. We are working on step two (the garage pod) right now.

toosexy.jpg

Nice build!


Better not let DW see that... lol
 
igbt that's very cool. how do you flip the cab to get to the engine. highdesertranger
 
highdesertranger said:
igbt that's very cool. how do you flip the cab to get to the engine. highdesertranger

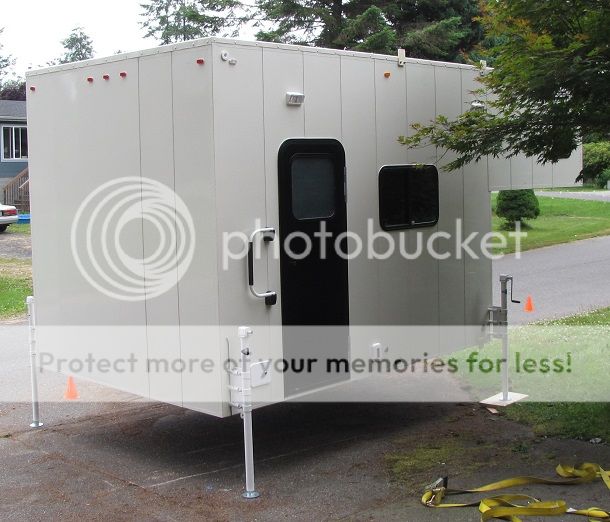
The camper can raise up high enough on the removable jackstands to allow the cab to tilt (it isn't that often you actually have to tilt the cab actually).

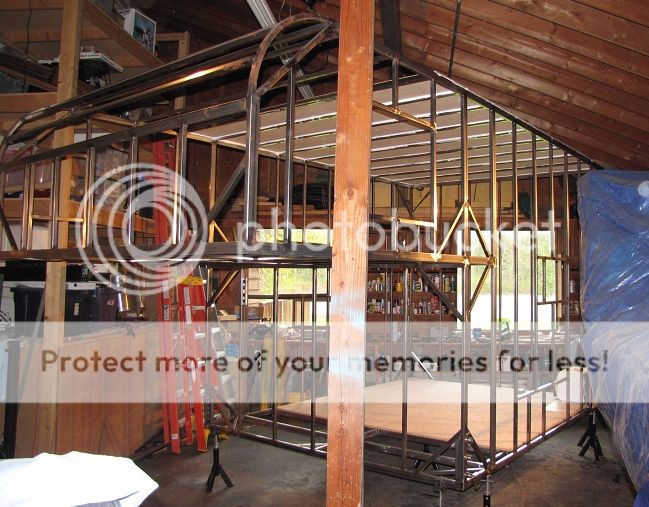
The garage pod we are constructing that will go where the motorcycles are now is the same width, 10 feet long, and 7.5 feet high with a roof rack for kayaks and such. It will also have the same sockets for our plug in jackstands so both the garage pod and camper can be placed on the ground if desired and the 20 foot flatbed can be used for hauling stuff. The garage pod will have a rear 8 foot by 2 foot workbench welded to the frame, tie downs for motorcycles, and overhead cabinets on each side for gear/tool storage. I plan to have a small mill/lathe mounted to the workbench as I can't live without a cnc milling machine. I probably will keep the Miller 211 welder in there also as it has been so handy MIG welding the tubular steel frame on both pods.

One might initially think a steel frame would be too heavy, but I used thin wall steel where I could and used angle sections to reinforce. The frame for the camper came out at about 700 pounds and the garage is about 500 pounds including the ramp door. The dry weight of the camper is under 3600 pounds and the dry weight of the garage should be under 1500 pounds. The truck base weight including flatbed is about 8500 pounds and it has a GVWR of 19,500 pounds. Essentially this means we can have around 5000 pounds of gear, water, food if needed.

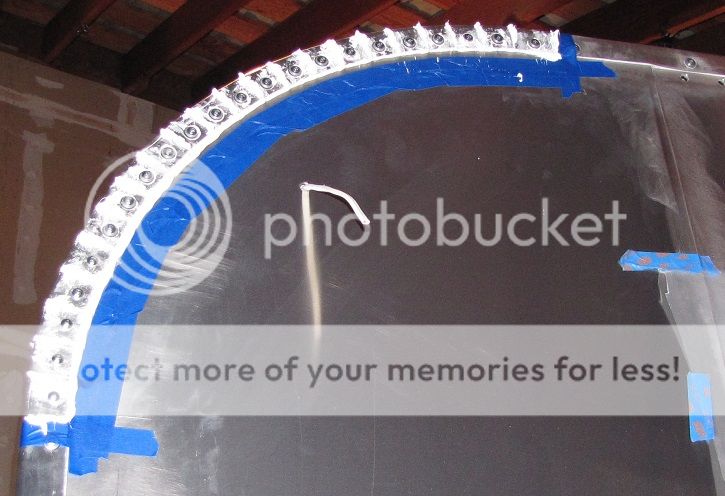
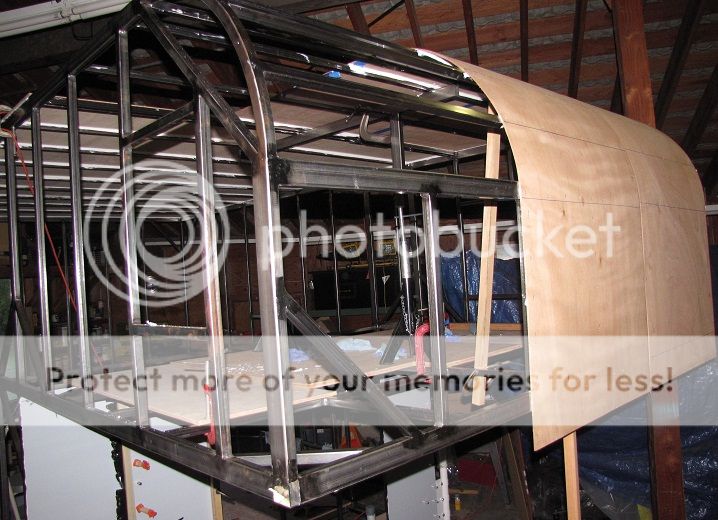
The roof is one piece 0.040" aluminum over 1/2" marine ply, tyvek barrier, then the steel frame. It is a continuous roll that has no seams or holes anywhere. It is folded down around the sides, front and rear, then sikaflexed and screwed on the sides. We then covered the whole roof with truck bed liner. In about 20 years we should inspect the roof for leaks :)

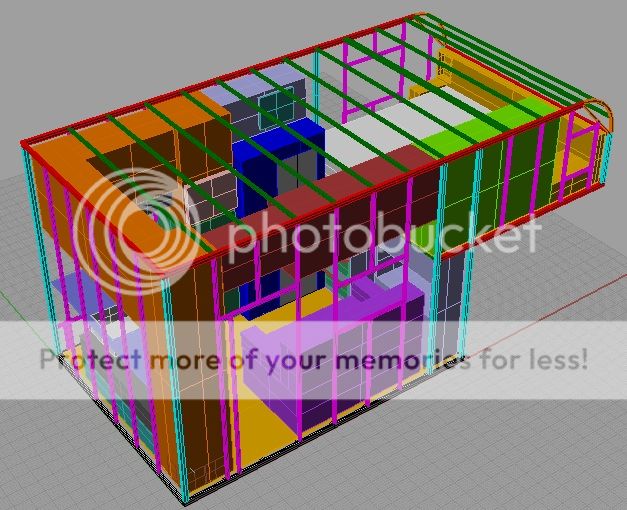
For the interior, we are using maple, walnut, and appleply (an amazingly well made maple faced plywood). The kitchen counter is 1-1/2" thick solid walnut butcher block. We have a 4kW Magnum inverter/charger that can also do generator sharing with our Honda EU2000i to give 6kW (probably never needed). On the roof we have 1100 watts of solar arranged as 2s2p feeding ~70v at 16 amps into a Midnite Classic 150 MPPT charger, which in turn will charge the Lifeline AGM batteries at 24V and ~40 to 50 amps. The 9.1cu-ft refrigerator is a Nova Kool compressor model with Danfoss brushless compressor. It uses about 500 watt-hr per day.

For insulation we went with 2 inches of polyisocyanurate fire resistant foam in the floor, walls and ceiling. Because of the care in the steel frame design, there is at least 1 inch of insulation between any steel frame member and the inside of the camper for thermal isolation, and there is 2 inches between the 0.063" aluminum siding and the inside. The insulation is rated at R13 per 2". The windows are all double pane. There is a 6 gallon water heater and a 19,000 BTU furnace, along with a 37 gallon fresh water tank and 37 gallon gray water tank, both contained under the kitchen counter and heated. The toilet is a Thetford cassette model with a removable 6 gallon cassette (will carry an extra) that can be dumped in a pit toilet or regular septic system.

I have a ton of pics but I don't want to eat up the bandwidth of those rv'ers who may be on 3G.
 
IGBT, please, I'd love for you to start a new thread and include pictures. If you upload them as attachments they will only post as thumbnails then people could enlarge them if they could spare the gigs.

What I do is shrink the pictures to 640 and then post them to the web and link to them from here. Most people can handle 640 x 480 pics.

I can create the new thread for you and cut and paste this post to it if you'd like.

If you'd rather not, that's fine too. I think we are all drooling over what you've done!
Bob
 
igbt very cool. yeah post up some pics. where did you find .040 aluminum in a continuous roll? so far I have only been able to find it in the .024 range. highdesertranger
 
highdesertranger said:
igbt very cool. yeah post up some pics. where did you find .040 aluminum in a continuous roll? so far I have only been able to find it in the .024 range. highdesertranger

Yes, at first all I could find was the thin 0.024 from an RV roofing place, but then someone suggested asking tractor trailor supply shops and sure enough, they have giant rolls of 8'6" wide, 0.040 thick aluminum roof coil for pretty cheap (I think I paid $11 or $12 a linear foot?)

You wouldn't want to go much thicker than 0.040 if you want to bend down the edges as we did. It was hard enough to bend that thickness using a rubber mallet and/or block of wood/hammer.

The front curved corner was interesting. After scratching my head for a minute or two, I decided to segment it into tabs, bend each one with sikaflex under it, then we coated the whole thing with the truck bed liner. Here is what that step by step looked like:

alumroof2.jpg


rapter2.jpg


paint4.jpg
 
nice looking radius. I agree with bob, start a thread and give us some more pics. do you have any pics of the skeleton? I have a lot of questions because this is how I am going to build mine. thanks for the tip about tractor trailer supplier. highdesertranger
 
highdesertranger said:
nice looking radius. I agree with bob, start a thread and give us some more pics. do you have any pics of the skeleton? I have a lot of questions because this is how I am going to build mine. thanks for the tip about tractor trailer supplier. highdesertranger

I will collect everything into a thread with pics in a day or two. I have a long build thread on another site but it is mixed in with comments from other people and is a very long read (like 39 pages).

For now, here are some pics of the skeleton of the camper pod. I am actually welding up the skeleton of the garage pod right now.

(The skeleton uses 1x1 and 1x2 rectangular steel tubing, with wall thickness of 0.063, 0.072, and 0.125 depending on where I thought extra strength was needed)

[
fullframe.jpg


jackmount2.jpg


curveroof.jpg


floorplan1.jpg


onfeetpassenger.jpg
 
Top