Mounting solar on fiberglass high top

Van Living Forum

Help Support Van Living Forum:

This site may earn a commission from merchant affiliate links, including eBay, Amazon, and others.

sephiro499

Well-known member
Joined
Aug 1, 2011
Messages
103
Reaction score
0
How difficult is it to mount panels on an uneven surface like a high top? I read the one tutorial of sorts that they did at the RTR. Taking the entire top off and adding plywood is way over my skill level.

If I get the flexible 3lb solar panels how do I mount them? If I use adhesive what happens if the top has to be replaced? How do I get the panels off? Is installation easier on a regular cargo van (without the high top)?
 
Bob Wells, who runs this forum, has come up with an interesting approach to this problem. I admit I am quite taken with it.

He put a pair of ladder racks on his cargo van. He then screwed four long two by fours to them lengthwise. Plywood was screwed down to the two by fours. The whole thing was then given a couple of coats of good, white paint to protect it from the sun and rain.

His solar panels are screwed down to this. ( space your two by fours so that the mounting screws for the solar panels go through the plywood and into a two by four )

Not only does this give him the perfect place to mount his solar panels without putting a lot of holes in his van roof, it also shades his roof and helps his van stay a lot cooler in the sun.

Moreover, the ladder racks are high enough that he can still open his rooftop vent under it, AND the plywood shields it from the rain, so he can leave it open for ventilation even in a pouring rain. See how neat it is? Damn close to a perfect system.

Regards
John
 
Optimistic Paranoid said:
Bob Wells, who runs this forum, has come up with an interesting approach to this problem. I admit I am quite taken with it.

He put a pair of ladder racks on his cargo van. He then screwed four long two by fours to them lengthwise. Plywood was screwed down to the two by fours. The whole thing was then given a couple of coats of good, white paint to protect it from the sun and rain.

His solar panels are screwed down to this. ( space your two by fours so that the mounting screws for the solar panels go through the plywood and into a two by four )


Regards
John

Awesome idea, does he mention this in his book? I might have missed it. I've never seen a rack on a high top are they only suitable for 'standard' vans?
 
The ladder rack he mentions is on my cargo trailer so it doesn't apply here.

But there are a couple ways to go here.

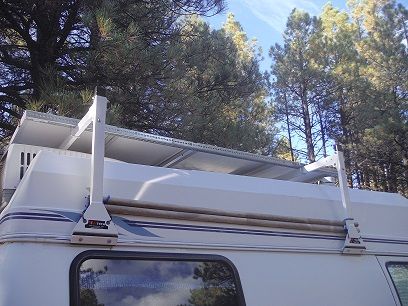
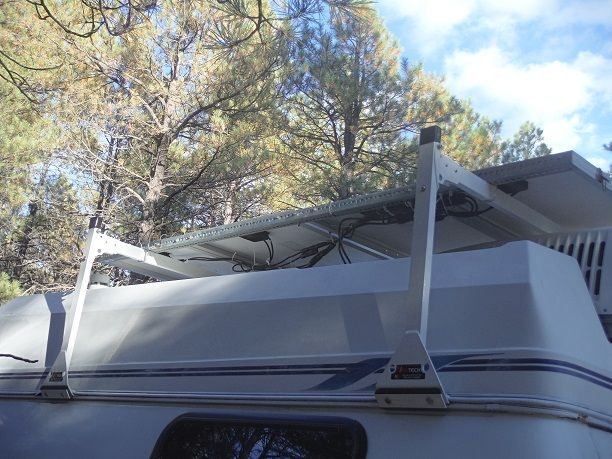
1) They make ladder racks that are designed for high tops. They are regular ladder racks but they have long extensions to get them above the hightop. It won't be easy but if you keep searching you can find them already made on the net. But they are expensive!

A cheaper way may be to find a fabricator who will take a regular ladder rack and make the long extensions. It would be easy for an experienced welder.

But, it will be ugly and obvious! That's the tradeoff

2) I had a friend who take his high top to Buddys RV in Flagstaff AZ and had a custom rack build for his single Kyocera 315 panel over his high top (he only had room for one panel so he made it the biggest he could find). It cost him $500 but that was also the entire solar install and also installing and wiring a Fantastic Fan.

They bolted the fabricated ladder rack right to the sides of the high top. It wasn't ugly but it was obvious. I'm really sorry to say I didn't take any pictures. Dumb mistake!!

I think you misunderstood the install at the RTR. We didn't take the top off we just dropped the headliner from the inside to see the fiberglass roof. The plywood was just gussetts (6 inch square plywood washers) so the bolts wouldn't pull through the fiberglass. While we had the headliner down we covered it all with Reflectix which was a good thing by itself.

If you glue the flexible panels on they can NOT be removed. They are permanent.
Bob
 
Something like this maybe?
roofrack1_zps6a0cad8f.jpg

roofrack2_zps0a9dc718.jpg


Bob is right, the hightop roof racks are not cheap. I paid 125. for each rack and had to assemble them myself or pay the company I bought them from 50. per rack to drill those 2 holes out for me.
I bought angle iron @ HD and mounted the panels to it, then attached the angle iron to my racks with square u-bolts. My next project with them will be figuring out a tilt mechanism. someday. :D
 
I chose to use my fiberglass and woodworking skills to mount some aerodynamic ish corners to hold down my kyocera 130TM.

I can tilt it 90 degrees toward either side of the van, but rarely do.

mountedpanel_zpsddc2bfb2.jpg


I painted the frame of the solar panel white, and tried to keep it stealthy.

I now have a unisolar 68 watt stick on panel on the other side of the roof.
049_zps9df11a1f.jpg


Each has their own wire run to the charge controller, the kyocera 8 awg, the unisolar 10 awg.
 
I have a friend who used Scotch extreme exterior mounting tape to mount his panels to the top of his fiberglass shell on his rv. This is the second vehicle he used it and has never had a problem with it coming undone. Just a thought.
 
I'm in the same boat. I'm thinking of flowing Bob's advice and use plywood as big washers on the inside. One challenge I see for me is I'm working on a built-out Class B RV, so the edge of the headliner is blocked by the RV cabinets on each side.

I'm not sure what to do about that. Removing the cabinets would be a major project. I'm considering cutting the headliner down the middle and pealing it back. Then I'd glue it back in place and hope the seam isn't too obvious.


On other idea I had was to reinforce the fiberglass roof with several layers of fiberglass matt. I've used the stuff before to seal a leaking black tank. But I'm worried for that to work if have to do it on both sides. I haven't had much luck getting fiberglass matt to defy gravity long enough to dry. Plus, I'd still have the headliner issue.
 
One possible solution, sephiro499 :

http://www.amazon.com/gp/product/B008LMIHNQ/ref=oh_details_o00_s00_i00?ie=UTF8&psc=1

A word of caution if using high bonding strength adhesive. Surface prep is critical :exclamation: Follow the instructions exactly. If done right, the fiberglass top would pull apart before the adhesive fails. If done wrong ...

concretebox said:
I'm in the same boat. I'm thinking of flowing Bob's advice and use plywood as big washers on the inside. One challenge I see for me is I'm working on a built-out Class B RV, so the edge of the headliner is blocked by the RV cabinets on each side.

I'm not sure what to do about that. Removing the cabinets would be a major project. I'm considering cutting the headliner down the middle and pealing it back. Then I'd glue it back in place and hope the seam isn't too obvious.

Instead of cutting the headliner down the middle, why not just cut out where the 'big washers' go or put them on top of the headliner. Shape them to look nice, paint or stain them, or cover them with something decorative.

Another option would be to make your racks so the mounting comes out inside the cabinets, where the big washers would not be seen.

-- Spiff
 
That's genius Spiff! Why didn't I think of that?:) I have some left over oak paneling that would look really nice.

Should I stick with the well nuts as suggested by the instructions or use standard bolts with nuts and washers on the inside?
 
concretebox said:
Should I stick with the well nuts as suggested by the instructions or use standard bolts with nuts and washers on the inside?

I'm not familiar with the term 'well nuts'. If you mean something like t-nuts, those would work OK, something like pem nuts or rivet nuts are for metal and would not have enough flange for wood. I went with nuts and washers on the inside; acorn nuts for looks. I used grade 5, cuz I had them, but grade 3 would be OK. Panels are light, my 100W Renogy panels are 16 lbs each and wind load should be minimal unless you are tilting them up. I went with a 3° slope, down in front, for driving wind load, to let rain wash the panels, and eliminate water pooling.

-- Spiff
 
I have never heard of well nuts before either. They appear to be rubber grommets with a threaded steel core. According to the Renogy installation instructions they expand on both sides when a bolt/screw is inserted, forming a water-tight seal. But I like the security of nuts a washers more. I hadn't considered Acorn Nuts. Those will look much nicer. I think I'll use those.

Spaceman Spiff (Cavan and Hobbes reference?), I'm guessing we have the same Renogy panel. Mine is 16lbs too. I'm installing one. It will be behind the my MaxxAir vent cover, so I'm expecting it to protect it somewhat from headwind. If I park facing the right direction (front of the vehicle facing North?) I'm thinking the chance of a the MaxxAir casting a shadow on the panel is minimal.

I hadn't considered tilting the panel so rain would run off. Good idea. The mounting brackets that came with the kit are designed to mount it flat, but there may be a way to give the panel a slight tilt. Even 1 or 2 degrees would prevent rain water from pooling.
 
concretebox said:
I hadn't considered tilting the panel so rain would run off. Good idea. The mounting brackets that came with the kit are designed to mount it flat, but there may be a way to give the panel a slight tilt. Even 1 or 2 degrees would prevent rain water from pooling.

Spacer blocks under a couple of the brackets. Maybe a couple of small pieces of half inch or three quarter plywood, with slightly longer bolts going through them.

Regards
John
 
So regardless if I go high top or not, how do you get the wires into the van? I don't remember the url now but another site the guy used a 25$ marine electrical connector 'housing' (from amazon) or sorts and put the wires through that. Another video I watched the guy fed the wires through the 'rain gutter'. I've also seen the 3M VHB tape that is extremely strong and would work on one of those lightweight Renology panels.
 
concretebox said:
I have never heard of well nuts before either. They appear to be rubber grommets with a threaded steel core. According to the Renogy installation instructions they expand on both sides when a bolt/screw is inserted, forming a water-tight seal. But I like the security of nuts a washers more. I hadn't considered Acorn Nuts. Those will look much nicer. I think I'll use those.

Spaceman Spiff (Cavan and Hobbes reference?), I'm guessing we have the same Renogy panel. Mine is 16lbs too. I'm installing one. It will be behind the my MaxxAir vent cover, so I'm expecting it to protect it somewhat from headwind. If I park facing the right direction (front of the vehicle facing North?) I'm thinking the chance of a the MaxxAir casting a shadow on the panel is minimal.

I hadn't considered tilting the panel so rain would run off. Good idea. The mounting brackets that came with the kit are designed to mount it flat, but there may be a way to give the panel a slight tilt. Even 1 or 2 degrees would prevent rain water from pooling.

The 'wall nuts' appear to be the same as rivet nuts; the metal sleeve has to collapse to create the seal (they work like rubber coated pop rivets). Works for light shear loads on sheet metal, not so good on fiberglass or wood. I agree, I went with through bolts and nuts.

I adopted Spiff as my alter ego first time I saw him in the Calvin & Hobbes comic.

I don't know if tilting the panels helps, I'm just paranoid about wind getting under them. It does hurt their performance when parked facing north. 3° seems like a lot of tilt, just looking at them. Just for reference: 2.8° is 1" in 21" (width of Renogy 100W panel), so raising it 1/2" would give ~1.4°. If you go with plywood 'washers' to lift one side, make sure you seal the hole in your roof UNDER the plywood, as the plywood will hold moisture and it will wick through the hole in your roof.

If you haven't read HandyBob's posts, you should. He has a very detailed addendum on the large affect small shadows has on solar panels. I mounted my rear solar panel (I have 2) about 8" in front of my Maxxair vent. I haven't seen any shadowing issues. http://handybobsolar.wordpress.com/the-rv-battery-charging-puzzle-2/ (way at the bottom of a very long, informative post).

-- Spiff
 
sephiro499 said:
So regardless if I go high top or not, how do you get the wires into the van? I don't remember the url now but another site the guy used a 25$ marine electrical connector 'housing' (from amazon) or sorts and put the wires through that. Another video I watched the guy fed the wires through the 'rain gutter'. I've also seen the 3M VHB tape that is extremely strong and would work on one of those lightweight Renology panels.

Sorry sephiro499, I don't know how to quote from two different persons in one reply :s

I used a plastic conduit 'splice box' with the exit hole out the bottom.
https://vanlivingforum.com/showthread.php?tid=10751
Hardest thing I did when adding solar was drilling a 1.25" hole in my roof. Took me three days to get up the nerve!

I took the least distance route - 7 feet of AWG #4 wire from junction box to charge controller and 1 foot from charge controller to batteries. I've included some pictures to explain better than I can.

Someone I read had used VHB tape to mount solar panels with good results. Like I said in a previous post, the key to the bond is surface prep. My camper has a corrugated roof, so I didn't have enough surface area for a adhesive only. I used 3M 5200 Marine Adhesive Sealant (fast cure, through hull, below waterline, permanent) and grade 5 through bolts (motto: When in doubt, build it stout). I used only 5200 on the junction box.

Hope this helps. -- Spiff
 

Attachments

  • splice box.jpg
    splice box.jpg
    64.2 KB
  • roof assembly.jpg
    roof assembly.jpg
    51 KB
  • inside assembly.jpg
    inside assembly.jpg
    38.3 KB
Hey guys I just finished a project like this. I took Spiff's suggestion and made wood backing plates. I had some 1/4in oak plywood I cut into 4x8 rectangles. I stained and poly'ed them.

My rig came with a roof vent. I added a MaxxAir vent cover earlier. I ran the wires from The solar panel in through the vent.

I used Butel Rubber and 1/4in hex bolts.

I'll upload photos in a bit.
 
Top