Cummins Canoe (A Stepvan Story)

Van Living Forum

Help Support Van Living Forum:

This site may earn a commission from merchant affiliate links, including eBay, Amazon, and others.
Thanks for the write up, Got a link to the camera?

You got all the cool stuff, a NATO Jerry can. Best Jerry can I have ever used.

Highdesertranger
 
I don"t think my idea of "secured" is the same as yours, you really should wedge something in there really tight between the milk crate and the step wall like a good metal box first aid kit! Lol!
 
Here is an idea for storage, under your van you may still have room for storage. I made plywood boxes, covered them with thin aluminium then secured them to the Ali cross section then cut a hole for storage rdv door I got four of them one is big enough to fit a full size golf bag a few jerry cans and my awning.see if I can find a picture, another thing I did for yukky stuff storage was removed two lower windows in my back doors inserted a pop riveted Ali box into the hole and again used an rev storage compartment door. These are only about four inches deep but perfect for oil or paint stuff like that. I then insulated them inside and covered them with panelling.
 
Here is a pick of the back doors and one side the other side has a larger door that accommodates my golf bag. There are shelves inside the door compartments to accommodate paint cans and oil containers1B0864BF-8E54-47BD-A60F-CAAED87059E3.jpeg
 

Attachments

  • 1B0864BF-8E54-47BD-A60F-CAAED87059E3.jpeg
    1B0864BF-8E54-47BD-A60F-CAAED87059E3.jpeg
    1 MB · Views: 19
Another thing I did for extra storage, I built a box initially I thought for a battery but now used as a tool box where you got your milk crate. I left enough room to put a foot down to get through. On the passenger side I built a another smaller box that works as another step where I store more tools. My front seat tilts forward on the drivers side that is where my porta pottie lives in a purpose built box, some day it may double as a shower tray. Tilt seat forward on steering wheel lift lid due your stuff then reset, the only down side you can’t do it while driving.
 
highdesertranger said:
Thanks for the write up,  Got a link to the camera?

You got all the cool stuff,  a NATO Jerry can.  Best Jerry can I have ever used.

Highdesertranger
Where are my manners! I totally forgot to post link of the camera stuff we got. Here ya go:
https://www.amazon.com/dp/B07TTB6NMG?psc=1&ref=ppx_yo2_dt_b_product_details

I know good fuel cans. Those stupid CARB compliant cans are the worst! You need three hands to get them to flow, and they still leak everywhere! If Nazi's did one thing right, it was the fuel can. Interesting backstory of how we stole their design back in WW2, but nowhere as good as the original German design.

bullfrog said:
I don"t think my idea of "secured" is the same as yours, you really should wedge something in there really tight between the milk crate and the step wall like a good metal box first aid kit! Lol!
Yea, I might change that bungee cord to a ratchet strap or something after the first time I lose stuff out the door.:) Found a nice spot for the first aid box in the back anyway. We could use another fire extinguisher in there somewhere too...

flying kurbmaster said:
Here is an idea for storage, under your van you may still have room for storage. I made plywood boxes, covered them with thin aluminium then secured them to the Ali cross section then cut a hole for storage rdv door I got four of them one is big enough to fit a full size golf bag a few jerry cans and my awning.see if I can find a picture, another thing I did for yukky stuff storage was removed two lower windows in my back doors inserted a pop riveted Ali box into the hole and again used an rev storage compartment door. These are only about four inches deep but perfect for oil or paint stuff like that. I then insulated them inside and covered them with panelling.
Looks good! Strange enough, I almost never go in and out of vehicle through the drivers door, always going through the passenger door. But yea, so much storage space under there! I was thinking about out sections of the side skirts and mounting these aluminum underbody truck boxes underneath the floor supports. They are expensive, so I'll wait for a deal or find in junkyard or something.
https://www.tractorsupply.com/tsc/catalog/underbody-truck-tool-boxes
 
Something that was on the list of things to do, but then the engine blew up and this went to the back burner, is the brakes. Well, this build added a lot of weight, so lets double check those bakes.

51193452144_076791b7df_c.jpg

[size=small]When we drove the van home after the purchase, the brakes worked great. Upon initial inspection showed pads and shoes about 50% life left. But recently, it's been feeling like the one or both of the front brakes are dragging for a little bit after hitting the brake pedal. After awhile, they don't drag anymore. Now you might call me crazy, but in my experience I've found that old rubber brake lines get weird inside. They sometimes let pressure through to the caliper, but don't release the pressure once you take foot off brake pedal. Just change the rubber hoses! Saves so many headaches.[/size]

51193452369_ea3e61807c_c.jpg

[size=small]Changing hoses, yea. But while we got it all apart, lets just change all the pads too.[/size]

51193453079_a975791beb_c.jpg

[size=small]Pretty anticlimactic. Both calipers needed a quick shot of heat to loosen up the bleeder valves. Please use never-seize on those threads so they can easily be removed next time. One day when time and funding allows us, we'll upgrade the rear brakes to disc brakes. The old drums should do us good for now as the shoes have some meat on them and even the parking brake works. Hopefully a wheel cylinder will start leaking so we'll be more encouraged to do disc brake conversion.[/size]

51191976717_d007bc48af_c.jpg

[size=small]We also pulled the fridge out again. Installed a thermometer probe. I'm curious to see what the temperature is back there when the fridge is operating.[/size]

51191978377_3b976fa1c4_c.jpg

[size=small]Got a bunch of thermometer probes. Not sure how hot is too hot behind a fridge, but we're looking at about 16 degrees warmer back there than inside the living space of the rig. What temperatures behind the fridge do you think we should start being concerned?[/size]
#1-Fidge
#2-Freezer
#3-Behind fridge
[size=small]In-Interior[/size]

51193755255_0d0ac9b7e3_c.jpg

[size=small]We put up a map to give us motivation to get up and go. But looking west, we see a lot of mountains that we think the lil 4 cylinder is gonna struggle with. There is no replacement for displacement...[/size]

51192906563_05c447d422_c.jpg

[size=small]...or is there?[/size]
 
Yep that happened to me I couldn’t figure out why my brakes were dragging, talked to a bunch of people about it. One guy asked an old mechanic friend of his and he suggested the rubber line even if looking at it seemed in nice shape, changed it, problem solved. Have bought other side intend on changing that one too one of these days.
 
Big turbo equals more power which equals more heat which equals more wear which equals half the engine life. Enjoy it while it lasts! Going over I 70 up the mountain will require big intercooler, larger radiator, large oil cooler with temp controlled electric fans as slow speeds at higher elevations will affect air flow and cooling. That engine compartment is gonna get crowded!
 
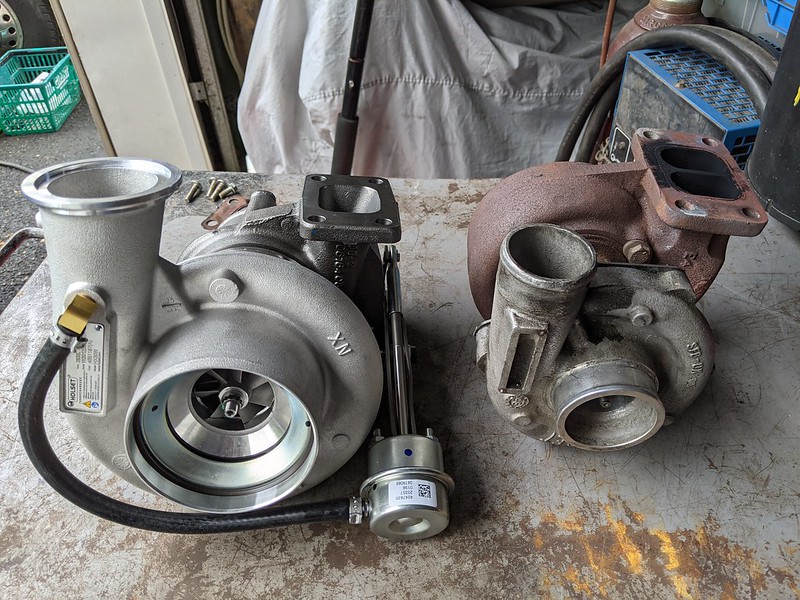
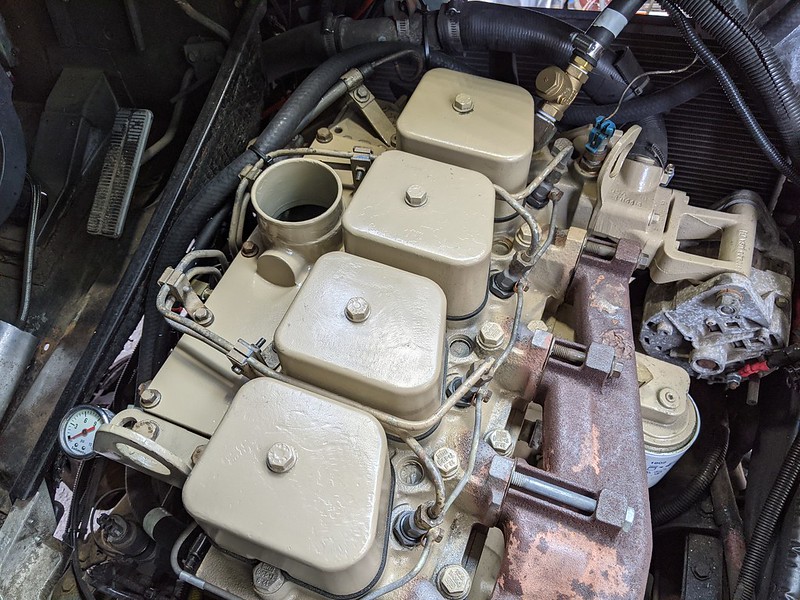
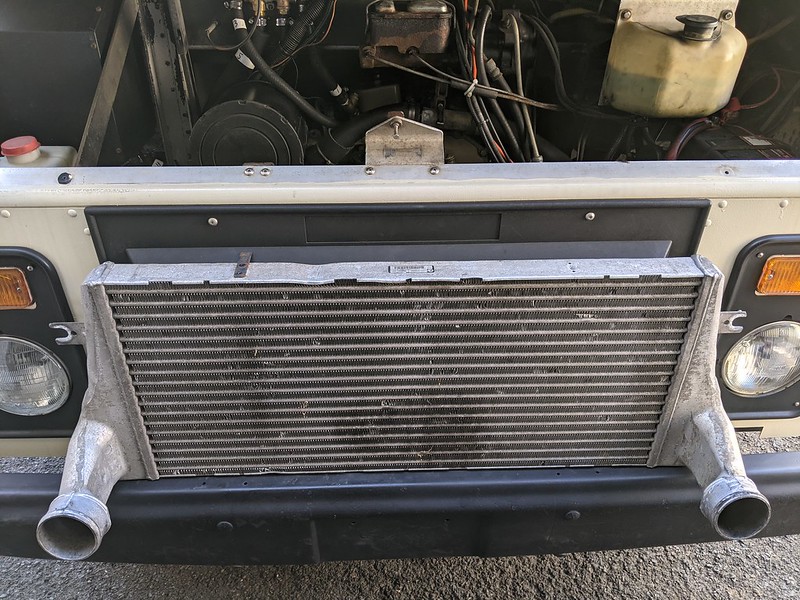
Well yes and no. A properly installed turbo is designed to get more CFM of air into engine to aid in breathing and burn more of the fuel, resulting in more power and fuel efficiency. But you're right, due to adiabatic heating, the air going into engine could be hotter if you increase boost psi. I think gains come from more CFM, not boost psi. But to be on the safe side, and since colder air is always better for engine, we'll try and fit an intercooler in there. The bigger turbo should also allow the exhaust to flow better, allowing for less back pressure on engine which will keep temperature down. Will definetely keep an eye on coolant temperatures though, thanks for the reminder. Step vans have plenty of engine bay space so we might throw in an electric fan setup if necessary. I don't think engine life will be drastically reduced. These Cummins engines are built to last and can handle it. The old engine made it 400,000 miles with half the oil it needed! We were getting almost 30mpg on highway before we added the build weight. Now we are under 20mpg. It be nice to maybe get back in the 20's if possible. A good alternative would have been to install a bigger engine. Trust me, I really considered upgrading to a 6 cylinder. That would have definitely ate up all that extra engine bay space!
 
Got to love those huge Bendix discs. I prefer the braided lines over the rubber, But I imagine the the braided are not available for a step van. The problem with rear disc is what about an E brake? I am sure you know drum brakes make for excellent E brakes, and disc make lousy E brakes. I hear some of the newer conversions use the newer type discs with built in drums for the E brake. Or some heavy duty apps have the drum mounted on the rear of the T400 trans great set up.

Love the map.

Highdesertranger
 
The old rubber lines still work. We're gonna keep them in the rig as spares in case ones gets severed and we get limb somewhere safely. Lines were a bit tricky to get a hold of as these setups had many different configurations. But now we have part numbers written down, so no worries. I've done the disc brake conversion on my military truck. It actually has the same corporate 14 bolt axle as we have in this van, just not a dually. I bolted on calipers from a 1972 Cadillac El Dorado. They are basically 3/4 Ton GM brakes with parking brake built into them. They work pretty good, much better than the old drums. Or you could install a driveshaft parking brake. But I hate fiddling with drums. Discs are much easier to maintain and stuff.
 
I have done several Cadillac rear disc conversion and on everyone I found the E brake lacking. I have also tried the E brake disc that mounts on a 205 transfer case, no way just can't hold. it's just the physics of it, on a drum brake the more it slips the more braking force is applied. it's just the way they are designed. Not so with a disc you are relying on the clamping force of the caliper and you need hydraulic pressure to really clamp it down, mechanical means just doesn't cut it. I am bias though because I have a stick and with a stick you need the E brake to hold 100%. working pretty good just don't cut it with a stick.

Don't get me wrong in all other way disc brakes are far superior.

Highdesertranger
 
Hmmm, definetely some things to consider, especially since it is stick shift. Driveshaft brakes always seem like a good option, but I have no experience with them. Will keep the drums for now as they work fine. I like the manual parking brake lever on the dashboard. You turn knob on handle and can adjust parking brake right from the driver's seat! For that feature alone, I might just not mess with it and keep the drums.
 
Actually if you do a proper brake job on the drums and bring them back to factory new specs they will last over 10 years easily. Especially if you have a stick, I find my brakes last seemingly forever. Down shifting with the stick really saves the brakes tremendously. With a dually I assume you have the big 13 x 3.5 inch brakes. those things are monsters. Highdesertranger
 
Yea, the shoes on drums do seem to last a long time. Most of the braking always seems to be up front. Yes, these are the 13x3.5" brakes. We'll keep em going I guess. Spend time and money on other important things like margarita machine and portable hot tub.  :D
 
So there just so happens to be a replacement for displacement, and it's turbochargers! Yes, we could have swapped in a Cummins 6 cylinder, but time and budget are a factor and we ended up rebuilding the Cummins 4 cylinder. Besides, my engine hoist couldn't pick up the 6 cylinder, so that was the final deciding factor, and I'm sticking to that. But I bet we could squeeze just a lil bit more out of the lil engine that could, or couldn't.

51201453452_ea351f183e_c.jpg

[size=small]The old setup has a turbo, stock from the factory for this van application. But as in other factors in life, size does sometimes matter. And the old little one got the job done for the van, but she wants to get up to speed faster sometimes and in a more efficient manner. You can also see the air intake setup. Not sure what went on there, but someone took some scrap metal brackets and exhaust pipe and welded up this horrendous attachment for the air filter, bolted to the exhaust manifold. I'm very glad to throw all that into the trash.[/size]

51202951864_5306ec608e_c.jpg

[size=small]So first thing is first, mount the new turbocharger. Of course it barely clears the exhaust manifold and butts up against the oil filter. No way to get a rubber elbow on that to clear it. This turbocharger is much longer than the old one. If we had a 6 cylinder, this would be no problem. Maybe this is a sign we should just get a larger engine?[/size]

51202179101_a23f576707_c.jpg

[size=small]Options were:[/size]
A-get a larger engine

B-get new oil filter plate and turn oil filter sideways

C-get new oil filter plate and retrofit the oil filter into a completely different location

D-flip exhaust manifold upside down and mount turbocharger on top of engine and make new exhaust

E-try to change the angle of the turbocharger to give clearance for intake boot


[size=small]Well, we went with option E. It was the cheapest and easiest solution. Being a step van, we had plenty of clearance in the engine bay for whatever we wanted. And access all around, front and back. Did I mention how easy it is to work on step vans?
[/size]


51202180006_28885b216b_c.jpg

[size=small]Got turbocharger mounted and the intake boot will clear the oil filter. But now the turbocharger is up and away from the engine block so the oil return won't reach. Simple enough, just need to replace hose with a longer one.[/size]

51201468827_0428a6328e_c.jpg

[size=small]Now that the exhaust manifold side of things is mostly done, lets run over to the intake manifold. The old piping wasn't going to fly. I did all the cfm calculations, which called for 2.6" pipe. That puts us at using 2.75" pipe at a minimum. The pipe coming out of the new turbocharger is 3" and we found an old 3" intake manifold off Ebay at a good deal, so we're using 3" pipe. Yes, there could be potential for some turbo lag, but we're not gonna worry about it. This isn't a race car. Better to go a little bigger than a little smaller.[/size]

51201470312_ab099abc42_c.jpg

[size=small]Cleaned up the new intake manifold and gave it some paint. It was pretty well used and used somewhere that allowed it to get pretty corroded. Surprisingly I was able to get it mounted up without removing the fuel injector lines.[/size]

51202393048_a9e412f050_c.jpg

[size=small]Some people have expressed concern about added heat. So to combat the heated up air from the pressurization of the turbocharger, we're gonna install a intercooler. We picked this 2nd Gen Dodge Cummins intercooler up for $10, score! Not sure how we're gonna fit it, but the tape measure says it will fit in there. Tape measure don't lie right?[/size]

51202397318_43c7dd7ced_m.jpg

[size=small]Unfortunately, upon cleaning it up, there were 3 small holes. Total bummer. Looks like some kind of bracket was rubbing against the metal. These aluminum tubes are very thin. At first I thought oh well, at least I can use it as a template to make some mounting brackets and order a new intercooler. Ok, great.[/size]

51203261055_c4cdcf515d_m.jpg

[size=small]But new intercoolers are like $500 and we blew that money on the turbocharger, so we gonna fix these small holes and hope for the best! The aluminum was super thin, and there wasn't a good way to clean the interior, so there was no way I was going to attempt to TIG weld it. So I opted to braze it instead. Was not easy. Aluminum radiators like this are really good at sucking up heat and making it disappear. I had to use quite a bit of heat from the oxyacetylene torch. The middle one had a weird blowout nowhere near where I was heating and working the filler. We'll pressure test it and see if it holds.[/size]

51201482852_4337c6854f_c.jpg

[size=small]Had to move the radiator out of the way and install intercooler down in through the inside of the engine bay. Just fits, with 3/16" of clearance on each side. Now need to fab up some brackets and get some plumbing done.[/size]
 
Top