building a healthy meal plan

Van Living Forum

Help Support Van Living Forum:

This site may earn a commission from merchant affiliate links, including eBay, Amazon, and others.
How does that work? are they like miniature versions of the main greens types?
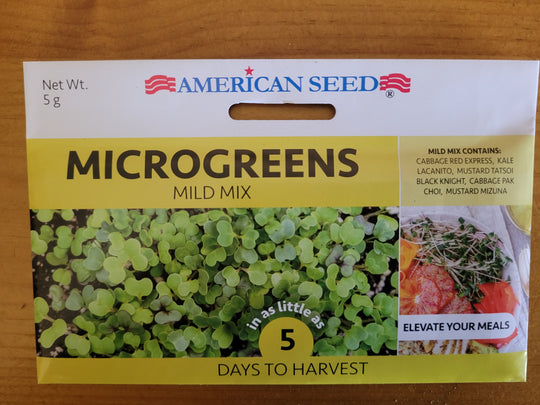
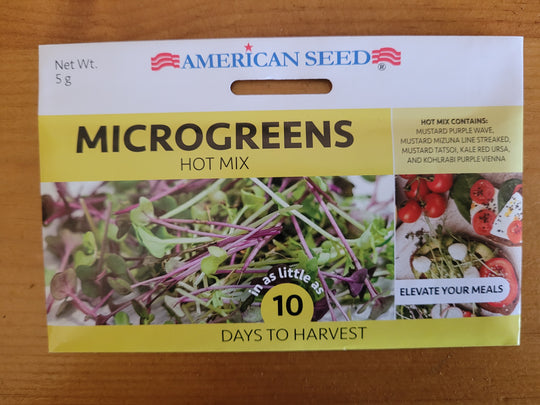
I'm just beginning to explore microgreens, and have only scratched the surface in terms of understanding how to grow and enjoy them. My understanding is that, yes, they are very immature vegetable plants, only grown to between 1" and 3" tall, then harvested with scissors.

For me, the intent would be to produce only a small amount, as a dietary supplement in nutritionally dense, tasty form. I have read that the vitamins, minerals and polyphenols in microgreens are 4 to 40 times (quite a range, huh) more than what's in mature plants of the same species. Plus--I think it will be a fun, portable (on a small scale), relatively inexpensive diversion.

(I enjoy sprouts, but they require a lot of water to rinse at least daily and are a little harder to manage when traveling than I like. A van friend of mine from long ago used to grow hers in a small burlap bag. I use an Easy Sprouter.)

Apparently, many plants can be grown as microgreens, with some being easier than others. It looks like it is important to use "untreated" or "microgreen" seeds, though, because some of the antifungal and systemic insecticides that may break down by the time a plant reaches full maturity will still be fairly concentrated in these little guys. (Personally, I will use organic, non-GMO seeds.)

For growing medium, I am starting with potting soil for seedlings (finer than standard potting soil). Some use various fiber growing mats; others hydroponic systems. Only about 1" of soil is needed.

So... The theory is seeds are densely spread on the soil, kept in the dark (some add a little pressure on top) for a few days until they sprout, then watered lightly each day and given a minimum of 2 hours of light (grow light or filtered natural light). Somewhere between 7 and 21 days later, they are ready to cut and eat.

I planted my first batch day before yesterday in a 6" x 3" x 3" container and banished them to a drawer. We'll see what happens!
 
Last edited:
I enjoy my salads and the salad dressings I make to go on them. I've long used sprouts in them and other food items.

My sprouting jars are simple. Basic canning jars (pints or quarts) and the "rings". Find a used "lid" to use as a template, an ink marker and a pair of scissors.

Next you will need a small sheet of that "plastic needle point mesh" from a craft store. Something fine enough that seeds won't come thru it. (when rinsing a couple times a day)

705897-36819-IMGSET


Trace around the lid with an ink marker and cut the inside of the line so it will fit
into the ring easily.

If you visit "Health Food Stores" or go mail order you can find sprouting seeds.
You only need follow directions. Remember seeds such as Broccoli have a potent smell when sprouting. They are still good. I like Alfalfa and Mung sprouts myself. Mung work well in stir fry/Wok dishes. I like to use Alfalfa spouts on toasted cheese sandwiches.

In the spring Dollar Tree offers numerous seed packages and among them are a couple varieties of Micro Greens. They also sell small "mini" foil loaf pans and with some good soil the greens can be grown in those. So for around $2.50 you are in business for Micro Greens. One type is Mild and the other is Hot.


MICROGREENSMILD1_540x.jpg


MICROGREENSHOT1_540x.jpg
 
So you do need to have special seeds for microgreens, right?
It's not just the same seeds, grown differently?
 
So you do need to have special seeds for microgreens, right?
It's not just the same seeds, grown differently?
It's really up to you. You could use regular seeds, but they contain some chemicals you might want to avoid. By the time, say, a broccoli plant grows to it's full size, the amount of those chemicals still in the plant is considered to be relatively harmless (depending on whom you ask). In microgreens, they are still pretty concentrated.

Argula, BTW, seems to be a popular choice for microgreens. I don't know who easy it is to grow that way compared to say, broccoli (again).
 
I guess I just have dwarf greens instead of microgreens then. I will have to look this up and do it properly next time (I mean, do micro on purpose). My dwarves are edible though. They're a lot sharper than the ones I get in the grocery store. I don't know if that's because they're dwarves or because it's a different variety.
Thanks for bringing this up!
 
This article in Mother Earth News regards growing micro greens on wet paper towels. (hydroponic if you like) There is a graph in the article that shows various
seed, it's difficulty to grow, days to grow till harvest, and so on. This should be interesting to anyone interested in growing micro greens or sprouts.

You can always harvest some extra paper napkins at a fast food place once you have seeds. Water and trays....even foil ones are easy enough to come by.

Growing Micro Greens on Paper Towels
 
This article in Mother Earth News regards growing micro greens...
Great article (yea! Mother Earth News)! Wish I had seen this before starting my first batch. Lots of different information out there, but the recommendations here make a lot of sense.

Thanks!
 
I love this conversation. It falls into the "every little bit helps" category. And it's also another way to engage with the lifestyle in a positive way.

I know space is an issue, but tomatoes are super easy as well. I know there was a thread or conversation on those as well.
 
Here are some simple Hacks that may benefit some micro nomadic gardens.
Tomato plants require lots of calcium or the fruit will get black bottoms and be useless. You can use old egg shells and I've heard of people using Tum's ant-acid tablets to increase calcium with the Tomato plants.

1718239657391.jpeg

Early Girl is a variety of tomato that bears fruit in about 50 days from planting seed. If you purchase plants it may be within a month.


Garden Hacks Fertilizer.jpg
 
Some basics for those who want to grow stuff but don't know much about it. A quick tutorial.

Gardeners often speak of having a "Green Thumb" if they are fortunate in growing vegetables & flowers. Generally they know a few secrets regarding
going about getting soil ready for the type of "plant" they are wanting to grow.

The first is getting the soil adjusted to the PH (acidity) of the plant that is going to be living and growing in that soil. Fertilizer isn't always the answer. Informed gardeners know that they can look up the type of plant that they are wanting to grow and find the PH range it grows best in. Each plant will have it's optimum PH and will still grow a bit above or below that point.

So you have "soil" to plant in. Whether it is a bag of potting soil or just a bucket of "dirt" you dug up. How to test it and adjust it ?

You need some distilled water or some rain water. This will be mixed into a little of the soil you have for testing purposes. Rain water has a natural PH of 7 which is a neutral PH. PH scale goes 0 (acid) to 14 (alkaline)

Next an inexpensive package of PH Testing Tape. Known as Litmus paper in chemistry class in school days. (cost a few dollars but is affordable and a package may contain 160 strips)

61JVNL-fNyL._AC_UL232_SR232,232_.jpg


PH can be adjusted easily enough by mixing baking soda or powdered alum in some rain water. About a TB spoon per gallon of soda will adjust PH to the +7 level and a TB spoon per gallon of Alum will adjust the soil to the -7 level. You need to first determine the PH of the soil before adjusting it. Then over a day or two water the soil and test until you get the desired range. This can be done early in the year while it is still too cold to plant so you soil will be ready. Soda & Alum are not that expensive.

Using a Tomato plant as an example (each variety will have it's optimum PH level) I mentioned "Early Girl" variety as it bears heavily and early, and it has a PH optimum between 6.0 and 6.5. (slightly acidic) You can Google for the best
growing environment details of any plant. As a tomato plant grows it is necessary to cut off the lower stems & leaves to prevent bacteria infection of the plant. Keep the plant growing and cut off those lower stems to have plenty of air flow under the lower limbs and leaves. (6 to 8 inches off the ground) If you see plants with yellow lower leaves....don't buy them as they are already infected. Fertilize small tomato plants early with nitrogen so they will grow quickly and you can prune off those lower stems & leaves to give them a chance. Those yellow leaves are usually a death knell.

Arugula (as mentioned) has a PH optimum between 6.0 and 7.0. It likes full sunlight but prefers cooler temperatures to thrive. Thus physically moving it's container thru the day may be advisable. Let it get the morning sun before moving it into partial shade where it may be cooler....or under the rig into a bit of shade.

A note on fertilizer. You can buy small packages of fertilizer for regular plants or for acid loving plants. You will see numbers like 10-10-10 as an example. The first number indicates Nitrogen. The second is Phosphorus. The third is Potassium. So what does it mean to you and the plant ? Well, the Nitrogen will influence the above ground part of the plant and it's growing. The Phosphorus will influence the root system or underground growth. Lastly the Potassium will influence the overall health of your plant.

The proper PH soil for a plant allows it to extract from the soil all the nutrients that it needs. Most garden fertilizers provide the essential 3 elements plants need. But plants also need calcium, magnesium, sulfur, boron, chlorine, iron, manganese, zinc, copper, molybdenum, and nickel in order to thrive. Most soils dug up in the wild will contain adequate amounts of those.

Happy gardening ;)
 
Top