My Trailer Build

Van Living Forum

Help Support Van Living Forum:

This site may earn a commission from merchant affiliate links, including eBay, Amazon, and others.

Patd4u2

Well-known member
Joined
Feb 5, 2016
Messages
98
Reaction score
0
Location
Murrieta California
Planning on doing some long term camping and traveling around the south west and up to the pacific northwest. I have been buying things I think I will need to make my living in a trailer more comfortable.
The high prices for a store bought trailer with what I wanted was way to high for me. So I got my son-in-law to build one for me. I sat down and thought what I needed to make living in it comfortable; I know I wanted a bed, a place to cook and a indoor toilet/shower and it had to be solar powered, once that was out of the way any thing extra would be a luxury. I started buying things that I didn't already have for it last year little by little and have almost everything I need for it to make living in it comfortable.
I'll post pictures of my build as it gets built.


IMAG1659 (Custom).jpg

IMAG1684 (Custom).jpg

IMAG1688 (Custom).jpg

IMAG1695 (Custom).jpg

IMAG1724 (Custom).jpg
 

Attachments

  • IMAG1659 (Custom).jpg
    IMAG1659 (Custom).jpg
    104.4 KB · Views: 49
  • IMAG1684 (Custom).jpg
    IMAG1684 (Custom).jpg
    109.4 KB · Views: 40
  • IMAG1688 (Custom).jpg
    IMAG1688 (Custom).jpg
    120 KB · Views: 46
  • IMAG1695 (Custom).jpg
    IMAG1695 (Custom).jpg
    108.4 KB · Views: 39
  • IMAG1724 (Custom).jpg
    IMAG1724 (Custom).jpg
    109.4 KB · Views: 68
Looking forward to updates. Your build looks pretty awesome so far.
 
Make sure you include a very comfortable place to sit, along with a table for when the weather is foul and you waant to spend your time indoors.

A place I can sit and be comfortable ALL DAY is a must for me...
 
We are going to put a fold down couch (small one) on the opposite side from the kitchen over the wheel well and have a little table that I will store under the bed to eat on if the weather is not good enough to be outside.
I have some boxes of wood flooring in my garage that have been in there for a few years that I am going to use for the floor.
The trailer looks bigger than it actually is in the pictures. the dimensions are six feet wide by twelve feet in length and five feet tall, with the pop-up center living room it will be six feet four inches, so I'll be able to stand up in it. I wanted a off road trailer so that I have access to a little more camp sites than with a standard trailer. The width and height is the same as the jeep wrangler I just purchased to tow it so that the wind resistance wont effect the gas mileage to much.
 
My son-in-law made the floor plan in paint that I am going to go with. It's amazing how much you can squeeze into a 6 x 12 space and still have room to live.


20160214_195955 (Custom).jpg
 

Attachments

  • 20160214_195955 (Custom).jpg
    20160214_195955 (Custom).jpg
    43.6 KB · Views: 111
Patd4u2My son-in-law made the floor plan in paint that I am going to go with. It's amazing how much you can squeeze into a 6 x 12 space and still have room to live.


Awesome.  I'll take one.  Seriously there is definitely a market for a bigger off-road "teardrop"  trailer.  Is your son-in-law fabricating the pop up section as well?  Can't wait to see more.
 
very nice looking build. what type of suspension are you going with? highdesertranger
 
acfdexpo said:
Patd4u2My son-in-law made the floor plan in paint that I am going to go with. It's amazing how much you can squeeze into a 6 x 12 space and still have room to live.


Awesome.  I'll take one.  Seriously there is definitely a market for a bigger off-road "teardrop"  trailer.  Is your son-in-law fabricating the pop up section as well?  Can't wait to see more.

Thank you, I am more than happy with the way the build has been going,
I told my son-in-law that there is a market for these smaller trailers, and that people might be interested in having him make them one.
I just received the 30 gallon water tank from Amazon a couple of days ago and the water pump, that is going under the bed, and a Triton tank-less hot water heater is going close to the shower.
Yes we are getting the sliding brackets right now for the pop-up roof and my son-in-law is going to fabricate the frame, it is going to have rip-stop fabric for the sides and a aluminum roof and have gas struts to lift it up.
 
We got some more work accomplished this weekend, Fabricated the storage compartment doors and the entrance door. Almost ready to paint the frame and go and get some aluminum sheet metal and some diamond plate.


IMAG1755 (Custom).jpg
 

Attachments

  • IMAG1755 (Custom).jpg
    IMAG1755 (Custom).jpg
    137 KB · Views: 61
We built a similar steel frame camper for our truck.  We used 1/16" thick aluminum panels for the sides and attached them with just glue (Sikaflex 252)

That was two years ago and everything is holding up beautifully.   Rivets would work also, but I like the look of the glue.
 
IGBT said:
We built a similar steel frame camper for our truck.  We used 1/16" thick aluminum panels for the sides and attached them with just glue (Sikaflex 252)

That was two years ago and everything is holding up beautifully.   Rivets would work also, but I like the look of the glue.

Thanks for the info on putting the sheet metal on the frame, I'll look into it with my son-in-law, That would definitely give the trailer sides a smoother look.
 
IGBT said:
We built a similar steel frame camper for our truck.  We used 1/16" thick aluminum panels for the sides and attached them with just glue (Sikaflex 252)

That was two years ago and everything is holding up beautifully.   Rivets would work also, but I like the look of the glue.

We decided to go with the Sikaflex 252 for the aluminum siding. Looks like it will do the trick,
Thanks for letting me know about how it worked on your camper build.
 
Patd4u2 said:
We decided to go with the Sikaflex 252 for the aluminum siding. Looks like it will do the trick,
Thanks for letting me know about how it worked on your camper build.

Just prep the metal well (we cleaned the steel with methanol).   We also used the Sika 210 primer/activator, which is absurdly expensive at $50 a bottle (little bottle) but goes a long way if you can use it up all at once.   If you store the 210 primer for more than a few days after opening, it will have gelled and be useless.   Make sure if you buy a new 210 primer bottle that it is not past the date code (had one store try and sell me some that expired 2 years ago).  Big marine stores carry it.

Sika 252 works without the primer, but you can peel it off with some effort.   If you primer the steel with the 210 activator and then use the 252, it is like the aluminum is welded to it and you will not be getting it off without a jackhammer.

We used rare earth magnets (50 pound pull 1 inch square 1/2" thick) from ebay to to hold the aluminum to the steel frame while the Sika cured (about half a day)


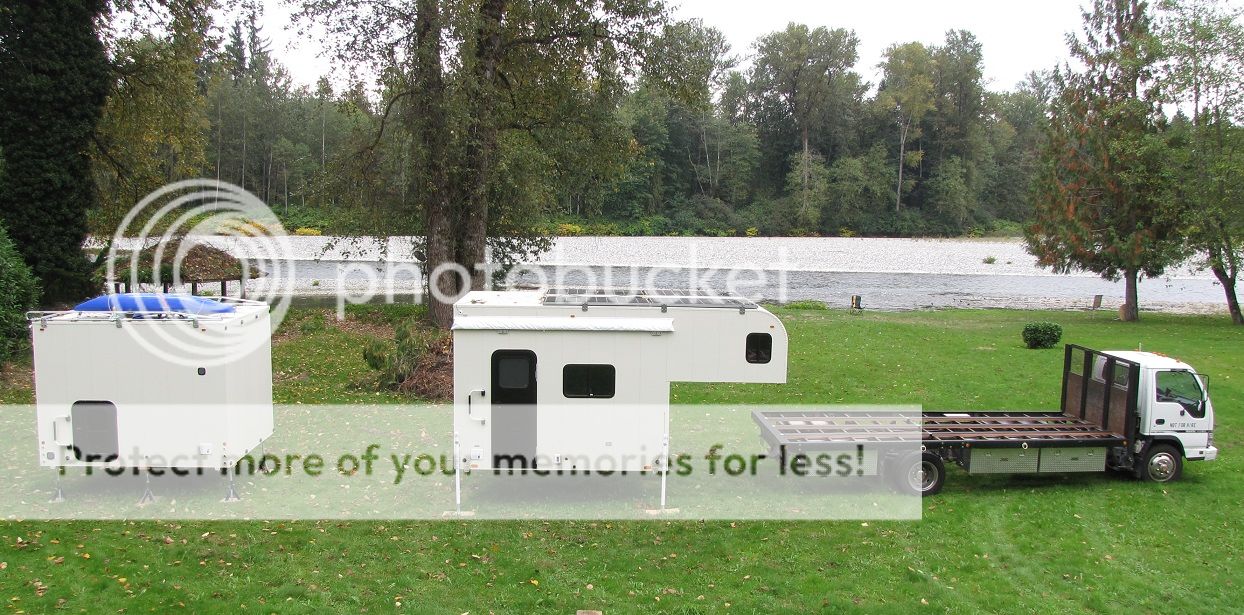
Did you put that on an Izuzu flatbed? I've heard those are good running trucks. Is it diesel and if so, what's the MPG?

Nice job! Love to see the inside.

John
 
Konaexpress said:
Did you put that on an Izuzu flatbed? I've heard those are good running trucks. Is it diesel and if so, what's the MPG?

Nice job! Love to see the inside.

John

(I don't want to hijack this thread too much, just want to help out a fellow builder)

We did put it on an Isuzu NRR 20 foot flatbed with 4 cyl diesel 200hp and gets about 10 to 11MPG with both pods on (about 14MPG bare)

When I get a chance, I will link some interior pics.   This is what the flatbed looks like:

 
IGBT said:
Just prep the metal well (we cleaned the steel with methanol).   We also used the Sika 210 primer/activator, which is absurdly expensive at $50 a bottle (little bottle) but goes a long way if you can use it up all at once.   If you store the 210 primer for more than a few days after opening, it will have gelled and be useless.   Make sure if you buy a new 210 primer bottle that it is not past the date code (had one store try and sell me some that expired 2 years ago).  Big marine stores carry it.

Sika 252 works without the primer, but you can peel it off with some effort.   If you primer the steel with the 210 activator and then use the 252, it is like the aluminum is welded to it and you will not be getting it off without a jackhammer.

We used rare earth magnets (50 pound pull 1 inch square 1/2" thick) from ebay to to hold the aluminum to the steel frame while the Sika cured (about half a day)


Wow, thank you so much for the pictures and the information on how you attached the aluminum sheeting to the steel frame. I am going to go with your recommendation and get the 210 activator, After spending this much so far on the build it is no time to start scrimping. I will look for the magnets on ebay to hold the aluminum sheeting to the frame like you did.
Thank you again for this awesome information!
Your build is absolutely first class. well done..!!

Pat D
 
Thanks for the nice compliments :)

One other thing we did which you may or may not want to bother doing.   Sika recommended a thickness of about 1/16" or so on the cured 252.   To ensure we maintained this and also to make sure there was no aluminum to steel contact (to prevent galvanic action) we cut up nylon tie wraps into little 1/2" long sections and pressed them into the applied Sika on the steel before sticking the aluminum skin to it.   Very cheap, since tie wraps are like 100  for a buck at Lowes.  They also happen to be about 1/16" thick.

If you use c-clamps instead of magnets in places where that will work (we did this) like on edges, try using long strips of wood under the c-clamps to spread the pressure over the joint so you don't squeeze out all of the Sika in one spot.  Essentially you make a really big low pressure clamp by having the surface area of the wood (we had a bunch of 1"x2" strips by 4 feet long and we used about 3 c-clamps per strip.
 
Top