Hey all,<br>I'm trying to figure out how to connect the components of my future solar set-up. From my solar panels,<br><br>http://www.amazon.com/Uni-Solar-PVL...=sr_1_1?ie=UTF8&qid=1320224899&sr=8-1<br><br>how would I connect them to this:<br><br>http://www.morningstarcorp.com/en/sunsavermppt<br><br>Would I need to strip the rubber housing from the solar panel's cables in order to expose the wires to connect them to the solar charge controller? Thanks everyone.<br><br>
You are using an out of date browser. It may not display this or other websites correctly.
You should upgrade or use an alternative browser.
You should upgrade or use an alternative browser.
Solar Panel Wiring
- Thread starter yamsack
- Start date


Help Support Van Living Forum:
This site may earn a commission from merchant affiliate
links, including eBay, Amazon, and others.
gadgetMe
Well-known member
- Joined
- Jan 9, 2011
- Messages
- 238
- Reaction score
- 0
the solar will have special connectors that are industry standard<br><br><a target="_blank" href="http://www.mouser.com/Interconnects/Photovoltaic-Solar-Connectors/_/N-79syi/">Here</a> is where you can buy the female and male connection that match the panel ones. I would recommend to also get the special tool that is sometimes needed to get them apart. For mobile applications I think they are a pita (not handy)<br><img src="http://www.mouser.com/images/amphenol/sm/9266.jpg"><br><br>For my set up I use <a target="_blank" href="http://www.powerwerx.com/anderson-powerpoles/powerpole-sets/sb50-sb-series-50-amp.html">Anderson electrical connectors</a><br><img src="http://www.powerwerx.com/_images/products/sb50_lrg.jpg"><br>I cut the existing connectors, strip the wire, soldier the lugs onto the wire.<br>the connector has plus and minus markings to get them in the right place.<br><br> I soldier a 12 gauge wire the the other half of the connector, install in pos & neg slots and attach the other end of the wire to the controller.<br><br>the nice thing about the Anderson connector is the ease of hooking and un-hooking and it is impossible to reverse the polarity when assembling. Also they are industrial strength , will last a long time<br><br>Putz<br><br>
4
4x4tour
Guest
This is how I did mine:<div><br></div><div>Get a (one for each panel u have) 3 foot extension of the proper attachment type of your panel, then cut that extension in half.</div><div><br></div><div>The 2 plastic ends of halves will clip into the pos/neg wiring of the panel, and you will then just crimp 12 gauge wiring (after stripping the cut ends for simple gauge crimp connectors) from the panel and run wiring to the pos/neg input of the morningstar. I think we've discussed the specifics before on here. <div><br></div><div>Getting the extension with save your panels' warranty by not cutting the panels' wiring to attach the 12gauge pos/neg wiring. </div><div><br></div><div>Piece of cake... </div></div>
<b>@ 4x4tour</b> I will be using 2 flexible solar panels, so there will be a total of 2 sets of pos/neg cables running from the panels. Instead of cutting a single extension cable in half (lengthwise) and connecting the halves to the pos/neg of the panels, would it still work if I just simply got 4 extension cables (1 for each of the pos/neg from the panels), strip the ends of the 4 cables and then just connect the ends to the Morningstar's pos/neg terminals?<br><br>Secondly, what type of cables do you use to connect the Morninstar to the actual batteries?<br><br>Lastly, how do you connect the batteries together (in parallel) and finally to the inverter?<br><br>
4
4x4tour
Guest
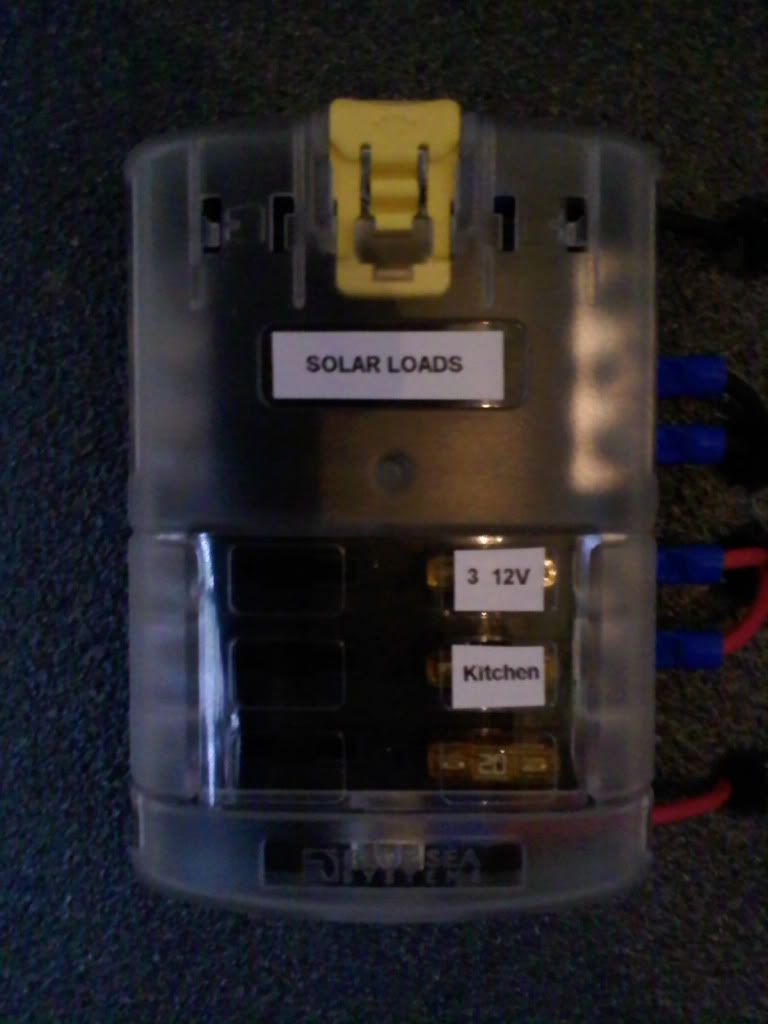
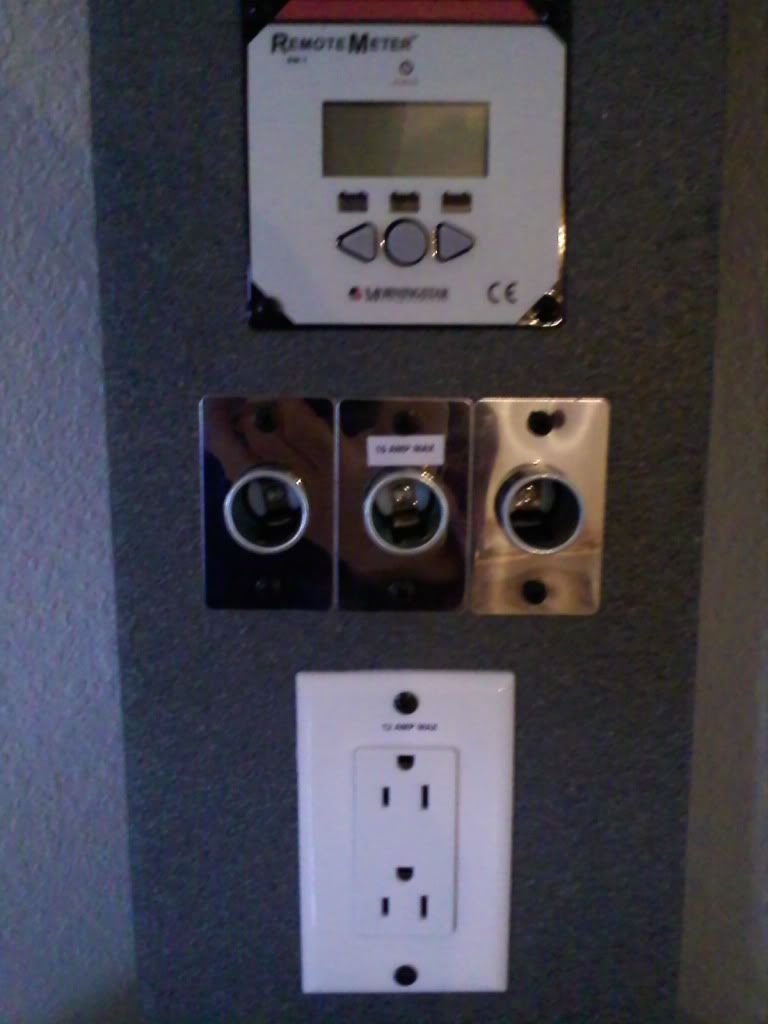
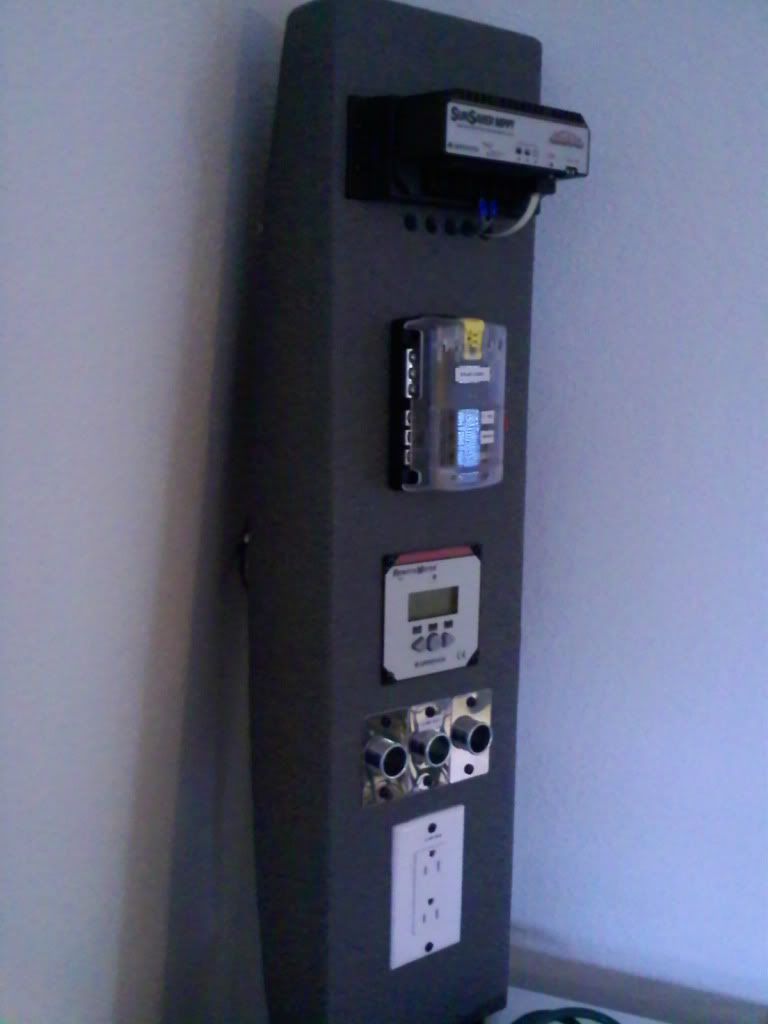
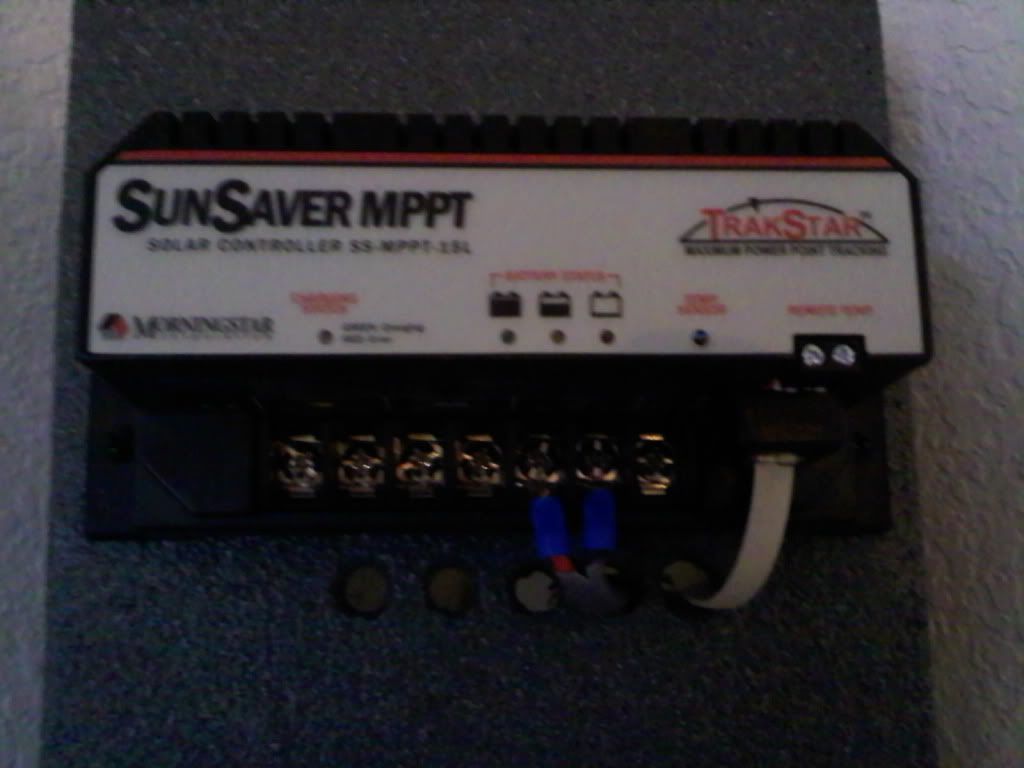
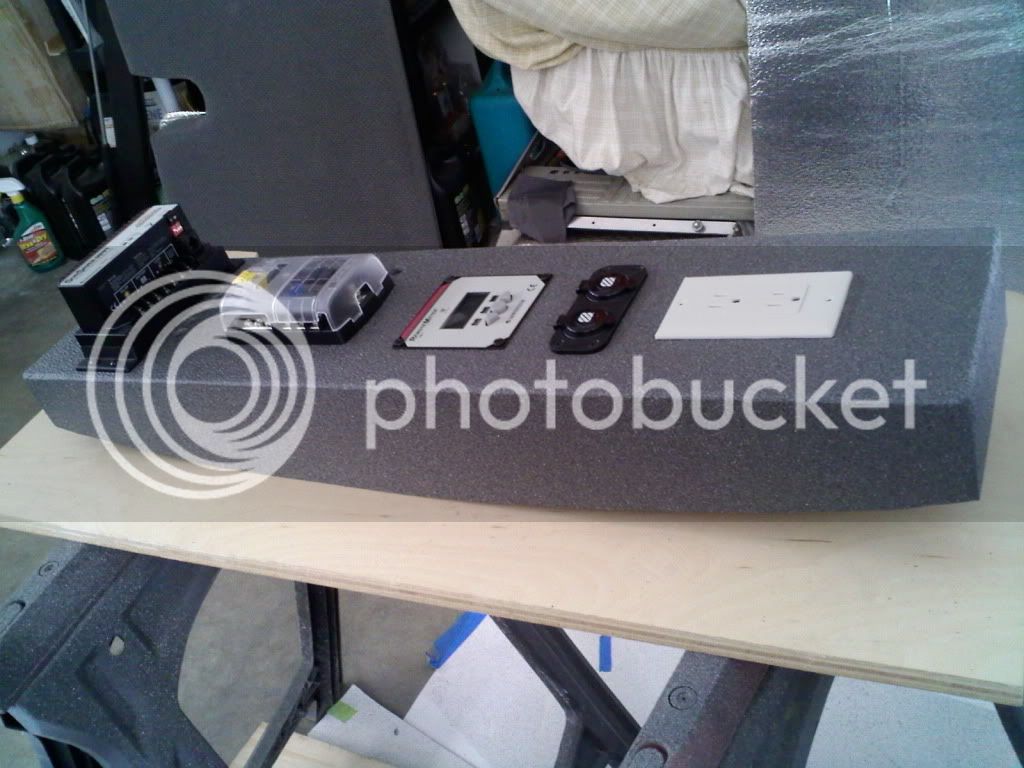
Id do 2 small extensions (same kind as your panels). We covered that I think (research for exact types), cut them, then join all of it between the panels then run one set to morningstar. Use 12 guage for all van 12 guage wiring with 20am fuses and you'll be fine. <div><br></div><div>Just remember, the morningstar is rated at 15amps (no more). For heavier amp items, run a separate 12volt receptacle with 12 gauge wiring and a 20 amp fuse. <br><div><br></div><div>For the wiring, I think we've covered that as well for you system, but just do this: </div><div><br></div><div>1. Get 8 guage pos/negative wiring for running from the battery battery bank to the morningstar (where it says), then use 12guage wiring (I used sleeved 12 guage wiring from Napa so I didnt have to use wire loom (in tight spots), as i did on all of the the 8 gauge pos wire. </div><div><br></div><div>Use 4 gauge for connecting the batteries together (pos to pos, neg to neg) for 12 volt batteries. I like the Sears P2 platinums (military Odyssey AGM rebadges). Dont forget to fuse each pos wire, or get the blue sea fuse box like i did. </div><div><br></div><div>Use 4 gauge from the inverter DIRECTLY to the the battery bank, NOT to the morningstar, or you will fry it. </div><div><br></div><div><br></div><div>Blue sea 12v Pos frame mounted connection:</div><div>
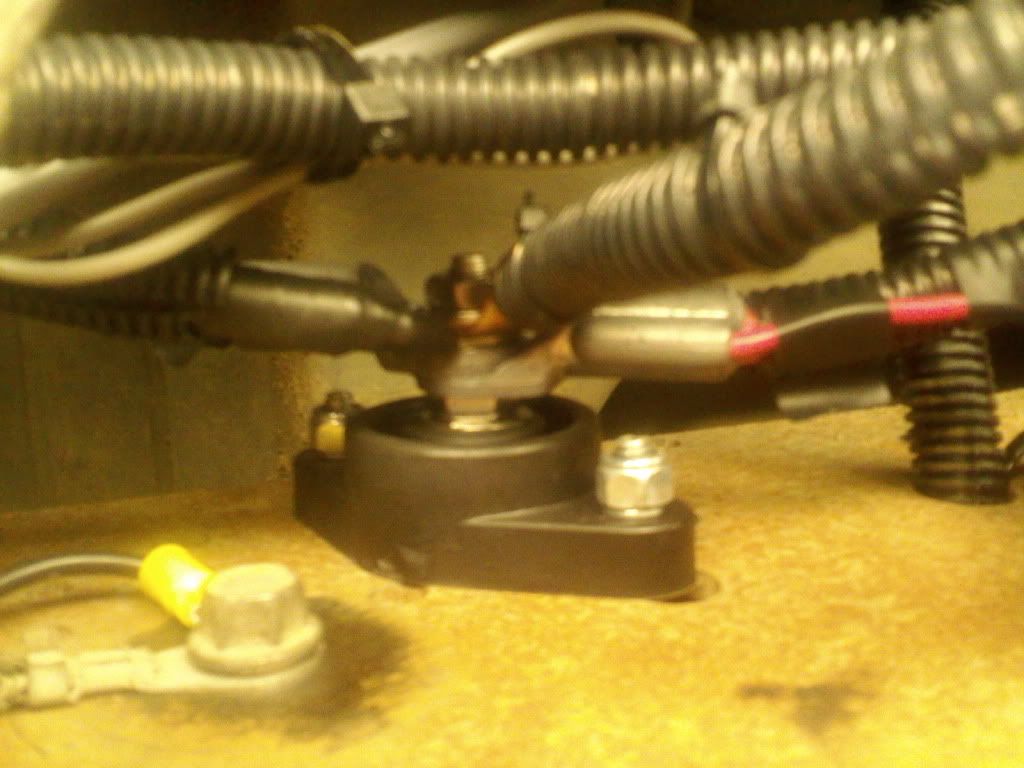 </div><div><br></div><div>Control panel I made:</div><div><br></div><div>In final assembly, 8 gauge is use at the top and bottom, 12 gauge in between. </div><div>
 </div><div><br></div><div>
 </div><div><br></div><div>
 </div><div><br></div><div>
 </div><div><br></div><div>
 </div></div>
I agree with sl1966.<br><br><b>@ 4x4tour </b> While I very much appreciate all of your instructions, these details are a bit overwhelming for me. I'm sure this is all very basic to you, but this is over my head. Is it at all possible to just run only wiring from the solar panels, to the charge controller, to the batteries, and finally to the inverter (in that order)? Where I get stumped is when you start adding fuses, controller panels, relays, etc. <br><br>My thinking is that as long as there is just basic wiring connecting all of the components together, the electronics inside the charge controller and inverter should be sufficient to keep things from blowing up. Additionally, the 2 solar panels will be totaling 138 watts and the controller is rated at 15 amps, so I don't think there will be a chance for anything to overload or fry.<br><br>If my logic is too simplistic (or nonsense), I still plan on getting the components myself and perhaps hiring an electrician to wire them together. Do you know how much that would cost for their services to simply wire the components together? As always, thanks for your info.<br><br>
4
4x4tour
Guest
Ok, here is the simplest way I can explain it. Read EACH NUMBER a few times to get the grasp (that's how I do it). Im currently learning how to weld aluminum via you-tube...lol<div><br></div><div>1. <b><u>Your inverter is separate from all other components</u></b>. You should mount it somewhere within 8 feet or so of the house battery(s). You will run 4 guage wire (I just used a set of 4gauge jumper cables, stripped a 1/4 inch off and soldered ends on them), or a stereo place can easily make them for you. I like to do everything myself, so I know it's done right...</div><div><br></div><div><b>***</b>Note: Oddly, I had never soldered before, and learned from a You-tube video. Use a 60% Tin/40% Alloy Flux Core solder for electrical soldering (withstands higher heat than regular solder), with a handheld torch. Heat the connection and solder in a vice like a bowl of soup, then dip the ends of the 4gauge wire in and let it cool in seconds... Worked great for me....</div><div><br></div><div>2. Mount your panels on the roof (and if you're not concerned about keeping their warranty), cut the pos/neg ends, attach 12 gauge wire (20amp fuse inline on pos wire) and run to the Morninstar "<b><u>solar</u></b>" "pos" and "neg" posts. </div><div><br></div><div>3. From the house battery, run 12 gauge (with an inline 20amp fuse) pos wire to the "<b><u>battery</u></b>" pos on the morninstar. Then use a 12 gauge ground wire from the morningstar "Battery" "neg" to the frame. </div><div><br></div><div>4. To run your 12volt stuff, you will need to attach 12 gauge (with 20 amp inline fuse) pos/neg wires to the "<b><u>load</u></b>" "pos" and "neg" of the Morningstar to a 12volt outlet(s) of your choice. Don't get the black West Marine 12v receptacles, as they suck. </div><div><br></div><div>I used that blue sea fuse box just to separate and separately fuse EACH of my different 12v loads. You dont need to, just remember not to exceed a TOTAL of 15 amps through the Morningstar, or it will keep resetting. The optional remote meter is really cool. It tells you how many volt/amps you're using at any time. </div><div><br></div><div><b><u>It's simple... </u></b>You only have <b>LOAD</b>, <b>SOLAR</b> and <b>BATTERY</b> connections to make on the Morningstar (just 6 wires). As for the inverter, it MUST be wired separately to the batteries (with 4 gauge wire), due to the massive power requirements. </div><div><br></div><div>The most time intensive part is actually running the wiring through the roof, to inside the vehicle, and to where you have the morningstar mounted. I used a west marine through0hull fitting, and siliconed the crap out of it. </div><div><br></div>
I have found that soldering does not hold up in a near constant moving vehicle. Crimping is better, an actual mechanical connection, in my experience. Of course, the tool costs about $100, or NAPA might do it for you just bring them the fittings. I have found that 2/0 cable running from my inverter to the batteries less than 2 ft. away creates far less voltage drop.
- Joined
- Dec 12, 2010
- Messages
- 7,706
- Reaction score
- 55
Installing solar seems difficult, but honestly, it is very simple. If you can strip and crimp a wire, you can do it yourself!! Here is an article of my solar install with pics. Take a look at it and let me know if you have any questions. Bob<br><br>http://cheapgreenrvliving.com/Solar_Installation.html<br><br>Here is a basic intro to solar:<br>http://cheapgreenrvliving.com/Solar-Basics.html<br><br><br>
G
Guest
Guest
<p style="margin: 0px;">Jay just set up the panels on our van and will be setting up the wiring soon too!</p><p style="margin: 0px;"> </p><p style="margin: 0px;"><a href="http://ourlifeourway.com/2011/12/15/van-conversion-solar-panels/" target=_blank>http://ourlifeourway.com/2011/12/15/van-conversion-solar-panels/</a></p><p style="margin: 0px;"> </p>
<b>@ 4x4tour</b> "2. Mount your panels on the roof (and if you're not concerned about keeping their warranty), cut the pos/neg ends, attach 12 gauge wire (20amp fuse inline on pos wire) and run to the Morninstar "<b><u>solar</u></b>" "pos" and "neg" posts."<br><br>__ What does "inline" mean?<br>__ Does the fuse go between the ends of the solar panel<br> wires and the 12 guage wire that goes to the Morningstar?<br>__ "20amp fuse inline on pos wire" Does this mean only the pos wire needs a fuse and not the neg?<br><br>Thanks, 4x4tour.<br>
cyndi
Well-known member
- Joined
- Jan 24, 2011
- Messages
- 5,731
- Reaction score
- 16
i think I spent too may years in technical writing. Now when I read technical information I go blank. There's a you tube video for everything. the challenge is finding one that produced and edited in a way that makes it bearable to watch/listen to.<BR><BR>This one helped me<BR><A href="" target=_blank target=_blank></A><BR>
Hey all,<br>OK, I think I'm almost there regarding understanding all of this. However, here are a couple of questions:<br><br>1. According to <b>4x4tour</b>, the only 2 places I would need to connect an inline 20amp fuse are:<br>A.) to the pos wire from the panels leading to the charge controller and <br>B.) to the pos wire from the charge controller leading to the batteries<br><br>Are there any other fuses I need to use (like from the batteries to the inverter)?<br><br>2. Secondly, the neg wire (from the charge controller's "Battery" needs to be connected the van's frame for grounding purposes. My question is where inside the van would this be done, or should I run this wire to the underside of the van to connect to an axle or something?<br><br>
Similar threads
- Replies
- 3
- Views
- 715
- Replies
- 4
- Views
- 922
- Replies
- 4
- Views
- 2K
- Replies
- 3
- Views
- 2K