"Harriette" 2003 Chevy Express 1500 Conversion

Van Living Forum

Help Support Van Living Forum:

This site may earn a commission from merchant affiliate links, including eBay, Amazon, and others.

TheKarmaVan

Well-known member
Joined
Feb 16, 2017
Messages
72
Reaction score
0
Location
Austin, TX
Hello, Everyone!
vrvuph.jpg

This is my very first post so I suppose I should introduce myself. My name is Mel. I am a traveler at heart and learned early on in life that need a continuous change in scenery to satisfy my urge to explore. My partner, Nicole, and I recently traveled from New York to Austin on a 3 1/2 month road trip in a 2004 Pontiac Vibe (close quarters). 
12814043_10206296222944504_7549334649584633051_n.jpg

25f1y79.jpg

We started in March and traveled the East and South Coast with Colorado in mind as our final destination.We enjoyed the trip but wish we had made more space for ourselves. We stopped in Austin to gather some funds and take a little break from the road. With everything we owned packed into the car up to the ceiling, it was quite a hassle to pack and unpack each night. We stopped just a bit early to recuperate and are currently saving up while we have the time. 
2ushpoy.jpg

n3mcqs.jpg

We just bought a 2003 Chevy Express 1500 cargo van for a change of pace on the road. We're calling her Harriette. For $4000, she came with shelving and rubber flooring with under layment but we've torn it all out to start from scratch. I've sold the shelves for $500 and I ordered new tires with the money today. The next step is getting her cleaned up, inspected and insured. Then we can really start the transformation.
eg7s2.jpg

netjf7.jpg

I'll be adding to the thread as our conversion pushes forward. We have until August 27th to complete it. Our lease will be up by then. Hopefully, she will be livable and ready for the road. We're going to need all the help we can get from this community. We've done plenty of research over the last 9 months and have a good grasp on how to get started and do most of the conversion but I'm sure we'll have plenty of questions for you all. I'm excited to be a part of the forum and to participate in this community. 

--Mel
 
:)  Hello and Welcome  The van will be a BIG nice change from what you guys have been traveling in.  You may already know this.......Texas can have some killer yearly vehicle safety  inspection criteria to meet...unless it's changed since I moved in 2005. If you are in Austin there is a lot of pretty country around there and good music too.  Good luck with your van build.

Jewellann
 
Oh how exciting!! I'll be watching closely as I've yet to find my perfect van, but after much research am leaning toward the Chevy Express! I'd like a high top, but time (and money) will tell!! Keep posting pictures so I can keep dreaming! (Yes, I'm selfish)
 
We will be updating this frequently to let people know the pros and cons of this van. We thought about the hightop but we plan on city dwelling and wanted to keep it as stealthy as possible. We've planned for adjustments in height. Hopefully we'll be able to help you make a choice. :)
 
Txjaybird said:
:)  Hello and Welcome  The van will be a BIG nice change from what you guys have been traveling in.  You may already know this.......Texas can have some killer yearly vehicle safety  inspection criteria to meet...unless it's changed since I moved in 2005. If you are in Austin there is a lot of pretty country around there and good music too.  Good luck with your van build.

Jewellann

Yes, we've been getting her up to the Texas standard. We fortunately bought the van at a dealership so it's already registered but it's always good to know we'd pass either way.
 
We might have gotten a bit ahead of ourselves with all the excitement of a new build out. We have been looking at components for the final touches on the van (aesthetics really). My mom is an interior designer so the look of our van is relatively important to us and hey, why turn down free, professional help from my mom? Anyway, we bought a few things:

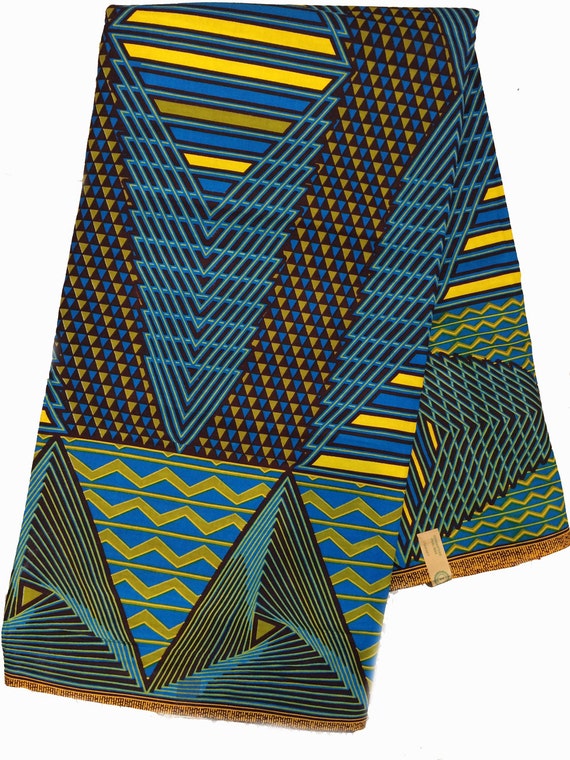
1) Fabric-- we plan on fabricating all of the soft furnishings. This includes bench seats, padded sideboards around the bed, pillows and fitted window insulation. We're going with a mix of Nigerian textiles and other brightly coloured patterns. We figured a splash of color would do us some good during the colder/wetter months when we're stuck inside. We bought these so far:
il_570xN.1184790575_kln7.jpg
il_570xN.1105241416_oyy4.jpg
il_570xN.1140307547_6xfo.jpg


2) Hammock-- this wasn't a necessary item but who doesn't love a good hammock. We chose a Yucatan handwoven double thick XXL(sounds impressive right?). We love this thing! It's bright and colourful, extremely comfortable for 2 people, folds up into a compact and relatively small bundle and it's very durable. Here's a link if you want to take a look at all the Yucatan/Mayan products: Hammocks

11qqng6.jpg
3) Flooring-- we decided on a flexible vinyl flooring with pre-adhered underlayment. We found a great deal on a returned roll at lowes. It's way more than we need but I'd rather have extra for mistakes. It's got a faux wood pattern on it and hopefully, it will add a nice touch to the space.
34huqlw.jpg
 
Yes, yes on the bright colorful fabrics! I am hoping to make mine my own little comfy space by reusing some of my old quilt tops on the walls. Debra Dickinson (youtube fave) wrapped her insulation in fabric and then adhered it to the walls of her van, and I'd like to do something similar using quilt tops! Quilts make me happy, so I feel they need to be included in my build!
 
whats with the roof rust in southern texas? i keep seeing it,must be ocean air

need to sand the rust to shiny metal the rest just sand smooth,a couple coats of primer then a few thin coats of color
just did it myself,i removed the hood
 
Gary68 said:
whats with the roof rust in southern texas? i keep seeing it,must be ocean air

need to sand the rust to shiny metal the rest just sand smooth,a couple coats of primer then a few thin coats of color
just did it myself,i removed the hood

Yea we already did all that. It's just an old picture. We touched it all up with a few coats of rustoleum primer and a gloss finish.
 
Just a mini-update. We haven't had much time to work on the van but we did take it to the carwash yesterday and pressure wash the whole thing. This is also a good trick to check for leaks. We sealed off the front cab with a huge plastic sheet and sprayed the exterior down and checked for water inside. we had a few minor spots with moisture. We finished off the inside and dried her out. She's so Sparkly!!! 

We sealed up all the seams(didn't need to do all of them but just to be safe) with white spray-on rubber flex-seal. Then once the interior was ready we sprayed the whole floor and all seams with rubberized undercoating. This holds a dual purpose-- It seals up and waterproofs as well as dampening sound. 

We've also added a few little things: cheap seat covers to protect the original fabric, a steering wheel cover because the wheel was falling to pieces, and reflective tape for the outside to add to the work-van stealth vibe we're going for. More to come on that note.

We bought 1/2' blue polyisocyanurate rigid foam board to start insulating the floor. We're skipping the Reflectix at this stage because it needs a 1" air gap to be effective anyway(<----opinions on this are welcome). We will lay down our foam, followed by a sheet of 1/4 ply and then our laminate flooring. We also aren't sure about laying down a moisture barrier. We don't know where it is most effective in the layers and also if it is necessary. 

PLEASE...IF ANYONE HAS TIPS OR OPINIONS ON ANYTHING MENTIONED ABOVE LET US KNOW. WE ARE OPEN TO SUGGESTIONS.
 
TheKarmaVan said:
Yea we already did all that. It's just an old picture. We touched it all up with a few coats of rustoleum primer and a gloss finish.

I call that the "White Express Van Cancer". We see it a lot here in Florida, only Chevy Express Vans of a certain vintage, and only the white paint. I suspect they had a huge batch of bad white paint.
Nice vans otherwise.
 
LeeRevell said:
I call that the "White Express Van Cancer".  We see it a lot here in Florida, only Chevy Express Vans of a certain vintage, and only the white paint.  I suspect they had a huge batch of bad white paint.
Nice vans otherwise.

Hmm...weird. Well, I hope that our rustoleum paint did the trick. I'll post if we have any trouble with it.
 
We spent hours trying to determine which mini-fridge to buy or whether we wanted a fridge at all. We looked at coolers and freezers and all sorts of food storage methods. We came to an interestingly unconventional but problem-solving conclusion: just buy the damn thing and be done with it. We were so caught up in what would be the most energy efficient for our planned solar system and then realized...we don't actually have one yet. We're just going to assemble all of our energy consuming components and build the solar system to accommodate it all.

OK, so here's what we got: HAIER Mini-fridge
29y3ynq.jpg

bhatko.jpg

It was delivered to us this morning in perfect condition. I'm hoping it stays that way after we're through with it. It's got a great energy rating. 200kWh a year. Should run at roughly 75-80 watts when running. There will be a spike in wattage when the compressor kicks in at startup but as long as our inverter can handle it we should be fine. 

Our only concern is it's housing. We want to be sure it has adequate space to run without overheating but we also want to keep it secure and compact. Any suggestions?

I forgot to mention in my earlier post that we will be constructing most of the shelving and storage spaces from 1/2 polyisocyanurate foam board wrapped in fiberglass and wooden(or aluminum, haven't decided yet) framework.
 
Last night was a bit of a pain but we made a little progress. We started insulating the floor but it was more tedious than expected. 
2rypnyv.jpg

I made the decision to fill all of the grooves in the floor with sheets of packing foam rolled up and adhered with 3M Super 77 spray-fixative. It will provide that little bit of extra insulation and seal up the air gap to reduce moisture/condensation. 
2le7bk8.jpg

With the weight of the foam board, plywood and laminate it should all press down into the grooves nicely. At the moment it just kind of puffs up.
suvtyt.jpg

We also began cutting our foam board down to size and fitting it to the layout. This was also a pain. It was very dark and our little lamp didn't provide much light. We made a few mistakes and cut a bit wide. We've resolved to spray in expanding foam, allowing it to dry then cutting off the excess to keep it all level. 

So far so good. We do have a couple concerns:

1) We've decided to keep the metal partition with the door to the front cab. The insulation board and flooring don't really fit under the gap between it and the floor, however. We would like the door to still be functional but we also hope to insulate the entire wall What should we do? Any suggestions?

2) We are skipping the Reflectix and the vapor barrier. I've mentioned this before but still haven't received much feedback. Are we making a big mistake?
 
On the door, you can cut the bottom of for clearance. If this isn't practical, then I'd just replace the door section with a homemade door. You could either just use a piece of plywood, or you could build one with 2 thin pieces of ply or luan underlayment, with some 1x material between around the perimeter, and rigid foam insulation in between. As for a vapor barrier, I actually think much of the time they cause more issues then they help. Moisture seems to find it's way into walls anyway, through leaks that develop or gaps in the vapor barrier. And then the wall has a really hard time drying out. That's part of the reason fiberglass batts aren't such a good idea for a van. That said, the plastic coating on one side and reflective coating on the other side of the rigid foam most of us have used is actually a vapor barrier, so if you want one there's no need to add extra. Just tape the seams with vapor proof tape like metal foil tape or the duct tape that is actually listed for use on duct work. Hope that all helps - keep up the good work and keep posting pictures.
 
masterplumber said:
On the door, you can cut the bottom of for clearance. If this isn't practical, then I'd just replace the door section with a homemade door. You could either just use a piece of plywood, or you could build one with 2 thin pieces of ply or luan underlayment, with some 1x material between around the perimeter, and rigid foam insulation in between. As for a vapor barrier, I actually think much of the time they cause more issues then they help. Moisture seems to find it's way into walls anyway, through leaks that develop or gaps in the vapor barrier. And then the wall has a really hard time drying out. That's part of the reason fiberglass batts aren't such a good idea for a van. That said, the plastic coating on one side and reflective coating on the other side of the rigid foam most of us have used is actually a vapor barrier, so if you want one there's no need to add extra. Just tape the seams with vapor proof tape like metal foil tape or the duct tape that is actually listed for use on duct work. Hope that all helps - keep up the good work and keep posting pictures.

Thanks. I appreciate the feedback. I'll be posting plenty of pictures and updates as we struggle through the build. Haha. It's not really the work itself that's difficult, it's finding the energy after a long day at work to crouch and bend in a van for hours.
 
Looks like you two are doing a great job! I'd take Masterplumber's advice on any thing to do with building -- like the vapor barrier question -- as he's got a great rep for knowing whereof he speaks.

On the door -- I think keeping the wall separation is in general a good idea. You see warnings about what happens to all our furnishings and "stuff" if ever in a wreck and things go flying. So since it is there, why not keep it as a safety feature. My van was a public transit wheelchair lift van so it has no partitions. I hung quilted moving blankets from a shower road stretched across the width behind the driver's seat. No safety in that but it is great for keeping cold air from the cab out and for privacy. With your exotic fabrics, I'm betting your wall and door will end up looking great.
 
When we bought our van we noticed the oil pressure gauge in the dash was acting up. The needle jumps up and down from 0 to 80 even when idle. 
[video=youtube]
I decided to take a look at that this morning. The first thing I checked was the oil pressure sensor. I opened up the panel in the cab to take a look. 
sq07xx.jpg

The sensor is located behind the engine block in my van and its tucked under some other lines. 
2s65w6x.jpg

It's that small plug right in the middle (the lowest one).
2nspd3o.jpg

I unplugged it, cleaned it up and plugged it back in. It wasn't very dirty and had a snug fit to begin with so it was to no surprise that it wasn't better. The next step is ordering a new sensor itself. It's $20 online and should arrive in 2 days. I'll post again once I change the part and let you all know the outcome. If that doesn't work I'll be taking a look at the small motor on the back of the instrument cluster. It'll be a pain due to all the small parts and having to mark out each needle placement, but "ya gotta do whatcha gotta do" right?

OTHER ISSUES: 

I've got some other things to address today. I'll actually have to drop off my car with the mechanic because I don't have the tools or the time today to do it myself. Unfortunately, we have a leak. It's a small leak but no leaks are good. I noticed a small oil spot beneath the van and took a closer look. I'm going to clean it up and de-grease it as best I can. If I can locate the general area of the leak it will make this process a bit quicker for the mechanic.
muu73m.jpg

Also, it seems that the peak-a-boo plate is falling off as well. Gotta fix that too.
16h9fld.jpg
 
Haven't posted in a few weeks so I thought I'd give you all an update. We've been pretty busy with work so the van progress was slow for a while. I'm pretty proud of our work so far. We are right on schedule for a 5 month or less completion. So here's what's new:

1) We finished the foam between the slots on the floor, followed by rigid polyiso board. This process took a decent amount of time because the rolled foam wasn't taking to the adhesive spray very well.

2) We've also managed to polyiso the walls and the partition; filling the gaps with spray foam. This also proved to be rather difficult and incredibly messy. I strongly advise wearing gloves when using sprayfoam. My hands were disgusting afterward. 
1jvj15.jpg

3) We removed the door on the partition so we could cut the bottom off to fit above the flooring. We haven't actually cut it yet because we're deciding on the method in which to seal the gap on the bottom. We're thinking a simple rubber door seal will do. Any other suggestions?
4) We removed door panels from the side and back doors to insulate. We might put small shelves in there for miscellaneous items. I have some drawers form work that I was given for free that might do the trick.
33js87o.jpg

5) We used reflectix on the wheel wells and gas inlet as well as the interior of the doors. I really enjoyed how simple this insulation was to apply. It was the easiest job so far.

6) We cut 1/4" underlayment board to level the floor for the laminate. Leveling the floor is a bit tough though. We may have to add some extra sheets of the packing foam to get it comepletely flat. The welding around the wheel wells has caused some issues. Does anyone know of an easier way to get around this problem? What if the floors are a bit uneven, does it matter? Oh and as you can tell from the picture we've begun putting the side boards up to support the walls.
b9c07t.jpg

7) We sprayed the windows with white Plasti-dip. This allows the light to in but looks like panels rather than windows. I am a bit sad to loose the visibility but it will help us be a bit more stealth. We figured we would be spending our time looking at the sites from outside the van. Inside is just a safe place to rest our heads.
1z1a4op.jpg

8) We ran all the conduit for our electric once we install it. 

9) I measured out the van and used our new stuff to figure out the placement of it. It should be a pretty simple layout. We also decided to go with a bed slightly bigger than a twin but not quite a full. We've got the room so why not. I was using the boards on the floor to mark the possible end of the bed to get a feel for the space.
10rsh1k.jpg

208tf07.jpg

Things we've bought:

1) We got our sink! It's a bar sink that measures 15x15" total. We also got our foot pump and the 5 gallon containers for water.
140ch76.jpg

2) We bought the wall panels. We chose a neutral white/gray wood to help make the space feel a bit cleaner and more spacious. 
287m1k6.jpg
3) We got a she-wee. This is an important purchase in my opinion. It will allow us to use pee-bottles when stealth camping in a city. No need to run to the nearest shop in our PJs. 
zlw5k5.jpg

UPDATE ON MECHANICS/OIL LEAK

I still haven't installed the oil pressure gauge but have ordered one. I'll be doing that very soon.

Bad news from our mechanic-- Our rear and lower oil pan seal is leaking. For now, because we don't drive Hariette to often, we are just topping up the oil. The fix was estimated to be around 1500-2000 dollars. That includes some other things we'd like to do as well (freon charge, chassis lube, differencial plug replacement, oil change, etc.) We cannot afford that right now but we will look into getting it fixed before July at the latest. We'd like to shop around and get 2nd and third opinions from different shops. I think this estimate was a bit steep for what we need done. 

Good news-- We've had great weather. Not condusive to hard work, however.
291jf53.jpg


Thanks for reading everyone!!
 
You're already living the lifestyle!! Good for y'all! You've made lots of progress, nice work and gives me something to aspire to!
 
Top