I am wanting to put some counters in my very small camper so I can have a “real” kitchen. I will have to rip out the dining area to do this. My question is what is the best way to do this accounting for the movement of the camper? I would like to avoid any cracking and get the best life possible out of my work, while keeping it lightweight and affordable. Thanks for the help!
You are using an out of date browser. It may not display this or other websites correctly.
You should upgrade or use an alternative browser.
You should upgrade or use an alternative browser.
DIY Counters in a small camper
- Thread starter aimes2019
- Start date


Help Support Van Living Forum:
This site may earn a commission from merchant affiliate
links, including eBay, Amazon, and others.
highdesertranger
R.I.P HDR
- Joined
- Apr 4, 2012
- Messages
- 22,892
- Reaction score
- 87
build cabinets and counter tops out off 1x2, 2x2, and plywood. there is absolutely no reason to use 2x4's, or 2x6's, or 4x4's on any build. use the plywood as webbing like they build boats and airplanes. if you need a better explanation let me know. highdesertranger
MrNoodly
Well-known member
- Joined
- Dec 15, 2012
- Messages
- 4,967
- Reaction score
- 60
highdesertranger said:...and plywood...
And the plywood probably doesn't need to be all that thick.
highdesertranger said:build cabinets and counter tops out off 1x2, 2x2, and plywood. there is absolutely no reason to use 2x4's, or 2x6's, or 4x4's on any build. use the plywood as webbing like they build boats and airplanes. if you need a better explanation let me know. highdesertranger
Thanks for your reply! I don’t know what you mean by webbing like on boats and I couldn’t find anything about it in a quick search. Can you explain that for me? Thanks!
highdesertranger
R.I.P HDR
- Joined
- Apr 4, 2012
- Messages
- 22,892
- Reaction score
- 87

1x2's sound right, that is what I'm going to use when I redo my sink and counters.
I also have a "pocket screw tool - By Kreg Tools" To connect the wood together. It is
a handy tool to use. Lowes and Home depot Have them, they are pricey, I just
bought the basic set a couple years ago.
I also have a "pocket screw tool - By Kreg Tools" To connect the wood together. It is
a handy tool to use. Lowes and Home depot Have them, they are pricey, I just
bought the basic set a couple years ago.
You can use thinner plywood if you put more support structure under it meaning more cross pieces going front to back along the length of the countertop. Those will help prevent it from cracking under the weight of a load sitting on the countertop. The best was to prevent a lot of movement is to spread glue evenly over the surface of the wood framing and then apply the plywood to it. That is an engineered structure method of building called "stress skin panels" It is strong and you can use smaller sized pieces of framing because it has been turned into one single piece with the use of the glue.
That boat that was shown is using a stress skin panel method of construction.
A stress skin panel can have more than one skin and the cavity between the skins can be insulated. Those are called SIPs...which stands for structurally insulated panels.
A Japanese Shoji screen is also a stress skin panel because the rice paper is adhered to the small thin pieces of wood. A hollow core door that has cardboard honeycomb inside of it is a stress skin panel. The honeycomb material is glued to that very thin layer of plywood. Corrogated cardboard used in boxes is a stress skin panel.
They are all around us, it is not a new technique for keeping things sufficiently strong for the task while keeping the structure lighter in weight.
Almost There
Well-known member
- Joined
- Nov 3, 2014
- Messages
- 5,130
- Reaction score
- 6
My entire kitchen unit is constructed of 1/2" plywood. You can see the various components in the build thread (link below). The use of the Kreg screw bit was vital to the design.
The only problem I have encountered after all this time living full-time in it is a bit of re design I had to to to the outside front wall of the pantry unit. The drawers worked perfectly until I loaded them with food... . The front wall (behind drivers' seat) is unsupported by anything else in the van and the 1/2" plywood bowed by just enough that the middle 3 shelves would pop off their tracks. I ended up installing a couple of 1x2" pieces that were screwed to both the two walls of the cabinet to hold them exactly perpendicular - end of bowing and end of track fail. I also had to install an extra piece of 1x2 along the outside front edge of the same piece of plywood to give enough depth for the cabinet door hinges to be properly placed. If I were do do it again, I'd use 1" wood on that one wall!
The only problem I have encountered after all this time living full-time in it is a bit of re design I had to to to the outside front wall of the pantry unit. The drawers worked perfectly until I loaded them with food...
. The front wall (behind drivers' seat) is unsupported by anything else in the van and the 1/2" plywood bowed by just enough that the middle 3 shelves would pop off their tracks. I ended up installing a couple of 1x2" pieces that were screwed to both the two walls of the cabinet to hold them exactly perpendicular - end of bowing and end of track fail. I also had to install an extra piece of 1x2 along the outside front edge of the same piece of plywood to give enough depth for the cabinet door hinges to be properly placed. If I were do do it again, I'd use 1" wood on that one wall!Basic timber frame looks like this below. (ignore the house size dimensions) As others have said use 1x2in posts and rails.
Cut thin ply to fill in the ends and back.
Cut and hinge heavier ply for cabinet doors.
Counter top can be pre bought (hardware store or reclaim yard) and cut to size, glue and screw from inside into underside of counter top.
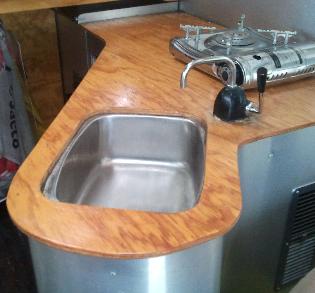
Cut out can be made for sink etc but is not necessary if using a washing up bowl on top.
Cut thin ply to fill in the ends and back.
Cut and hinge heavier ply for cabinet doors.
Counter top can be pre bought (hardware store or reclaim yard) and cut to size, glue and screw from inside into underside of counter top.
Cut out can be made for sink etc but is not necessary if using a washing up bowl on top.
Attachments

if you took this design and in each of the two current areas added two more cross supports, 1x2 is sufficient size, then you could use 1/4" plywood for the counter top , 1x2 is sufficient size, then you could use 1/4" plywood for the counter top. But where you might want to drop in a since I would add a second layer around the rim of the sink to act as a doubler to help prevent flexing which will help make sure no voids develop in the caulking or plumber's putty used under the sink rim. I made my countertop with 3/8" plywood but I have a heavier stovetop that is also a heater powered by diesel. The countertop on the other side functions as a workbench. So my use is not typical as I have more weight on the counter than the average van dweller. The point being you have to design to support the loads you intent to put onto a cabinet or countertop. Lots of ways to do things and if you don't have a need for heavy duty cabinets then build lightweight ones.
maki2 said:if you took this design and in each of the two current areas added two more cross supports, 1x2 is sufficient size, then you could use 1/4" plywood for the counter top , 1x2 is sufficient size, then you could use 1/4" plywood for the counter top. But where you might want to drop in a since I would add a second layer around the rim of the sink to act as a doubler to help prevent flexing which will help make sure no voids develop in the caulking or plumber's putty used under the sink rim. I made my countertop with 3/8" plywood but I have a heavier stovetop that is also a heater powered by diesel. The countertop on the other side functions as a workbench. So my use is not typical as I have more weight on the counter than the average van dweller. The point being you have to design to support the loads you intent to put onto a cabinet or countertop. Lots of ways to do things and if you don't have a need for heavy duty cabinets then build lightweight ones.
Yep, this is a basic design to help someone out who is not familiar building stuff, not something us seasoned builders might do.
Pictured below is the last one I built for my current motorhome. Built from the same basic principle, it uncouples from the water inlet and outlet and can be removed with the frig still attached.
Attachments

travlin man and wife
Well-known member
- Joined
- Jul 25, 2019
- Messages
- 56
- Reaction score
- 3
I used only 1/2 in plywood cabinet grade. I used no ribing for counter top 1/2 inch with lament. cabinet is 5 ft long 7years and 200,000 miles no problem.
Boy your guys stuff is beautiful! I actually sleep on my counter tops so lots of weight as I'm 200 lbs. more or less and I occasionally stand on them as well. I simply used 2"x 2" lumber (which is actually 1 1/2") and anchored it to the wall with Gorilla glue and screws and built a rectangular frame with boxed legs. I wanted a super strong top surface so I bought a cheap damaged interior door ($15) and cut off one end and one side to make it fit my rectangle. I found a fence board that fit inside the door to make new edges where I had cut them off ($4) and glued them in with TiteBond III wood glue. I drilled 1/4" holes every few inches in the top side and sprayed in window and door insulation foam till it came out another hole. I then used a brush and spread Gorilla glue on the top where the foam wasn't (insulation foam and Gorilla glue are basically the same thing). I then quickly laid a piece of precut 1/4" cabinet grade plywood over the top of the door and clamped or screwed it in place. Once it was mounted and the glue dried I sanded and painted it making sure all surfaces were well coated and waterproof. It actually made the side wall of the camper stiffer and weighs less than if I used 1/2" plywood.
crofter
Well-known member
HAHA - me too. The only counter top in the van is under the mattress. To use it, I push the mattress toward the back doors until enough counter top is exposed for the current project. Under the mattress is plexiglass surface that can be used for anything from food prep to sewing or bookwork. ~crofterbullfrog said:I actually sleep on my counter tops
I just wanted to add something I don't usually see mentioned when someone asks about modifying the interior of a camper. I know some campers are built different than others but I think the majority of them are built such that anything that is screwed/bolted to the floor or ceiling and a wall is part of the structural integrity of the camper. Meaning that these items help control the flexing of the walls from side to side and front to back. This is the reason most campers have at least 1 floor to ceiling cabinet installed. This one cabinet provides a tremendous amount of stability for the entire camper. The internet is full of camper remodels where these structural cabinets are removed without understanding the potential consequences. And there are plenty of cases where campers blow apart on the highway because the structural integrity has been compromised. Sometimes the cause is rot and sometimes it is because of a remodel. So any remodel of the interior should take this into consideration. Since you are building a counter where you previously had a dining area you should be able to maintain that connection between the floor and wall. Assuming your dinette/bench was connected to the floor and wall. If not then this does not apply.
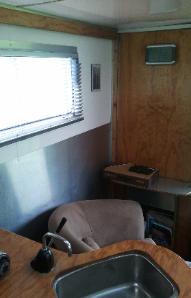
Thanks @hazelee for that. My camper has been renovated by the previous owner to the extent that it is listed as “homemade” on the title. It actually doesn’t have a floor-to-ceiling cabinet in it, although that would have been fantastic if it did. My table is connected to the wall, but just has a leg that rests it on the floor, and is not fixed to the floor. I will be leaving the base of the seat rather than pulling it out because I was worried about damaging the structural integrity as you say. It is a box with a lid, so I will use it as kitchen storage. Really, the only thing coming out would be the table, and it would be replaced with a counter, only because a counter would be narrower and would give me more floor space as well. And I haven’t completely decided that it’s coming out. Part of me wants to leave it and just build the counters to connect to it, that way I still have my full table, but I’m not sure yet.
Similar threads
- Replies
- 8
- Views
- 586
- Replies
- 52
- Views
- 7K