Alternative to plywood?

Van Living Forum

Help Support Van Living Forum:

This site may earn a commission from merchant affiliate links, including eBay, Amazon, and others.
I am building out a truck camper shell, 7.5 ft x 8 ft. Inside walls are 1/4" plywood done by previous owner. I used 3 sheets of 1/2" plywood to build refrigerator cabinet, counter cabinet, bed with storage compartments underneath and clothes cabinet. Total weight = less than 150 lbs; which is less than my solar setup (2 GC batteries, 200W solar). I like the strength and simplicity of 1/2" plywood over other materials.

-- Spiff
 
loess said:
Lafnbug, I'm thinking of going with coroplast as well. I got a bunch of scraps for cheap from a sign shop. I hadn't thought of PVC, that's a good idea. I was just going to use 1x1s. Curious how do you plan to affix the PVC to the walls of the vehicle, and the coroplast to the PVC?

By the way, 'tis the season for free coroplast -- election time is right around the corner and that means free signs once its over!

Election time last year sparked the idea! I am a contractor by trade, and have access to a lot of unused scrap material. PVC pipe is fairly strong, light, easy to cut and work with, and I grew up playing with Lego's! :D

I first thought about building a slide-in unit where both sides are connected at the top by cross members. Cabinets and bedframe made from coro and PVC couldn't weigh much, and this would (maybe) allow me to quickly, easily, and single-handedly remove the unit as a whole. This would be desirable in case I need to transport a bunch of materials for my job, or if I decide to upgrade my rusty van. The jury is still out on this option. The strength of the PVC frame would largely come from the glued joints, and the coro would triangulate and strengthen the structure. I'm starting to think a more modular approach is more feasible. Maybe screwing some areas together to aid in disassembly. This is all swirling in my head, but when I get some time I'll attempt a CarCampire-quality drawing for others to peruse and constructively criticize :)

As far as attaching the coro to the pipes, screws or even zipties would likely suffice. I would employ alot of folded corners in the coroplast for strength in inside and outside corners, doors, etc. Band clamps will attach the bottom pipes to the plywood floor, and possibly the side walls. This will obviously not be a show vehicle, but I think it is an interesting and amusing exercise.

Note that plywood will still likely be used for the bed and countertop, but that's about it. I may also be able to incorporate water storage, ventilation (range hood, air circulation?), and wire runs in this PVC framing setup as well. We'll see! Let your imagination run wild!

CarCampire, if your closet is visible through the rear windows, you could disguise it as a dry cleaning van!
 
Hello again!

Luisafernandes
– Thanks for the bed tips- will do that. I’ve also marked the ¼” for the walls as a good possibility. It’s either that or coroplast after insulation, will have to see what would work better. Still searching for some pvc/poly-plastic plywood alternative.

Amwbox – Thank you! Please click the link for my E-350 basic dimensions. My drawings are too big at the moment- will have to resize them later.

From the info I have gathered; this is a good ‘basic’ measurement of the van’s dimensions. If you take a ruler to the drawing; each ½” = 1ft to scale.
Hope it helps. 

LeeRevell
– Yup, driving seat and main ‘stealthy’ access point is on the right.
Im female so If I were to do this, it’s already a little suspicious to see a female climb into the drivers seat of what I hope to look like a construction vehicle but if I disguise it like a laundry truck as was suggested in another post- might not be such a bad idea. Hehe.
As for the closet- I gotta have it…

If I were to take on this lifestyletomorrow I would still maintain my 9-5 job and I have pressed shirts that need to be worn in daily. Mugh have hangers. My only other option would be to rent a storage unit and go back and forth weekly for the pick up and drop off of clothing for the next week. Figured I would just indulge and have all my clothes and GOODNESS… THE SHOES, at my disposal.
As I moved in, I would place a little sticker on each item and in 6 months, only to be removed when I used the item and get rid of the items who’s stickers haven’t been removed… Im already doing that now with my clothes. It will be a long process though… Tis what it is to love your apparel.
As for the bed; I’ve seen it done here on the forums. Please see the pic linked below. 

I liked the idea of a pull out sofa bed but having a standard bed in the middle actually servs as extra shoe storage, a place to sit while digging through my closet in this plan and it covers the wheel well’s nicely. At 3ft wide and 69”ish- I should be sleeping cozy.
Front passengers seat will be where the battery box resides.

Optomistic Paraniod – Back closet can be used as an extra escape route, though Im sure the shoes would be a hazard, they always are… the right side does look ‘stuffed’- but it’s just my gym bag and a fold up table with a tea pot on it that can be folded down and pushed aside if I need to get out. The 3rd drawing is mainly to over-emphasize all the junk I will likely have in the beginning before I decide what I really want vs need. If you look in the 2nd picture- you can see how the fold up surface on the sink’s side will work. 

Willy – Edge board sounds good but what about weight as opposed to the regular ply? I will have to look that up. Thanks for the info! 

Decodancer – Wow- looks like some really nice wood and it’s already sanded… thank you for the pic and info!

Spacerman Spiff – Ply for ½” is a definite if I don’t over-do it with ¾” for the floor and bed. Thank you!

Lafnbug- Laundry truck… wonderful idea! Would also make it easier to get my stuff out of the back on laundry day that I intend to do at a laundry mat. Perfect…
Also- hehe, thank you for the drawing complement! I’d love to see some drawings of yours as well. XD


Still looking into an alternative for plywood that is plastic based now. I have found a few but the majority are either not sold locally in my area or you have to buy in bulk- leaving me with a ton more than I would need. Here are a few links:

http://bearboardlumber.com/plastic-lumber-products.html
http://www.ecosheet.com/products/
http://plasticlumberyard.com/plasticlumber.htm
http://www.totalplastics.com/products/253
 
There is a synthetic material that is used in place of plywood in several applications. It's called Phenolic. It mills basically like wood. They use it in bathrooms, some commercial kitchens, and woodworkers make jigs out of it sometimes, but it is heavy.

Here is a link to the Sagulator, a calculator for shelving thickness and run length to avoid sagging that some may find useful.

If you decide to go with PVC, check out Formufit fittings. Here is a link to them on Amazon. These fittings are made specifically for building with PVC pipe (as opposed to plumbing), and offer some fittings not available at the typical hardware store, like 3-way corners.

I agree that thin plywood skinned onto a frame will add a lot of strength. You could probably get away with 1x2 or 3 frames with 1/4" plywood, birch or oak as you prefer. Skinning the back of the cabinet carcases or mounting them firmly will prevent racking and ensure a strong structure.
 
Go to a building supply store and look at how kitchen cabinets are built. They use very basic framing and no heavy wood, yet are very strong. Trying to use plywood and traditional framing is a bad mistake when building out a van.

It's too heavy and uses up too much space. Look at kitchen cabinets and replicate that build style. It let's you use thinner and lighter building techniques.
 
David said:
Go to a building supply store and look at how kitchen cabinets are built. They use very basic framing and no heavy wood, yet are very strong. Trying to use plywood and traditional framing is a bad mistake when building out a van.

It's too heavy and uses up too much space. Look at kitchen cabinets and replicate that build style. It let's you use thinner and lighter building techniques.

House carpenters and cabinet makers both work with wood, but, as you point out, they use very different techniques to do so. Most people are more familiar with house carpentry, so that's what they default to.

Regards
John
 
CarCampire said:
Hello again!

Luisafernandes
– Thanks for the bed tips- will do that. I’ve also marked the ¼” for the walls as a good possibility. It’s either that or coroplast after insulation, will have to see what would work better. Still searching for some pvc/poly-plastic plywood alternative.

Amwbox – Thank you! Please click the link for my E-350 basic dimensions. My drawings are too big at the moment- will have to resize them later.

From the info I have gathered; this is a good ‘basic’ measurement of the van’s dimensions. If you take a ruler to the drawing; each ½” = 1ft to scale.
Hope it helps. 

LeeRevell
– Yup, driving seat and main ‘stealthy’ access point is on the right.
Im female so If I were to do this, it’s already a little suspicious to see a female climb into the drivers seat of what I hope to look like a construction vehicle but if I disguise it like a laundry truck as was suggested in another post- might not be such a bad idea. Hehe.
As for the closet- I gotta have it…

If I were to take on this lifestyletomorrow I would still maintain my 9-5 job and I have pressed shirts that need to be worn in daily. Mugh have hangers. My only other option would be to rent a storage unit and go back and forth weekly for the pick up and drop off of clothing for the next week. Figured I would just indulge and have all my clothes and GOODNESS… THE SHOES, at my disposal.
As I moved in, I would place a little sticker on each item and in 6 months, only to be removed when I used the item and get rid of the items who’s stickers haven’t been removed… Im already doing that now with my clothes. It will be a long process though… Tis what it is to love your apparel.
As for the bed; I’ve seen it done here on the forums. Please see the pic linked below. 

I liked the idea of a pull out sofa bed but having a standard bed in the middle actually servs as extra shoe storage, a place to sit while digging through my closet in this plan and it covers the wheel well’s nicely. At 3ft wide and 69”ish- I should be sleeping cozy.
Front passengers seat will be where the battery box resides.

Optomistic Paraniod – Back closet can be used as an extra escape route, though Im sure the shoes would be a hazard, they always are… the right side does look ‘stuffed’- but it’s just my gym bag and a fold up table with a tea pot on it that can be folded down and pushed aside if I need to get out. The 3rd drawing is mainly to over-emphasize all the junk I will likely have in the beginning before I decide what I really want vs need. If you look in the 2nd picture- you can see how the fold up surface on the sink’s side will work. 

Willy – Edge board sounds good but what about weight as opposed to the regular ply? I will have to look that up. Thanks for the info! 

Decodancer – Wow- looks like some really nice wood and it’s already sanded… thank you for the pic and info!

Spacerman Spiff – Ply for ½” is a definite if I don’t over-do it with ¾” for the floor and bed. Thank you!

Lafnbug- Laundry truck… wonderful idea! Would also make it easier to get my stuff out of the back on laundry day that I intend to do at a laundry mat. Perfect…
Also- hehe, thank you for the drawing complement! I’d love to see some drawings of yours as well. XD


Still looking into an alternative for plywood that is plastic based now. I have found a few but the majority are either not sold locally in my area or you have to buy in bulk- leaving me with a ton more than I would need. Here are a few links:

http://bearboardlumber.com/plastic-lumber-products.html
http://www.ecosheet.com/products/
http://plasticlumberyard.com/plasticlumber.htm
http://www.totalplastics.com/products/253


Hey, that bed looks familiar! : )
I don't know how tall you are, but I'm 5' 10" and sleep with room to spare.


That product in the link to totalplastic.com looks promising!
 
ok let me try this again, for walls and the roof you only need 1/8 plywood. it is not structural the van is the structure the plywood is just a skin. for cabinet type builds you can use 1/2" or even 3/8" plywood or make a frame out of 1"x2" pine and skin with 1/8" plywood. there is no reason for using more than 1/8" on the walls and roof, unless you already have it or it's free. make sure it's real plywood and not a particle board with veneer. highdesertranger
 
I went to the local van and rv show and walked through all sorts of different units. I looked closely at the cabinetry construction, and all but the most expensive models used 1x1 frames skinned with very thin plywood. I'll be using 1x2s and 5mm (0.19") luan plywood for my construction.
 
I’m learning a TON of techniques and alternatives about van-interior-alternative-methods here.
Thank you all so much!

So, from what I gather;

AFTER insulating – Floor should be ¾” ply, walls can be 1/8”ply (as it’s a shin… likely better to bend to the van walls but I worry it would snap as it’s so thin), and ceiling is 1/8”ply too.

PVC is a good framing alternative that’s light weight, cheaper than ply, easy to connect, cut, glue together- not to mention that by framing with it I can avoid doing all those tricky carpenter-pro (aligns right up to the van wall) cuts I’ve been biting my lower lip over AND it can be painted!

After drawing out another (EXTREMELY similar)layout using PVC instead of plywood framing (see links for pix below)for my assumed ‘DIY’ furniture; I found thought it would look a little ‘odd’. Essentially I would be making PVC shelves and placing lighter plywood atop it for the flat surface but to me that looks a little ‘lack luster’.


So I was browsing around the web and found that there is a way to prime and plastic-paint PVC. I could make this light weight material that’s easy to work with (and be taken apart and placed in a similar van if goodness forbid anything happened) – look like some fancy metal pipe or painted funky colors if I so desired.

http://makezine.com/2010/09/20/make-projects-permanently-stain-p/

Imagine shiny silver pipe with wooden surfaces and several bins to keep everything neat and tidy or elegant shiny black pipe with industrial modern looking ply atop it and more bins.

I could even leave the drain pipe exposed or BUILD IT IN to the pvc shelving below the sink and it would all looked like it was meant to be.

Good stuff!

I’m still looking for light-weight plastic-plywood looking material bit now I have a great way of framing the floors, walls and ceilings with some light weight, stylish alternatives to heavy ply furniture.

Thanks again all!

Please keep the suggestions and comment coming!
 
I lived 6 years in a box van and the cheapest, lightest and fastest way to get instant storage was with the plastic shelving with tubes and shelves. When I bought the van I went to Costco and got heavy duty shelving and had it in my van for the next 6 years trouble-free. I didn't even glue it together, just hand pressed it in. The box van came with plywood on the walls so I just drove screws through the shelves into the plywood so it couldn't move.

That won't work for you because of your curved walls (a box van is just a big, tall square cube!). But it does go to show how durable PVC is and how well it works in a van.

But, you don't want it to move and vibrate, I think that would weaken it. So securely fasten it to the walls with screws and "L" brackets.
Bob
 
Wood is one of the strongest strength to weight ration materials available. It has good strength in compression and tension, in all temperatures, and is easy to work with. Plywood takes it one step further as it is a composite - wood and glue, which helps with certain loads (ie plywood does not snap like a solid block of wood will). Although depending on the glue used in the actual plywood you choose there can be some off-gassing.

I would check into PVC off-gassing before I decided to install a bunch of it inside a vehicle I was living in. I have used PVC for a few different projects, and it is a great material but I don't think I would want a lot of it inside a enclosed space. Also from experience the joints become the week point, so I have used both rivets and bolts in addition to PVC adhesive, however this then creates a stress point that can easily crack especially when cold.

I think the key is proper construction. I can't see needing 3/4 inch plywood on anything in a van. 1/2 maybe for flooring areas, and Luann or similar paneling for walls, etc. Heavy shelves I would personally look for a steel or aluminum alternative if weight was the most important attribute.
 
Rustoleum's Painter's Touch 2X and Rustoleum's Universal (both are Interior/Exterior - all surface) can be used, without special primers, on plastic. Both are available in spray cans and the Painter's Touch 2X is also available in 8 oz and 32 oz brush on.

We used interior hollow core luan doors as partition walls in our bus. It worked out to roughly $1 per inch for a lightweight but sturdy "wall" that was finished on two sides. All we had to do was paint. We put the walls in before we finished insulating and covering the walls. Screwed the long edge of the door to a furring strip screwed to the wall. The "front" edge of the door/wall was toe nailed (or toe screwed) into the metal ceiling and into the metal floor.


A couple of places we used a small "L" bracket.
 
One method used in our van conversion for walls was to go _soft_ walls. They are a combination of bubble wrap/mylar/reflectix covered by a marine hull liner fabric. Very light per square foot and does a fine job of insulation (sound and temp).
On cabinetry build we used 3/4" welded steel framing with thin marine ply/formica.

Here is one shot of the interior chevy AWD rb build...closet on street side is a bath/shower closet my wife dreamed up.

TCLawdInteriorv2c.jpg


If we were to ever do a Van2... 80/20 and related plastic "walls" would be tops on the list of how-to.

Happy pondering,
Thom
 
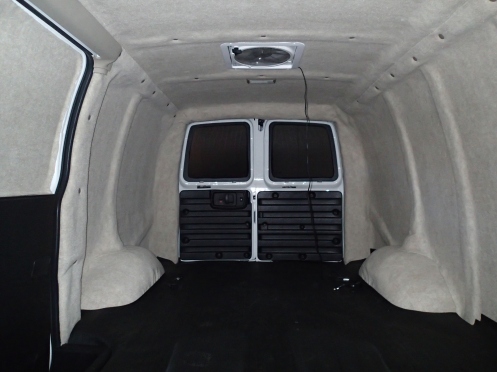
Following in Accrete's footsteps, we just finished the walls of our van and used Hulliner over reflectix over pink foam over dynamat.

It was a lot of work, but after sleeping in the van a few days in freezing temperatures, it is quite nice. We have no heater, just body heat and blankets. We leave the MaxxFan open just a crack (but not running). By morning, it is chilly, probably around 50ish degrees inside, while outside it has been just at freezing.

Very, very pleased, and maximizes space.

Also trying to figure out what to use for shelving/cabinets at the moment...

http://aimlesswanderlust.com/2014/11/03/insulating-the-van-part-10/


AimlessWanderLust said:
Following in Accrete's footsteps, we just finished the walls of our van and used Hulliner over reflectix over pink foam over dynamat.

It was a lot of work, but after sleeping in the van a few days in freezing temperatures, it is quite nice. We have no heater, just body heat and blankets. We leave the MaxxFan open just a crack (but not running). By morning, it is chilly, probably around 50ish degrees inside, while outside it has been just at freezing.

Very, very pleased, and maximizes space.

Also trying to figure out what to use for shelving/cabinets at the moment...

http://aimlesswanderlust.com/2014/11/03/insulating-the-van-part-10/


Also, here's a peek:

van_hulliner12.jpg
 
accrete said:
One method used in our van conversion for walls was to go _soft_ walls. They are a combination of bubble wrap/mylar/reflectix covered by a marine hull liner fabric. Very light per square foot and does a fine job of insulation (sound and temp). ...

Thom,

Do you have a source for the go_soft_walls?

-- Spiff
 
Greetinga Spiff... well i might have thrown a new word out there? What i meant was to emphasize the words "Soft" and "Wall"...so i did the underscore before/after them.

We just sandwiched bubble wrap (think post office green stuff) and reflectix (Lowes/HomeDepot) and then covered the whole lot of it with marine grade "Hull Liner fabric" available locally and at many online shops.

Apologies for any confusion.
Thom


GREAT WORK AWL!!
 
Wow, I was going to go with coroplast but I am really into that hull liner fabric, that looks really slick. And one cannot ignore the importance of the soft coziness factor when it comes to choosing material. Dig your idea for using christmas tree clips to secure the large pieces of fabric, AWL. I am very much appreciative of both of your efforts to document your insulating process in detail with photos. For better or worse I'm an incessant planner and it helps greatly for me to see real results like this in practice before I continue with insulation phase of my conversion.
 
The hull liner fabric does look interesting but since my van will have full cooking facilities in it, something that is at least wipeable is vital.

This thread has given me a lot of alternative possibles, for which I thank y'all. I would never have thought of using corplast for anything but it is going to go in for walls in the area where I figure will have a lot of wet storage items like my PFD and rainwear.
 
Top