Access Panels for tight spaces.

Van Living Forum

Help Support Van Living Forum:

This site may earn a commission from merchant affiliate links, including eBay, Amazon, and others.

debit.servus

Well-known member
Joined
Dec 16, 2012
Messages
730
Reaction score
0
Location
San Jose, CA
I just realized something that should be a feature in tight spaces. For complex systems that are hard to get to or uncomfortable to work on, because they are in a tight cabinet; those systems should be installed onto a removable panel with quick-disconnects for everything if feasible. Or have access panels to said systems. Why they don't do this more with everything is beyond me, design things so everything has quick access and stadardized mounting. It is almost criminal.
 
debit.servus said:
I just realized something that should be a feature in tight spaces. For complex systems that are hard to get to or uncomfortable to work on, because they are in a tight cabinet; those systems should be installed onto a removable panel with quick-disconnects for everything if feasible. Or have access panels to said systems. Why they don't do this more with everything is beyond me, design things so everything has quick access and stadardized mounting. It is almost criminal.

Haha, that would be like asking a vehicle manufacturer to make a car or truck that could be serviced easily. The engineers that design these things never have to work on them nor do they care.

Most of what you're seeing is done that way for the convenience of initial construction.

One of my beefs with the Winnebago was that the carpet was laid throughout the entire coach BEFORE any walls were put in place. It meant that removing the carpet was a total nightmare. It was done that way because the cost of the extra square footage of carpet was less than the labor to install it after all the furniture components went in.

Just another reason to build your own!
 
Hello Dwellers:

"Debit.Servus" makes an excellent point about access panels. When I was constructing our motorhome conversion i attempted to make all "service points" as easily accessible as possible. This included both the plumbing and electrical systems. In the van box area this was a simple matter of just designing ahead before construction and then building accordingly. Main points to consider is convenient work height to the access panel if possible, and clearance of any doors or hatches to surrounding structures. Also, construct the access panels to blend in and not be too obvious.

When constructing the tractor and sleeper area of the motorhome, several of the electric panels I had added in tight locations had to be carefully planned and executed. I ended up having to cut additional access holes in the overhead console above the windshield to get at some radio and electronic equipment I had added up there. Good decision, too. Even though our conversion is only five years old, I have had to use this specific access panel on two occasions to replace and/or modify equipment. Instead of these repairs taking several hours having to disassemble the upper portion of the cab; removing the newly-cut access panel required only minutes and the job was completely done in less than an hour.

In a location in the bunk area I had constructed the main control panel for the 12VDC, 120VAC shore power; inverter control and battery charger control. Again, I can maintain and upgrade these systems easily due to the convenience afforded by easy access.

I never really much thought of this as I was doing it; so I'm glad this was pointed out in the lead post! Thanks!
 
Almost There said:
Most of what you're seeing is done that way for the convenience of initial construction.

One of my beefs with the Winnebago was that the carpet was laid throughout the entire coach BEFORE any walls were put in place. It meant that removing the carpet was a total nightmare. It was done that way because the cost of the extra square footage of carpet was less than the labor to install it after all the furniture components went in.

Just another reason to build your own!

Sorry, but I strongly disagree. I own a Winnebago product and have disassembled several areas. Which left me continually impressed by the level of engineering and workmanship involved in the construction. I also built new homes for a living, and have done tens of thousands of feet of floor coverings, everything from carpet to high end wood and granite. I can't imagine any RV manufacturer agreeing to install floor coverings after the unit is nearly complete, no matter how much you are willing to pay, it not only would result in a far lower quality installation, it would be a real counterproductive mess to accomplish. There are areas of carpet in my rig that are a foot wide and boxed in by the bed and the exterior wall. You really think that it's possible to nail tack strip, pad, carpet and stretch that area, on an assembly line? It would be like trying to carpet the bottom of a foot locker, but a smaller area, with less access. I absolutely agree that it can be rough to demo old floor coverings in a motorhome, but I is what it is, and doing an inferior job of the original install, on an assembly line, isn't the answer.

If you end up near a top notch manufacturer, like Winnebago in north central Iowa, or Newmar in NW Indiana, take a free tour. It's a real educational experience. In the Winny factory, things are done to a level of engineering and precision that most DIY van builders will never even get close to. Carpet is cut on giant CAD/CAM controlled automated tables. Many other soft materials are cut to within thousands of an inch on water jet tables. And the place looks like a automotive assembly line. Quite the opposite of what you would typically find in Elkhart, where some trailer factories are one step up from a bunch of guys running like idiots, clubbing piles of parts together, in a pole barn.
 
On my trailer I not only made pretty much all of the systems accessible in the front sink compartment, but I also ran the wires through flexible conduit so I could pull new wire if needed. I've always like the approach of making things accessible. I especially love the old Peterbuilt and Kenworth dashboards that unscrew and pull out in 3 panels to access every switch and gauge.
 
Almost There said:
Haha, that would be like asking a vehicle manufacturer to make a car or truck that could be serviced easily. The engineers that design these things never have to work on them nor do they care.

Most of what you're seeing is done that way for the convenience of initial construction.

I'll second this.

Very little in the realms of consumer products and the installation work of contractors is done with the end user or servicing in mind. If you have the skills, the time, attention to detail and the inclination to do it yourself, you'll end up with a much better end product.

A few years back, I needed to come up with a 24 volt power system for the orchestra pit at work. There was nothing commercially available that met all of my requirements. I needed an outdoor rated system since my venue is an amphitheater ad therefore, exposed to the elements. I needed a high level of redundancy in the system since we can't afford to lose half the lights in the pit during a performance if a transformer dies. I needed something that would be easy to work on since I knew I would be the guy maintaining the system for the foreseeable future.

Since I couldn't find any ready made equipment that met all my requirements, I designed and built my own.

P1020284.jpeg P1020287.jpeg P1020286.jpeg P1020283.jpeg

It's all in a washdown rated enclosure to which I added vents, cooling fans and a thermostat. There are 21 transformers sized to power 4 of our music stand lights. I could have used two larger transformers, but if I had, I wouldn't have the redundancy I wanted. This way, when, not if I loose a transformer I haven't lost half the lights in the orchestra pit. All I have to do is unplug a cable and plug it into a different transformer. And of course, since I approached the design from the perspective of the guy who has to maintain and service the system, everything is easily accessible and uses parts that are easy to find and replace. Finally, all the wiring is neatly laid out, everything is properly fused, and it's all labelled (I did most of the labeling after I took these photos.).

This installation was inspected by the local jurisdiction's toughest building inspector. In the ten years I'd dealt with the man on various installation by contractors, I'd never heard him say anything complementary about any installation. Quite the opposite in fact. He'd always found something that needed to be fixed. For my installation, after a few brief questions, he signed off on it and said that he wished he saw more installs like mine. My jaw just about hit the floor when he actually complemented my work.

The point here of course, is to illustrate that designing and building something to suit your needs rather than the generic general public, you can end up with a much better finished product than if you buy something off the assembly line.
 

Attachments

  • P1020284.jpeg
    P1020284.jpeg
    151.2 KB
  • P1020287.jpeg
    P1020287.jpeg
    273.1 KB
  • P1020286.jpeg
    P1020286.jpeg
    220.3 KB
  • P1020283.jpeg
    P1020283.jpeg
    250.7 KB
I've been stewing on ways to build cable/plumbing runs along the front of cabinetry rather than behind it. Kind of how cubicle sections have gutters built into the bottom few inches. This way it would be easier to add things later.
 
Picking up on GrantRobertson's comment about running wires, when I was in the design-phase for my Peterbilt motor home project, I stole the method for wire runs used on WWII Gato class fleet submarines; wires are run fully exposed along the bulkheads and hulls. Open, easy access; that's what I wanted, too!

I ended up providing a wire way trough at the top of the sidewalks, and along the bottom of the wall at floor level. I do have some wiring "inside" the walls for circuits which will never change, like base plugs and switches controlling outside wiring.

I find changing technology to be the main cause of having to "rewire" stuff. But, with both high and low positioned wire troughs running along the inside perimeter of my 16' van box, wiring and some plumbing modifications can be accommodated without too much hassle.
 
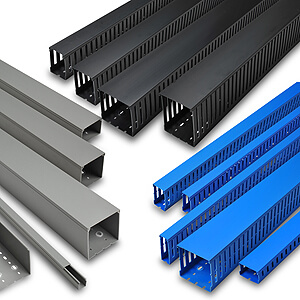
I'm a huge fan of wire ducts for a neat, clean electrical installation where conduit is not required. They also make it really easy to separate different voltages. Run two of these side by side with your 12 volt in one and your 120 volt in the other and you've got the separation that code requires.

wire_duct_family_300.jpg


You can get them in different colors, with slotted or solid walls and you can trim them to fit. I use a Dremel tool with a cutting blade, easy. Bends could be a little tricky though.

As for suppliers, there are plenty of them. I use Mcmaster-Carr and Grainger, but that's mainly because my employer has accounts with them. Neither of them are cheap, so you'd probably do better shopping around online.
 
My electrical wall inside my Cabinet has grown substantially over the years. It is not easy to access much of it, and there is too much wiring to simply move it to access it easier, and having enough wiring to make it easily accessible would still be problem prone and require longer lengths of wiring.

Instead I have to basically crawl into my cabinet and put something to rest my Head on when working on the deeper connections.

With 12vDC, voltage drop is the nemesis, So minimal connections and minimal length of wiring is paramount, So I just work around the limitations of my original Design. It was OK before I expanded my capabilities but now is quite crowded.
 
For the FORD van I am "central planning" the water and electrical. I have an old entertainment center furniture piece that I plan to repurpose as the kitchen cabinet, since it's built strong and with real wood unlike the DODGE vans kitchenette. This will be the hub for the water and electrical systems with auxillary substations spidered out to. This way if I have to change vans in two years I am not spending weeks dismantling the water and electric and can have everything permanently installed like it was in the DODGE van.

Plan to house electrical junctions and run loads out of circuit breaker boxes (Like the Siemens E0816ML1125S Surface Mount, 125 amp, 8 space, 16 circuit load center) or in plain wooden "spice cabinet" wall mounted boxes if they're affordable (What is the generic name of this type of houseware). Placing them on the sides of the TV cabinet where they'll be easily accessible and workable. The design of this hub will focus on minimizing dead space, this includes when it comes to fitting all the kitchen appliances on the shelves of the entertainment center.

Which brings me to another point. When I refitted the DODGE interior, I was appalled at all the wasted space behind, in between and walled off. I see this in cars and trucks as well, the ribs in the FORD walls have so much deadspace it makes me want to cut them out! Ofcourse there will always be some deadspace even in the best designed spacecrafts, as eliminating deadspace is impossible. The aim should be to minimize deadspace especially in places where space is at a premium, like inside a van.
 
between the ribs should be insulated. have to ask, why do you need a 125 amp 120 volt circuit breaker box? highdesertranger
 
highdesertranger said:
between the ribs should be insulated.  have to ask,  why do you need a 125 amp 120 volt circuit breaker box?  highdesertranger

I don't have the money right now to have it insulated between the ribs, as polyurethane can get expensive.

The circuilt breaker boxes are going to be used to house the hub for each system in an accessible, centralized way; unless you know of a better wall mounted housing with a door on it (http://www.ikea.com/us/en/catalog/products/80262088/#/80262088 something like this but flatter and with 4-6" of depth with a dark wood grain look to it). Thinking of 3 side-mounted boxes for freshwater (including 12v pump & related components), 12v (all 12v wiring, things like 12v circuit breakers, switches, fuse holders, wiring junctions, and outlets cut into the door/sides) and 120v DC.

Thinking of placing the sink on the top of the entertainment center, with cooking utensils and vandwelling gadgets stored directly under the sink. The microwave goes on the shelf below and a crate or two of food or the fresh & greywater containers go on the bottom. The system boxes are mounted to the sides of the entertainment center with their respective outlets and inlets. This is a lot to put in a space two feet deep, two and a half feet wide and 3 feet tall.

It was very hard to get to the 12v in the DODGE, which was centered in two cabinets. This time I want to make it accessible and centered in one part of the van, making spidering out easy and simple.
 
debit.servus said:
The circuilt breaker boxes are going to be used to house the hub for each system in an accessible, centralized way; unless you know of a better wall mounted housing with a door on it (http://www.ikea.com/us/en/catalog/products/80262088/#/80262088 something like this but flatter and with 4-6" of depth with a dark wood grain look to it).
 
Can anybody help me find some wooden wall mountable boxes like I described, for a reasonable price?
 
if you want wood boxes build your own. then you get exactly what you want. highdesertranger
 
highdesertranger said:
if you want wood boxes build your own.  then you get exactly what you want.  highdesertranger

Agreed. This is why I DIY, get exactly what I want. Looking at buying square load centers made of metal and paneling wood over it when I can afford cosmetic mods. Function before form is how I designed it.
 
Top