2001 Chevrolet Express 2500 - "Chief Dave"

Van Living Forum

Help Support Van Living Forum:

This site may earn a commission from merchant affiliate links, including eBay, Amazon, and others.
Gary68 said:
nice work,on the floors is that 1/8 or 1/4 thick and did you use the thin foam like pad under?

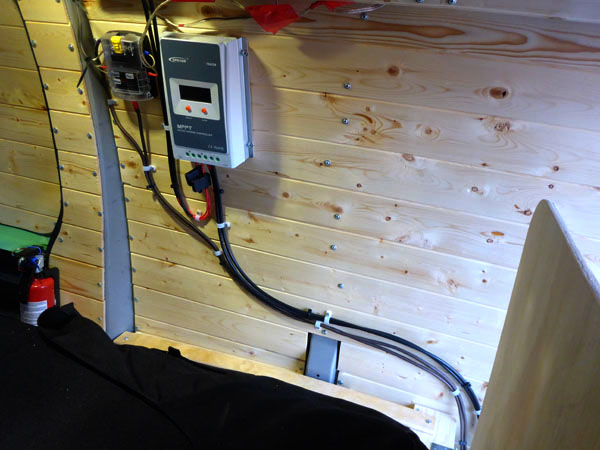
on the solar,not a fan of tape,it will eventually dry out and fail,one 1/4" bolt per mount will not fail

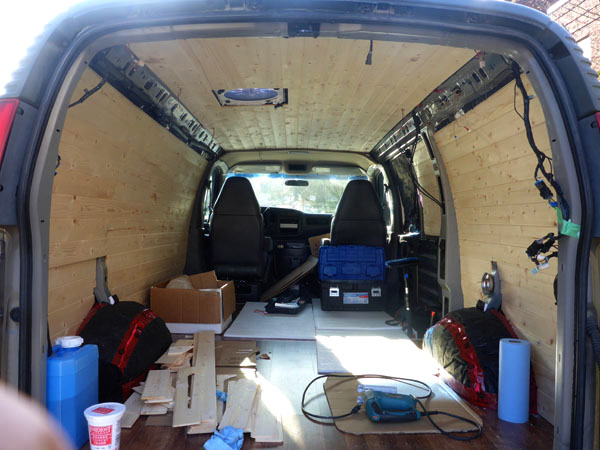
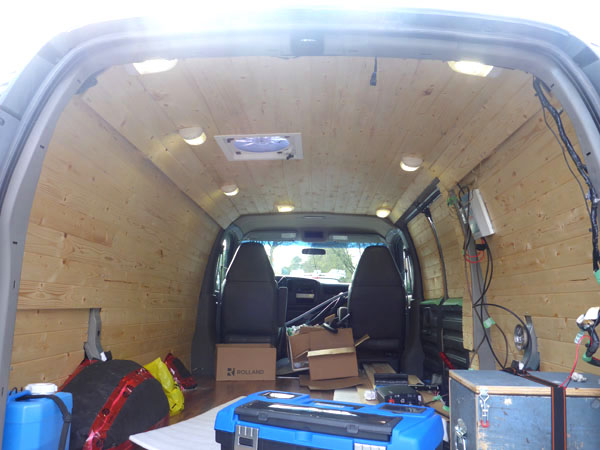
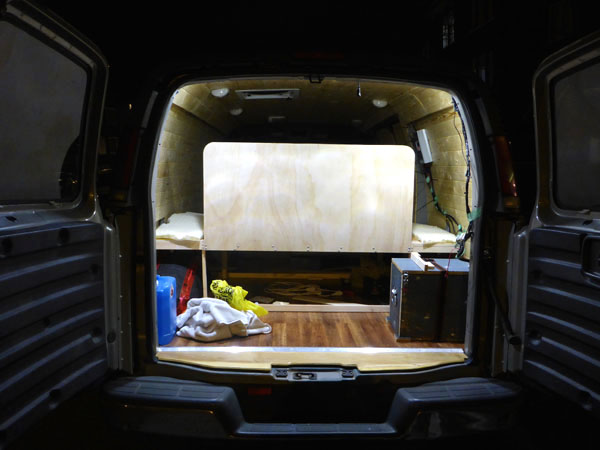
The subfloor is 3/8 (1/4 felt liable to split) and the laminate is somewhere between 1/4 and 3/8 (I'll check when I get home). In total it's a bit more than I'd like but not terrible. The underlayment is a very thin foam (link below) but just enough to cushion between materials when stepped on. I managed to cut the roll to get a bit under the subfloor as well so the ply and metal floor aren't directly in contact with one another.

Underlayment: https://www.homedepot.ca/en/home/p....-for-laminate-and-wood-floors.1000404555.html

I did a lot of reading before going with VHB and feel pretty confident it does a good job but I can always whack some self-tapping bolts in any time I choose.
 
@Gary68: The laminate is 1/4" so the floor is a total thickness of about 5/8"

So I put a little bit of trim in. It's a small thing but seeing it makes me feel warm inside.

[img=600x450]

[img=600x450]

[img=600x800]
 
nice clean job,looks great

i can stand in my rig but only have a couple inches of headroom so was looking at vinyl but looks like i will keep 1/4" laminate as an option
 
Gary68 said:
nice clean job,looks great

i can stand in my rig but only have a couple inches of headroom so was looking at vinyl but looks like i will keep 1/4" laminate as an option

I thought over the pros and cons for a while. The laminate is nice and sturdy particularly since it runs against the subfloor seams. The boards uncut were 8" x 48" and it's surprising how heavy they started to feel once you pick up 8 or 10 at a time so that's a con for me. I got this stuff off craigslist free however. I reckon a big water spill over a seam could do some damage if not cleaned up quickly unlike a big sheet of vinyl but they're both easy to clean and weather reasonably well. For vinyl I particularly liked this build: http://vandogtraveller.com/campervan-conversion-fitting-floor/
 
I managed to get 90% of the thinsulate insulation in over the weekend. Just a tiny bit to do on the doors still. I'm going to give my impressions on the insulation in the dedicated thread once I've tested a few more things.

[img=600x450]


Getting the thinsulate threaded into the corners and struts was easily done using a bit of cord tied onto one end:

[img=600x450]


I forgot to photograph it but I used some bent wire to push strips into the hollow areas surrounding this top piece:

[img=600x800]


[img=600x450]


[img=600x450]

:)
 
Couple of questions about the thinsulate...

What size did you buy? Where did you get yours from?
How much did you actually use for the entire van?
How much did it all cost?

As you mentioned, you would post opinions of it in another thread...
But the above would be very helpful to me as we are near the insulation phase, and I do not want to waste any money...

Luv your images! They are very helpful!!!
 
galladanb said:
Couple of questions about the thinsulate...

What size did you buy? Where did you get yours from?
How much did you actually use for the entire van?
How much did it all cost?

As you mentioned, you would post opinions of it in another thread...
But the above would be very helpful to me as we are near the insulation phase, and I do not want to waste any money...

Luv your images! They are very helpful!!!

Hi! I got the SM600L which you can find here: http://www.ebay.com/itm/3M-Thinsulate-tm-SM600L-noise-thermal-insulation-/131754566187
Alternatively you can do as I did and contact the seller direct - [email protected]

I'd say I'll have about 4ft left over from the 42 linear feet I purchased. It's a 5ft wide roll so say 38ft x 5ft total. That includes setting material aside for the rear window covers and a curtain which will run between the bay and the cab. Also I didn't do the wheel wells in the end because I plan to build polyiso boxes but maybe I could double up since I have enough. It's touch and go whether I'll be able to make the spray adhesive last for the final pieces. I've had to be a bit conservative with two cans. Wish I'd got three.

The total cost was $414.96 plus $51.60 shipping. Steep, yes but I elected not to use any sound deadener due to the acoustic properties of the insulation. Yet to find out whether that was a wise decision but I suppose it's done now!

Hope this helps!
Tom
 
Electrical work!! The fan and lights wired up as well as an extra 12V outlet which will be used by the fridge.

[img=600x450]


A closer look at my precarious-looking temporary setup. The charge controller and fuse box are just sort of hanging out there.

[img=600x450]


I was thinking about mounting the controller etc. on this as an electrical panel of sorts. Who can guess what it is? :D

[img=600x450]
 
So your van came with armrests?

I sooooooo want armrests, (mine does not have any...:( )

Did yours also have power door locks and Windows?

Cruise?

Sooooooooo envious of those options!
 
galladanb said:
So your van came with armrests?

I sooooooo want armrests, (mine does not have any...:( )

Did yours also have power door locks and Windows?

Cruise?

Sooooooooo envious of those options!

Came with armrests, cruise control, power windows and you can lock/unlock all doors from inside the driver or passenger side doors. I guess those are power locks. Not the remote fob or anything.
 
galladanb said:
So your van came with armrests?

I sooooooo want armrests

Dan-My van comes with armrests (it is a Ford and not a Chevy) but my fat dog broke the one on the driver's seat so the arm rest wont sit parallel to the floor. Yeah. ::Of course I'm sure Sophia wouldnt do such a thing.::
 
A LOT has happened since my last post so you'll have to forgive me for this photo bonanza! I've kept the file sizes down as much as possible. More has actually been done since but I'm just yet to take photos.

Paneling going in:
nIyuW8K.jpg


The side doors included:
FAIDEKD.jpg


Battery box testing. I used the previous owner's old subfloor ply to build this:
0Rcb2FT.jpg


Cable glands and breakers installed on the battery box:
VbQeNYW.jpg


Paneling finished and stained / lighting working! Went for a natural stain so just something to bring the grain out a tiny bit:
DBewXxx.jpg


Bed build:
iitwynC.jpg


A closer look. The middle portion of the bed lifts on a piano hinge so I should get a picture of that soon:
kZfiuCI.jpg


I made a divide between the bed and rear storage area where I'll be keeping (sometimes mucky) bikes:
GwvgfT3.jpg


At night the lighting really comes into its own:
xar7pPQ.jpg


Part of my bike storage bracket concept. It's difficult to describe how exactly this will function so just trust me!
OrWabeH.jpg
 
Another bit of bike storage bracket stuff. It's on a hinge with a flip latch beneath so as not to impede battery box access:
vtZqBf6.jpg


Neatening up some of the wiring:
xvuv86u.jpg


Galley build (in progress):
eZLkfL5.jpg


Cheers!
Tom
 
WOW! NICE!!!! So many questions for you!

Back doors, drivers side, why is there a setback, like above the water jugs?
How did you handle the back inside corners and the uprights?
How did you keep all the horizontal lines even as they go up the wall?

Same for the vertical panel by the rear side of the cargo door on the passenger side?

OH MY Goodness, so many questions....

Great job so far! I'm totally gonna copy your efforts.
(We already have the same paneling you chose, from a few months back. We just need to get er dunn!)
 
Thanks guys!

galladanb:
Back doors, drivers side, why is there a setback, like above the water jugs?
It's an anomaly. I tried and tried to get the board to line up there but with all the weird unevenness and going directly into the metal I eventually settled knowing that it would be "one of those things I won't see often."

How did you handle the back inside corners and the uprights?
The corners just required a bit more care when they started tapering. I had a bunch of boards cut to length so I just measured with the taper how much a board should lose over the course of its height. This is the sort of thing that will make a lot more sense when you go to do it and you'll want to figure out as you go anyway. Same for the uprights. I did a bunch of measurements and worked my way around them. Have a general plan but then take your time and solve problems as they come up.

How did you keep all the horizontal lines even as they go up the wall?
The first boards will dictate how straight most of everything is so one those are in just be sure the tongue and groove are all the way in for each board. staggered the boards so that there was a large overlap between rows. The measurements lined up with the ribs but going bottom to top, left to right it was essentially; long, short, short, long, long short, short, long etc.

Same for the vertical panel by the rear side of the cargo door on the passenger side?
That was just a bunch of short cuts. I templated it with cardboard to get the curve down and laid it all out. Once the bottom board is in it's a breeze.

Tom
 
Thx so much! I'm thinking way to much on this project! My feeble tiny brain has hurts all over it!
The electrical has just about done me in...

Just so I'm clear, you ran self tapping screws directly into the upright ribs, right?
How long are they? I'm so fearful of running thru the outer skin....?

Your rig looks totally awesummmmmmmm!
Wishing you were in middle Tennessee, so that you could help me get it right!

Such fun!!!
 
Wow! What progress!

In just a minute---as the kids say these days---you'll be out on the road.
 
galladanb: You have just described my own brain for the last 18 months. Learning the basics of carpentry, electrical, insulation, mechanics etc. has been absolutely exhausting since I'd never done any of it either. On top of all that working a full time job certainly made it twice as hard! What I've learned is just to keep it simple and take your time.

I did use screws into the ribs against much of the advice offered here. They were 1" which were an ideal length and you definitely won't pierce the skin. Having gone through all that now perhaps I would do as was suggested and put wood studs up but at a certain point you have to take control of your own project and learn by doing. I'd say the biggest problem with screwing into the ribs is that it's very time consuming. You need to check and position each screw, drill a clearance hole in the wood and sometimes a pilot in the metal since there are narrow parts of the ribs which will walk if you try to use self tappers on them blind. Flat surfaces however are super easy. Get behind the butt of the drill and you can drive a screw into the metal in just over a second. Sometimes though there's double or triple thickness which is harder and definitely avoid spot welds! They're hard as anything.


Likewise, if you were in the pacific northwest I'd be delighted for you to come and have a nosey :D
 
Top