Introducing...Tilikum and my modification log

Van Living Forum

Help Support Van Living Forum:

This site may earn a commission from merchant affiliate links, including eBay, Amazon, and others.

waldenbound

Well-known member
Joined
Mar 19, 2015
Messages
668
Reaction score
4
CRVL, meet Tilikum, my great big white 2011 Chevy 3/4 ton van.


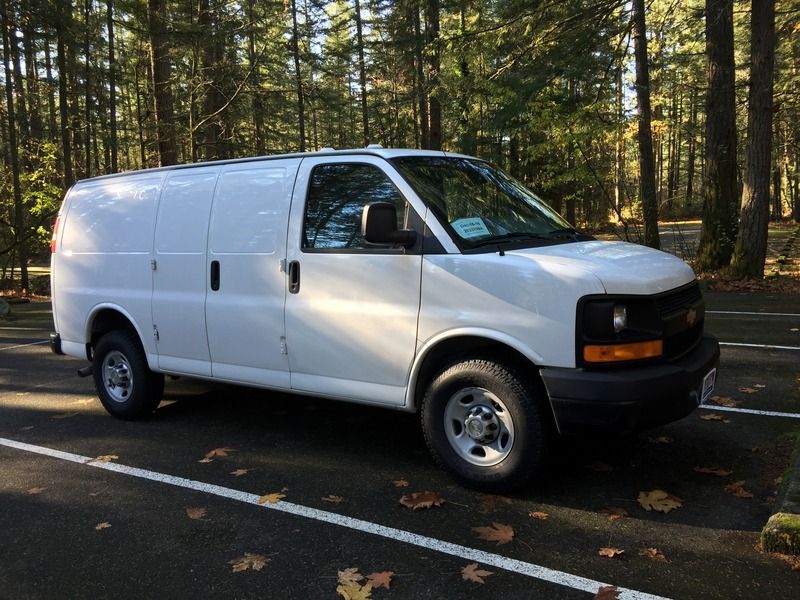
Tilikum is the Chinook word for "tribe." It's also the subject of the movie Blackfish, Tilikum the orca whale that killed three of his Sea World trainers. Those majestic animals just don't belong in captivity. :(  But my Tilikum is very gentle, and wouldn't hurt a fly.

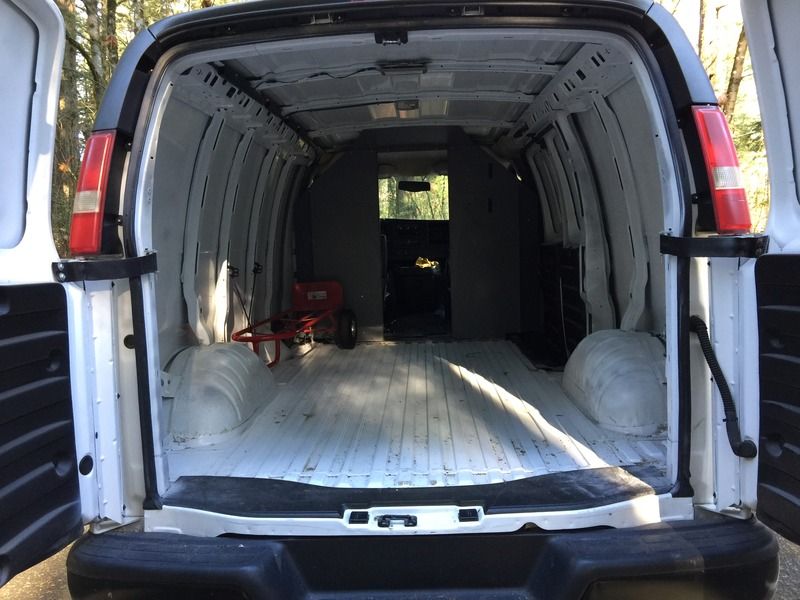
I got all of the shelves, carpet, and vinyl off, and Tilikum is ready to be transformed.


Took over 500 pounds to the dump. Tilikum was on the job today. Too much stuff! UGH!


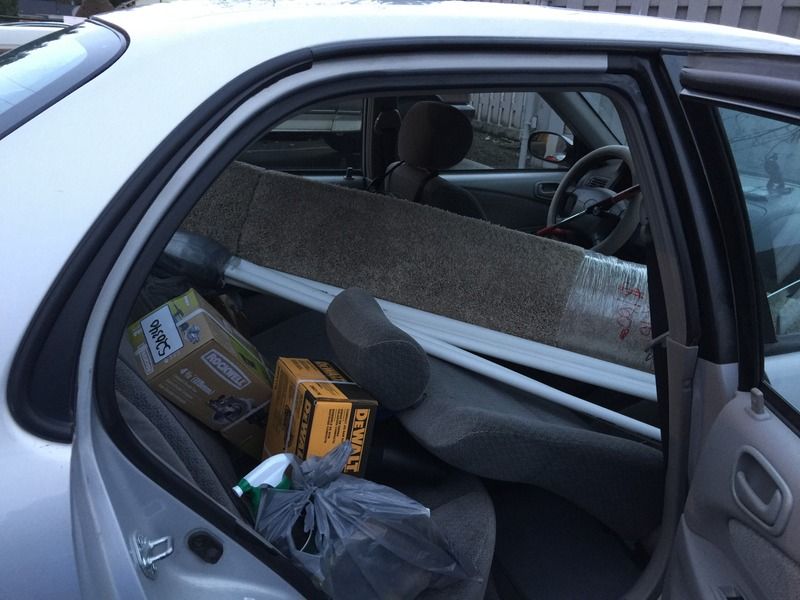
And, while Tilikum was being a driveway queen, the Toyota Corolla acts as the hauler. How much stuff can you fit in a compact sedan?


I will be working on the van when time and funds allows. I'll keep adding to this thread as progress is made.
 
looks nice and clean ,any idea on its past life?
 
Gary68 said:
looks nice and clean ,any idea on its past life?


Based on the picture of what got dumped out, I think we have the makings of a good guessing game:

1) carpet
2) red wagon sides,
3) planters with plants,
4) bricks,
5) cinder block
6) toilet seat cover

Not sure what all this adds up to...   :)
 
It belonged to the Colorado DMV, in the Colorado Springs area. I figure, government van, DMV officials tooled around in it. Carfax captured a lot of maintenance done. "Time to take the van for an oil change, ok, good time for an hour coffee break."

It spent five years with the Colorado DMV, then was driven up to Oregon where is spent three months as a fleet vehicle. It was sold at auction and brought to Washington.
 
Maybe a nice exterior themed paint job?

Shamu-One-Southwest-Airlines.jpg
 
BradKW said:
Based on the picture of what got dumped out, I think we have the makings of a good guessing game:

1) carpet
2) red wagon sides,
3) planters with plants,
4) bricks,
5) cinder block
6) toilet seat cover

Not sure what all this adds up to...   :)

the past owner was really bad at dumpster diving?
 
Gary68 said:
the past owner was really bad at dumpster diving?

That was me taking advantage of the hauling capacity. :) I didn't want to be a bad neighbor by throwing the carpet and padding in the dumpster, so I loaded up some household stuff that will need to go eventually, and dumped it.
 
Very cool. Looks like a great rig. Is it going to be your full-time home or a part-time adventuremobile?
 
SUV_RVing said:
Very cool. Looks like a great rig. Is it going to be your full-time home or a part-time adventuremobile?

I have to stay where I am a little over one more year. That's plenty of time to get the van ship-shape. Get it on my maintenance schedule, which is very strict, and get all the insulation, fans, solar, and various tinkering done.

I have the spring and summer to take trips, fine tune my downsizing, what's going to fit, ect.

I definitely have a plan to do this full time.
 
Off to a good start it looks like. Looks clean and straight.
 
I'm starting my building process, with my limited knowledge and know-how. I have my speed square which I have no idea how to use, and my carpenter's square, which I call my L shaped ruler. That's all it is to me. I do have a nifty compact Rockwell circular saw and a jig saw, and some sawhorses.

Well, Tilikum has a floor, a 4x8 sheet of 3/4 plywood, and I have a problem.


I can't get the wheel wells covered with the Reflectix. I've tried spray adhesive, I've tried Reflectix foil tape. I bought five rolls of the tape and it was a good thing I was in the Lowes parking lot, so I took it right back. Anybody got any tips to wrapping wheel wells?

Also, I tried something, and I wanted to see if it would work before I posted a picture.
We need the all important air gap between the van's metal and the Reflectix. I needed some kind of spacer, so one of ladies at Lowes thought of taking pvc pipe and cutting it into 1/2 inch rings. Little ringlets. I used the 3M high powered stuff, put up five spacers, and two days later, they are still there.


All the rings have to do is provide that space for an air gap, the Reflextic can rest up against it.  In fact, I bet the Reflectix and polyiso can both just rest against each other and the spacers, since furring strips will hold every thing down.
 
To wrap the wheel wells, I took measured the length of the wheel well from the front edge at the floor, up and over the wheel well to the back of it at the floor. Also need the measurement from the wall of the van out over the curve of the wheel well to the floor. This gives you the length and width of what you'll need.

Tape it down, even if you have to use duct tape, to the floor at the front edge of the wheel well and the back edge of the wheel well easing it in to the wall by cutting out for ribs as needed. Now you can tape it to the reflectix on the wall with the aluminum tape. The edge toward the middle of the van is still flapping around all over the place at this point..

Now, tape it down at the middle of the wheel well to the floor for as far as it will lay flat against the upright edge of the wheel well. Now you're going to cut in to it along the curve of the wheel well and cut away all the excess reflectix.

I did dress making for years and just used the same set of skills one uses to make a dart in a blouse.... :D only you're cutting away the material not just making a dart.

Aluminum tape will be your friend.

I tried to find close up pics of the wheel wells but don't have any that are suitable...sorry!!

Don't forget to use the bubble wrap on the underside of the reflectix on the wheel wells as well as on the walls.

I hope you can make sense of the above, it's hard to describe what a couple of pics would have handled but unfortunately I wasn't making instructional pics at the time...just showing off the progress...sigh!!
 
Great looking van, look forward to following your progress. That year will fly by fast :)
 
Spent all day putting up Reflectix. It went better than I thought, even though cutting all those sections was a pita. Bought some more supplies. One thing I've learned: the pvc ringlets works! The other thing, Reflectix tape against van metal, bad, Reflectix tape against Reflectix, it works!

Thursday I will be wrapping wheel wells with Reflectix. I'm not a seamstress so I don't know about sewing, but as long as a can tape Reflectix tape to Reflectix, it will hold.

I now have to think ahead to putting up the polyiso and furring strips. How are you attaching furring strips to the van's ribs? Can you use the available spaces? I sure don't want to put more holes in the ribs.
 
waldenbound said:
Spent all day putting up Reflectix. It went better than I thought, even though cutting all those sections was a pita. Bought some more supplies. One thing I've learned: the pvc ringlets works! The other thing, Reflectix tape against van metal, bad, Reflectix tape against Reflectix, it works!

I now have to think ahead to putting up the polyiso and furring strips. How are you attaching furring strips to the van's ribs? Can you use the available spaces? I sure don't want to put more holes in the ribs.

If you need to stick reflectix panels to the metal of the van, regular aluminum tape from H/D works just fine. I never bought 'reflectix tape'.

I did something to attach the furring strips to the van ribs that I don't recommend - I countersunk holes big enough to handle the socket for hex bolts and then held the nuts inside the ribs with two of my little tiny fingers...it was a bitch of a job and I had to glue large washers to the nuts to get them big enough to not come back out the damn holes. Chev/GMC made the ribs with all these stupid cut outs in them. The older vans had straight sided ribs with no holes...they were great for screwing in to. The newer vans not so much at all.

Edit: Yep, I just looked at one of your pics and you've got the same darned slots in the ribs that I had... PITA to work around.

The reason I did it that way was because the slots in the ribs happened to be in the exact same spot as I wanted to put the furring strips...sigh!!

IMO, just go ahead and put more holes in the ribs. The small holes you're going to make attaching furring strips are not going to do anything to disrupt the strength of the ribs.
 
Almost There said:
I did something to attach the furring strips to the van ribs that I don't recommend - I countersunk holes big enough to handle the socket for hex bolts and then held the nuts inside the ribs with two of my little tiny fingers...it was a bitch of a job and I had to glue large washers to the nuts to get them big enough to not come back out the damn holes. Chev/GMC made the ribs with all these stupid cut outs in them. The older vans had straight sided ribs with no holes...they were great for screwing in to. The newer vans not so much at all.

Edit: Yep, I just looked at one of your pics and you've got the same darned slots in the ribs that I had... PITA to work around.

The reason I did it that way was because the slots in the ribs happened to be in the exact same spot as I wanted to put the furring strips...sigh!!

IMO, just go ahead and put more holes in the ribs. The small holes you're going to make attaching furring strips are not going to do anything to disrupt the strength of the ribs.

Mercy, that sounds complicated. I'm not sure I even understand what you said.
Here's what I thought of. You've got your Rlectix and polyiso in between the ribs right? The ribs are a clean slate, they have that long oval cutout already there. So, make it work for you.
I thought of getting some kind of straight bracket. I couldn't find any at Lowe's so I got some jibber jabber long piece of metal thingy, with 3/8 holes in them. All I have to do is take a hack saw, and saw off pieces to fit behind the oval. Then take my furring strip, drill a 3/8 hole, then put a 3/8 bolt, and a 3/8 nut. The furring strips are attached nice and strong, and now I have a "stud" that's easy to locate to put up the plywood.
 
waldenbound said:
Mercy, that sounds complicated. I'm not sure I even understand what you said.
Here's what I thought of.  You've got your Rlectix and polyiso in between the ribs right? The ribs are a clean slate, they have that long oval cutout already there. So, make it work for you.
I thought of getting some kind of straight bracket. I couldn't find any at Lowe's so I got some jibber jabber long piece of metal thingy, with 3/8 holes in them. All I have to do is take a hack saw, and saw off pieces to fit behind the oval. Then take my furring strip, drill a 3/8 hole, then put a 3/8 bolt, and a 3/8 nut. The furring strips are attached nice and strong, and now I have a "stud" that's easy to locate to put up the plywood.

I suspect that what you're thinking of doing is almost the same as what I did, only you're going to try to use some 'jibber jabber long piece of metal thingy.... :D :D

Best description of something I've seen in a long time btw.... :D :D

The problem with both ideas is that you have to get inside the rib to hold the nut in place while you turn the bolt in to it.

The reason I countersunk the bolt head was so that they weren't sticking out once I had the furring strip attached.

'
 
When I put up the furring strips, I'll take pictures and show you my jibber jabber. :p
 
Top