Building to fit curved walls?

Van Living Forum

Help Support Van Living Forum:

This site may earn a commission from merchant affiliate links, including eBay, Amazon, and others.

Meh47

New member
Joined
Oct 15, 2016
Messages
2
Reaction score
0
Ok, first post. I still have a while before I can even begin the van life (I'm 17 and I still don't know how to drive yet) but the idea has stuck with me. Anyway I've got a rough idea of how I would probably build my future van, but I've got a problem;

I've noticed that with most vans, the walls have a slight curvature to them and that with other peoples builds, they have the cabinets and beds and stuff fit into the curve, instead of all the sides being straight.

I can't find any information on how to find the measurement for the wall curve so you can cut out the material to fit it...any help?
 
CAD

Cardboard Aided Design.

Make templates of curvature of walls with cardboard, then translate to wood
 
What he said! ^^^^

Trial and error cutting the cardboard until you get the fit, trim a little off, add a little back on with tape.

Once the cardboard fits, it's a template for cutting your wood accurately.

There are also computer aided high tech laser methods but most of us don't have the funds for or access to them.

Dave

Dave
 
There are tools like contour gauges and curve templates that wood and metal workers use to duplicate curved shapes. They're on the expensive side, especially for larger ones, but you might be able to borrow or rent them.
 
A cheap way and the way I did it back in the 70's (yes, I am old) is to use a compass (not the one to find North).  We used them in Drafting class, they probably use CAD now.  These are used to draw circles.  They hold a pencil on one leg and a point on the other leg and are hinged.  Take your cardboard (or thin wood preferably) and stand vertically along the curved wall with the edge toward the wall and the flat part toward you.  Spread the compass out to as wide as the biggest gap between the raw template and the van wall you are trying to copy.  If it doesn't go wide enough, you will have to do it in multiple passes.  Hold the pointed end to the van wall and the pencil end on the wood.  Holding it by the knob is the easy way to hold and draw.  Move the pointed end along the wall while drawing a parallel line with the pencil on the raw template.  Cut along drawn line and hold cut line along van wall to see if you need to redraw the line and cut again.  Good luck.  Here is a picture of an inexpensive one:

  
605015_p
 
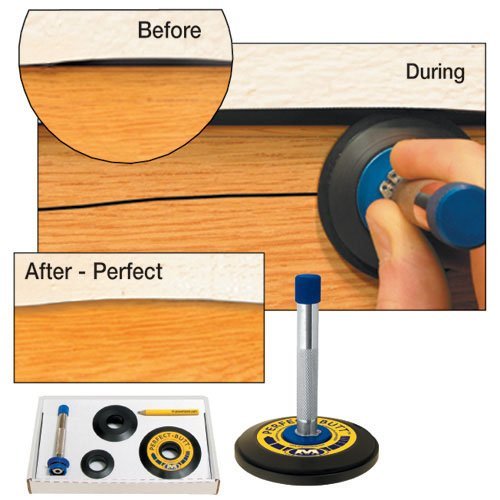
A handy way to do consistent scribes is a wheeled pencil like this:  Perfect Butt

51GY%2BW7b9fL.jpg


Here is a link to a nice demonstration of how it's used in a van build...jump to 20:50 in the video:  
 
Go to a local library and look at books on boat building and cabinets. Nothing on a boat is straight, square or level.

There are a couple of methods that I have used. If you have a hot glue gun, (or even regular paper glue), you can glue strips of cardboard together following the curve.

Another method that I used on boats is more complicated but very accurate. It uses something that I was told called a witness stick. I didn't have much luck finding this on the internet, so I will do my best to explain the method. On a van, you can hang a sheet of cardboard cut to approximate shape from a roof bow. Now you make a witness stick out of a strip of wood, (this is one piece of wood with different markings on the two sides).

This procedure sounds complicated, but once done is very easy and quick.
You put the stick against the cardboard and then slide the point of the stick onto the side of the van wherever you want the point documented, (more points taken, the more accurate it will be). Now take a pencil and using the stick as a guide trace out two of the notches onto the cardboard and mark on the cardboard what notches they were, (the further apart the notches, the more accurate).

Now after marking as many places as possible, take down the sheet of cardboard and place it on the material that you want to cut. Tape it into place so that it doesn't move, ( until you get the hang of it I would place it several inches away from the edge of your work piece). Now place the witness stick back over one set of the reference marks that you made. Take your marker and trace the tip of the stick onto your work piece. Do this for all the marks that you made on the cardboard. If you now take your pencil or marker and connect all the tip points, you will have an picture of the contour that you want to cut.  left click on image for a larger view. 
WITNESS STICK.jpg   WITNESS STICK2.jpg      WITNESS STICK3.jpg   WITNESS STICK4.jpg
 

Attachments

  • WITNESS STICK.jpg
    WITNESS STICK.jpg
    169.7 KB
  • WITNESS STICK2.jpg
    WITNESS STICK2.jpg
    48.5 KB
  • WITNESS STICK3.jpg
    WITNESS STICK3.jpg
    107.1 KB
  • WITNESS STICK4.jpg
    WITNESS STICK4.jpg
    41.3 KB
The cheap way: get some cardboard, a box knife, a glue gun, and a roll of double-sided tape (sticky on both sides). Decide if you're wanting to duplicate the actual van WALL, or the RIBS.

Make a stable base with 2 pieces of corrugated cardboard, each about a foot square (NO prefolded creases!). Set one piece flat on the floor, with one edge up against the wall or rib. Hot-glue the second piece securely so it is standing up in the middle of the first square, with a bottom corner also against the wall or rib: _l_ This is what you build onto.

Now, cut a bunch of small pieces of cardboard about 4" long by around 1" wide; the grooves of the currugations need to be running lengthwise for strength.

Apply a strip of the tape almost the full length of a cardboard strip (one side only), and position it carefully on the van-wall side of the vertical sheet of cardboard, with the bottom corner set exactly over the vertical support bottom corner, and the upper-outside end of the 4" piece swung out so it's corner touches the van wall or rib. Apply tape to the next 4" piece, and attach it to the first piece (almost halfway down), making sure that two corners touch the van or rib. These two little corners form the pattern of the curve. Repeat. Repeat. Repeat.

You may be tempted to lengthen the pieces, or make the overlap very short to speed up the process. I tried that, and as I got closer to the top, it got more wobbly. Even when I set a brick on the square-foot base, the top was unstable. Redoing it with 4" pieces and overlapping them well provided more stability.

When you've made it as high as you want (or to the roof), remove the curve and base from the van, and cut away the base so the curve lays flat. Then connect the corner tips ('dots') to make the curve on another piece of cardboard and use that as a pattern.

CHECK THE NEW PATTERN AGAINST THE CURVE OF THE VAN WALL OR RIB BEFORE CUTTING WOOD.

I tried to find a photo at Google Images, but couldn't. I can't be the only one who has done it this way.
 
Meh47 said:
I see where you're going with this, but what about finding the angle of the curve?

I've never used this ruler but I think it holds the shape of where you put it , if you can find one of these rulers in the Home improvement store you could test it
 
a scribe(compass) is how I was taught. you need one that locks in position. for pieces that span both sides with one piece of plywood. I would use 1/8 inch plywood to make a pattern. scribe two pieces for the sides and one for the top then attach the two sides to the top and bottom together. then you have a complex pattern. transfer this pattern to your plywood. it helps to practice if you have never done this before. once you get good at it you will be amazed how easy it is to copy complex patterns. I have never had good luck with cardboard, it's to flexible. highdesertranger
 
This is my life tonight. Using cardboard and tape so I can trace over and make an ok cut. Maybe this is not the most professional solution but it has yet to fail me.
 

Attachments

  • image.jpg
    image.jpg
    1.8 MB
You might want to consider buying a "french curve" at a local art or hobby shop.

A french curve is a plastic tool that contains many curves at many angles. It comes in different sizes as well. You'll be certain to find the right curve to draw it on paper. I used one many years ago when I took a drafting class in school. It comes in very handy when it comes to locating the correct angle for a drawing.
 

Attachments

  • Curve.jpg
    Curve.jpg
    4.2 KB
Another idea, if you don't mind losing some space, is just to frame the sides and maybe the ends to make a square area.  Attached is a picture that gave me the idea, although metal was used in the van.
 

Attachments

  • 2016-10-04--1475561239_854x638_scrot.png
    2016-10-04--1475561239_854x638_scrot.png
    532.6 KB
highdesertranger said:
a scribe(compass)  is how I was taught.  you need one that locks in position.  for pieces that span both sides with one piece of plywood.  I would use 1/8 inch plywood to make a pattern. scribe two pieces for the sides and one for the top then attach the two sides to the top and bottom together.  then you have a complex pattern.  transfer this pattern to your plywood.  it helps to practice if you have never done this before.  once you get good at it you will be amazed how easy it is to copy complex patterns.  I have never had good luck with cardboard,  it's to flexible.  highdesertranger

I can't, for the life of me, seem to wrap my head around this concept. Can anyone explain this in some type of dummy-proof way?
 
watch these. this is a good quality compass/scribe in the first vid, . this vid shows how to do a curve kinda, . you just do this on a bigger scale. are you going to be at the RTR? I could teach you. highdesertranger
 
highdesertranger said:
watch these.  this is a good quality compass/scribe in the first vid,   .  this vid shows how to do a curve kinda,   .  you just do this on a bigger scale.  are you going to be at the RTR?  I could teach you.  highdesertranger


HDR,

Those videos were very helpful. Thank you. I do plan on going to RTR but hope to have this process done by then!
 
I *think* this is what Freedom is describing because it sounded very much like what I do give or take a few details.


You'll have to make sure you hold the stick horizontal so it doesn't warp the contour too much but I've found this to be the easiest and cheapest way to do it.  The more careful you are while drawing the more accurate your contours will be.  However, it's not perfect and I've found that stick on weather stripping fills in the small gaps you may have from cutting.

I use a marker for drawing my cut line because I can't see the pencil lines very well.
 
I use the pencil because it's smooth and slides along the surface well as long as there's no big honkin' eraser on it(I use drawing pencils with no erasers or metal on them) but I forgot the most important part: clear tape. Once you tape it to the end of the stick it's the tape that sticks out farther than the pencil. I use a single piece of clear tape at each spot where I tape it to the stick. It's worked out pretty decent for me and then I just run up some weather stripping to take care of the areas where I cut too far inside on.
 

Latest posts

Top