TMT - My build so far

Van Living Forum

Help Support Van Living Forum:

This site may earn a commission from merchant affiliate links, including eBay, Amazon, and others.

Tiny Metal Tube

Well-known member
Joined
Jan 31, 2018
Messages
80
Reaction score
1
I've gone with a U-shape revolving around a dinette in the middle.  The build can be thought of in sections. Behind the driver's seat will be the kitchen. Behind that there are two benches flanking a dinette. Behind those are two couches, one facing forward and one facing backward. To the left of that is where the cabinets will go. On both sides of each couch are trap doors that will go to nightstand/endtable areas. The rearmost compartment will be used for the battery bank and electronics, sitting right near the wheelwells. They'll be offset a bit to the right to counteract the extra weight of the cabinets.

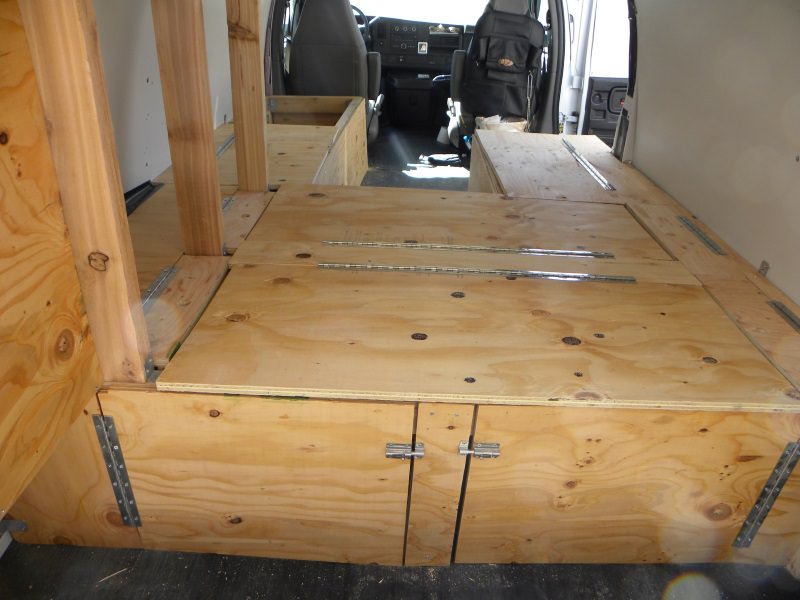
Most people immediately notice the heavy duty construction of 2x4s and 3/4" plywood. Basically I'm building this thing to last 20-30 years, and I don't treat my stuff very delicately, so it needs to be tough. I've also verified the 3/4" plywood can fully support my weight without extra 2x4s supporting it in the middle of each section, which is nice. 

Here is the view from the rear cargo door:

CmdsZAJ.jpg


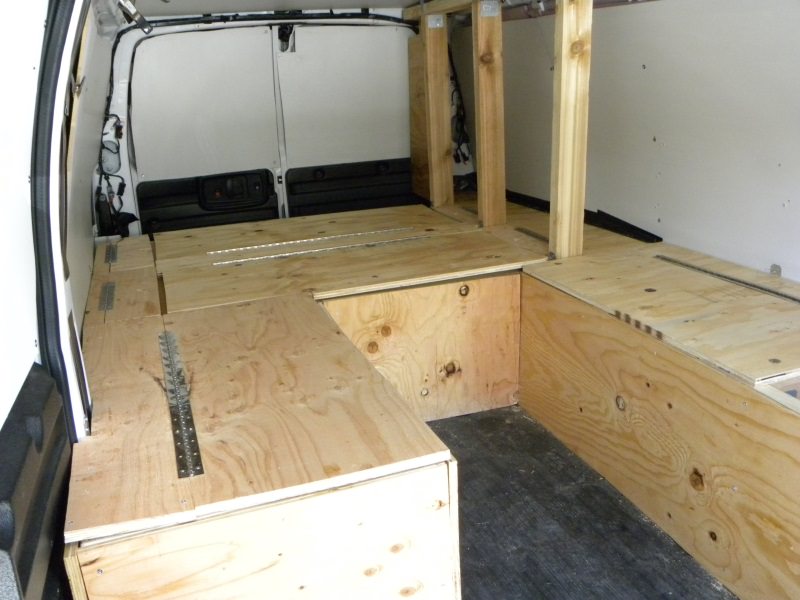
Here is the view from the side cargo door.  Notice things don't all line up perfectly, but "perfect is the enemy of good [enough]".  The bottom layer of plywood (compartment sides) is all finished. The top layer (compartment tops) still needs to be sanded and polyurethaned. 

40Ythk5.jpg


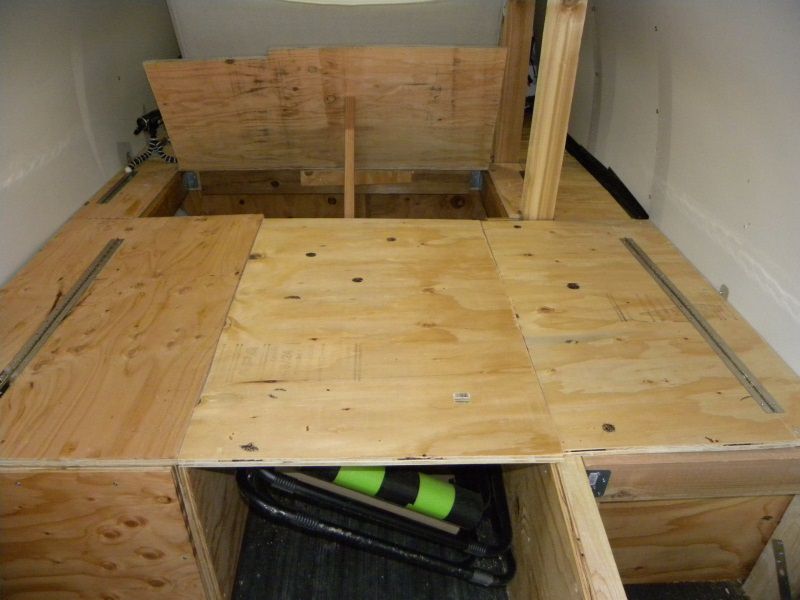
Here is the dinette as it will appear when in bed mode. It will sit on a pipe that will raise it 25" off the floor. For comparison, the legs are 14" and with the beams and plywood, the seating area is overall about 18" off the floor. Initially I bought a 29" pole and decided it needed to be about 4" lower. How fortunate I was able to find a 25" equivalent.  Pole is arriving shortly so not installed/pictured.  In this image I have one of the couches up in couch mode. Today, I sat there looking out the back door at a sunset behind the mountains with a slowly-thawing lake in the foreground. It was magnificent!   I took a video of it, but I'm not sure I'm allowed to post links to it yet. If you're interested, look my name up on YouTube.

kI5ENTs.jpg


The build is progressing slowly, but surely.
 
TMT, that is very nicely planned. I like it and can envision it when finished, it will be nice & comfortable. It's well built and will last despite those edges that don't match perfectly.  :) You've done well in your planning, the hard part. Keep on going. It be done before you know it. So will the wallet!

After 10 posts, you're at 15, you can post links. Make sure you provide a decent description of every link, or the mods will get after you or even delete your post & links. They have good reasons, mainly for those who have limited bandwidth on their devices.
 
And Goodwill said:
TMT, that is very nicely planned. I like it and can envision it when finished, it will be nice & comfortable. It's well built and will last despite those edges that don't match perfectly.  :) You've done well in your planning, the hard part. Keep on going. It be done before you know it. So will the wallet!

After 10 posts, you're at 15, you can post links. Make sure you provide a decent description of every link, or the mods will get after you or even delete your post & links. They have good reasons, mainly for those who have limited bandwidth on their devices.

Thanks for your kind words. The way I had read the rule, I thought it was about number of threads, and subject to some mod's opinion of whether they were good threads. Well, here goes.

In the video below, I demonstrate the various doors and hinges I've installed. Then I just kinda sit there and watch the sunset. The lake below is partially frozen but slowly thawing. Behind that are the Rocky Mountains. The sun sets behind them. At one point it looked like a waterspout was going to form, but then it dissipated. It was fun to watch.

Sometimes I like to put these kinds of things in because they both reinforce the desire to join the van life, and also speak to me on a spiritual level. I feel like being in Nature brings us closer to how we were "meant" to live; and indeed even lets us commune with the Creator (I call it Nature; feel free to substitute God if you prefer).  I don't mention that element of it in the video, but sometimes it comes up on my channel.


[video=youtube]

Edit: There are other videos on my channel that show parts of my design and build process.
 
nice, loved the video of the lake and the storm blowing through. highdesertranger
 
Update on my build. First few batches of plywood are all finished and installed. 
I have a bed! I have storage! I can go camping in it again!

Now on to the dinette leg, kitchen, cabinets, and then electrical.  Once those are all done, I can hit the road for real.

Everything down and in bed mode:
DSCN0771.JPG DSCN0755.JPG

Rear-facing couch up:
DSCN0768.JPG DSCN0767.JPG

Forward-facing couch up:
DSCN0758.JPG DSCN0757.JPG

Edit: The changes may not be obvious.  In the first post in this thread, I had only test-fitted the topside plywood (couches, compartments, benches, etc.). Since then I have sanded and polyurethaned the wood. That is, I finished the wood.
 

Attachments

  • DSCN0755.JPG
    DSCN0755.JPG
    639 KB · Views: 20
  • DSCN0757.JPG
    DSCN0757.JPG
    660.3 KB · Views: 18
  • DSCN0758.JPG
    DSCN0758.JPG
    692.3 KB · Views: 18
  • DSCN0759.JPG
    DSCN0759.JPG
    652.1 KB · Views: 14
  • DSCN0767.JPG
    DSCN0767.JPG
    675.4 KB · Views: 19
  • DSCN0768.JPG
    DSCN0768.JPG
    619 KB · Views: 18
  • DSCN0771.JPG
    DSCN0771.JPG
    688.1 KB · Views: 20
I just placed my order for the electrical system. $4500. 74 total items. Things just got very real. LET'S DO THIS!

They only have one of the battery I want, so I'll be going back later for more and for some additional solar panels. I think I'll be doing two layers of solar panels whereby the bottom layer will slide out on drawer sliders.

Time to go make some space in the garage. It's filled with van stuff, RV stuff, camping stuff, and plywood shavings.
 
Continuing on my existing thread since it won't seem spammy that way.

Here's a video of how I plumbed my kitchen. Warning: 1080p video. Check your playback settings to save bandwidth.

The fresh water goes from a 5-gallon water jug into a hand-pump faucet through a 3/8" tube. That was the easy part.

My sink is an 8-quart mixing bowl from Wal-Mart. They run out of these often, so if you don't see an 8-quart, be sure to ask. They have the ability to check other nearby Wal-Marts (but they may not say that because only certain people can look that up).

I drilled a hole in the bowl using a hole saw and stuck a sink drain in the bottom. From there, a 1.5" PVC pipe runs through a series of FIVE ADAPTERS before it can finally interface with the Tote-n-Stor 6-gallon gray tank. The adapters were necessary because (believe it or not) house sinks are not designed to be compatible with RV waste tanks. 

The contact cement is still drying, so I still need to check it for leaks. If it leaks, I'll add more, or caulk it with silicone.

Edit: Removed video since my embeds seem to be broken. Click below to watch it.

Here's a link to the video on YouTube proper, as Part 14 of my build playlist. There's some other stuff in that playlist I haven't shown here, such as my process for preparing wood, and the furniture and cabinet builds.

 
Be observant that the next batteries you buy match the manufacture date of the first. Some times even a few months can make a difference.
 
^ I knew it was important, but didn't realize it had to be that close.  Well I should have two arriving in a few days, and they're 214Ah each.  Hopefully that'll be enough.
 
Hey there, Tiny!

Just watched all of your videos! Very cool build!

I'm pleased you made so much progress in your build...

Mine has proven to be a lot slower, lol!

We are going on trips more often now so there's that!

Any way, congrats!

Such Fun!!!
 
galladanb said:
I'm pleased you made so much progress in your build...
Mine has proven to be a lot slower, lol!

If it makes you feel better, I got basically nothing done in December and January due to the weather being so cold, and in the summer due to it being so hot.  I get a lot done on temperate weekends, but those aren't very plentiful.

[font=Verdana, Arial, sans-serif]> We are going on trips more often now so there's that![/font]

[font=Verdana, Arial, sans-serif]Every week/weekend spent on a trip is a week/weekend when nothing gets done on the van. But we need those trips to find problems that need to be solved. It's a double-edged sword.[/font]
 
Lots of improvement in the last couple months.

I installed a series of 9 ventilation fans under the woodworking. They will keep air moving in a circular motion throughout the van, particularly at night.
fans.jpg

The plumbing under the sink is done. Tubing in, tubing out. It's just easier this way.
sink.JPG

I installed a wood roof rack system, mounted to the existing metal roof rack system. Reinstalled awning, installed 700W solar, a rear-view camera, some solar LEDs, and tons of eye hooks (for shade cloths etc).
solar.JPG

The electrical system is in. It's not done yet but well on its way. I have two 214Ah batteries, two controllers, and 700W of solar. One controller and 400W aren't wired in yet, but they're up.
batt.JPGcharge.JPG

Dometic CFX-50US fridge where the passenger seat was. Bolted to the seat bracket with 5 3/8" bolts.
fridge.JPG

I've also started sleeping in the van again. In my driveway, for the time being.
 

Attachments

  • fans.jpg
    fans.jpg
    239 KB · Views: 14
  • sink.JPG
    sink.JPG
    221.5 KB · Views: 14
  • batt.JPG
    batt.JPG
    240.8 KB · Views: 16
  • charge.JPG
    charge.JPG
    190.7 KB · Views: 14
  • fridge.JPG
    fridge.JPG
    243.4 KB · Views: 21
  • solar.JPG
    solar.JPG
    260.3 KB · Views: 18
Second controller got wired up and configured today. Now witnessing the full power of my 700W solar array.
...Well not now; the sun doesn't shine at night. But earlier today.

Batteries leveled off for the night at 13.2V instead of their usual 13.1.
I woke up in the van this morning at 9:15 to find my batteries were already fully charged (13.8V, I think). And that was on only 300 watts.
So unless I get a few days of bad sun in a row, I don't think I'll be having any capacity problems.

I am pleased to see the two controllers seem to be behaving well together, other than sometimes one reports 0.1V higher than the other one. I figure they must poll at regular intervals and their timers aren't synced or something.

I thought it would be more complicated. Both arrived set for sealed batteries and with the right voltage points set (matched the battery manual). All I had to do was set the Ah capacity and set the equalize time to 0 minutes to disable equalization (because I'm paranoid).
 
I got the same StowAway swing-away trailer hitch carrier Bob reviews last year. I didn't record installing it, but I recorded some information about how I built the platform on top of it and the big box I mounted to it.

Don't use paint to waterproof the wood. Use Thompson's WaterSeal.


... The conversion is essentially DONE at this point. Time to start testing it!
 
My build has entered the test phase. Over Memorial Day weekend, I went camping and identified quite a few deficiencies. No show stoppers, but a bunch of little things.

This video doesn't feature those, but is geared more toward "hey look at this great weekend I had!".

 
Today I switched to Verizon. 
Thus it seemed important to test my new MiFi hotspot, with AND without the weBoost cell signal booster.
I also tested my WiFi range extender.
TLDW: All of the above worked well, but they aren't magic; and there is a bit of a learning curve.

 
Quick update. The build is done. Just getting the house ready to sell. Won't be long now.
 
Top