


urbankid12
Well-known member
- Joined
- Jul 31, 2018
- Messages
- 120
- Reaction score
- 54
Here is pictures and a brief explanation of my build. My build was focused around a twin size ikea foam mattrace. On the right is a shelf turned into a desk Under the desk/kitchen counter is my fridge I found it SUPER easy to build these shelfs to the uneven floor and slanted walls. The far side I overlapped two different shelves making it into one bigger shelf The sides have clear plastic bins I zip-tied to the metal shelf. (drilled holes in them and then just zip-tied them directly that way. worked fine and are still holding up, very strong zip ties)
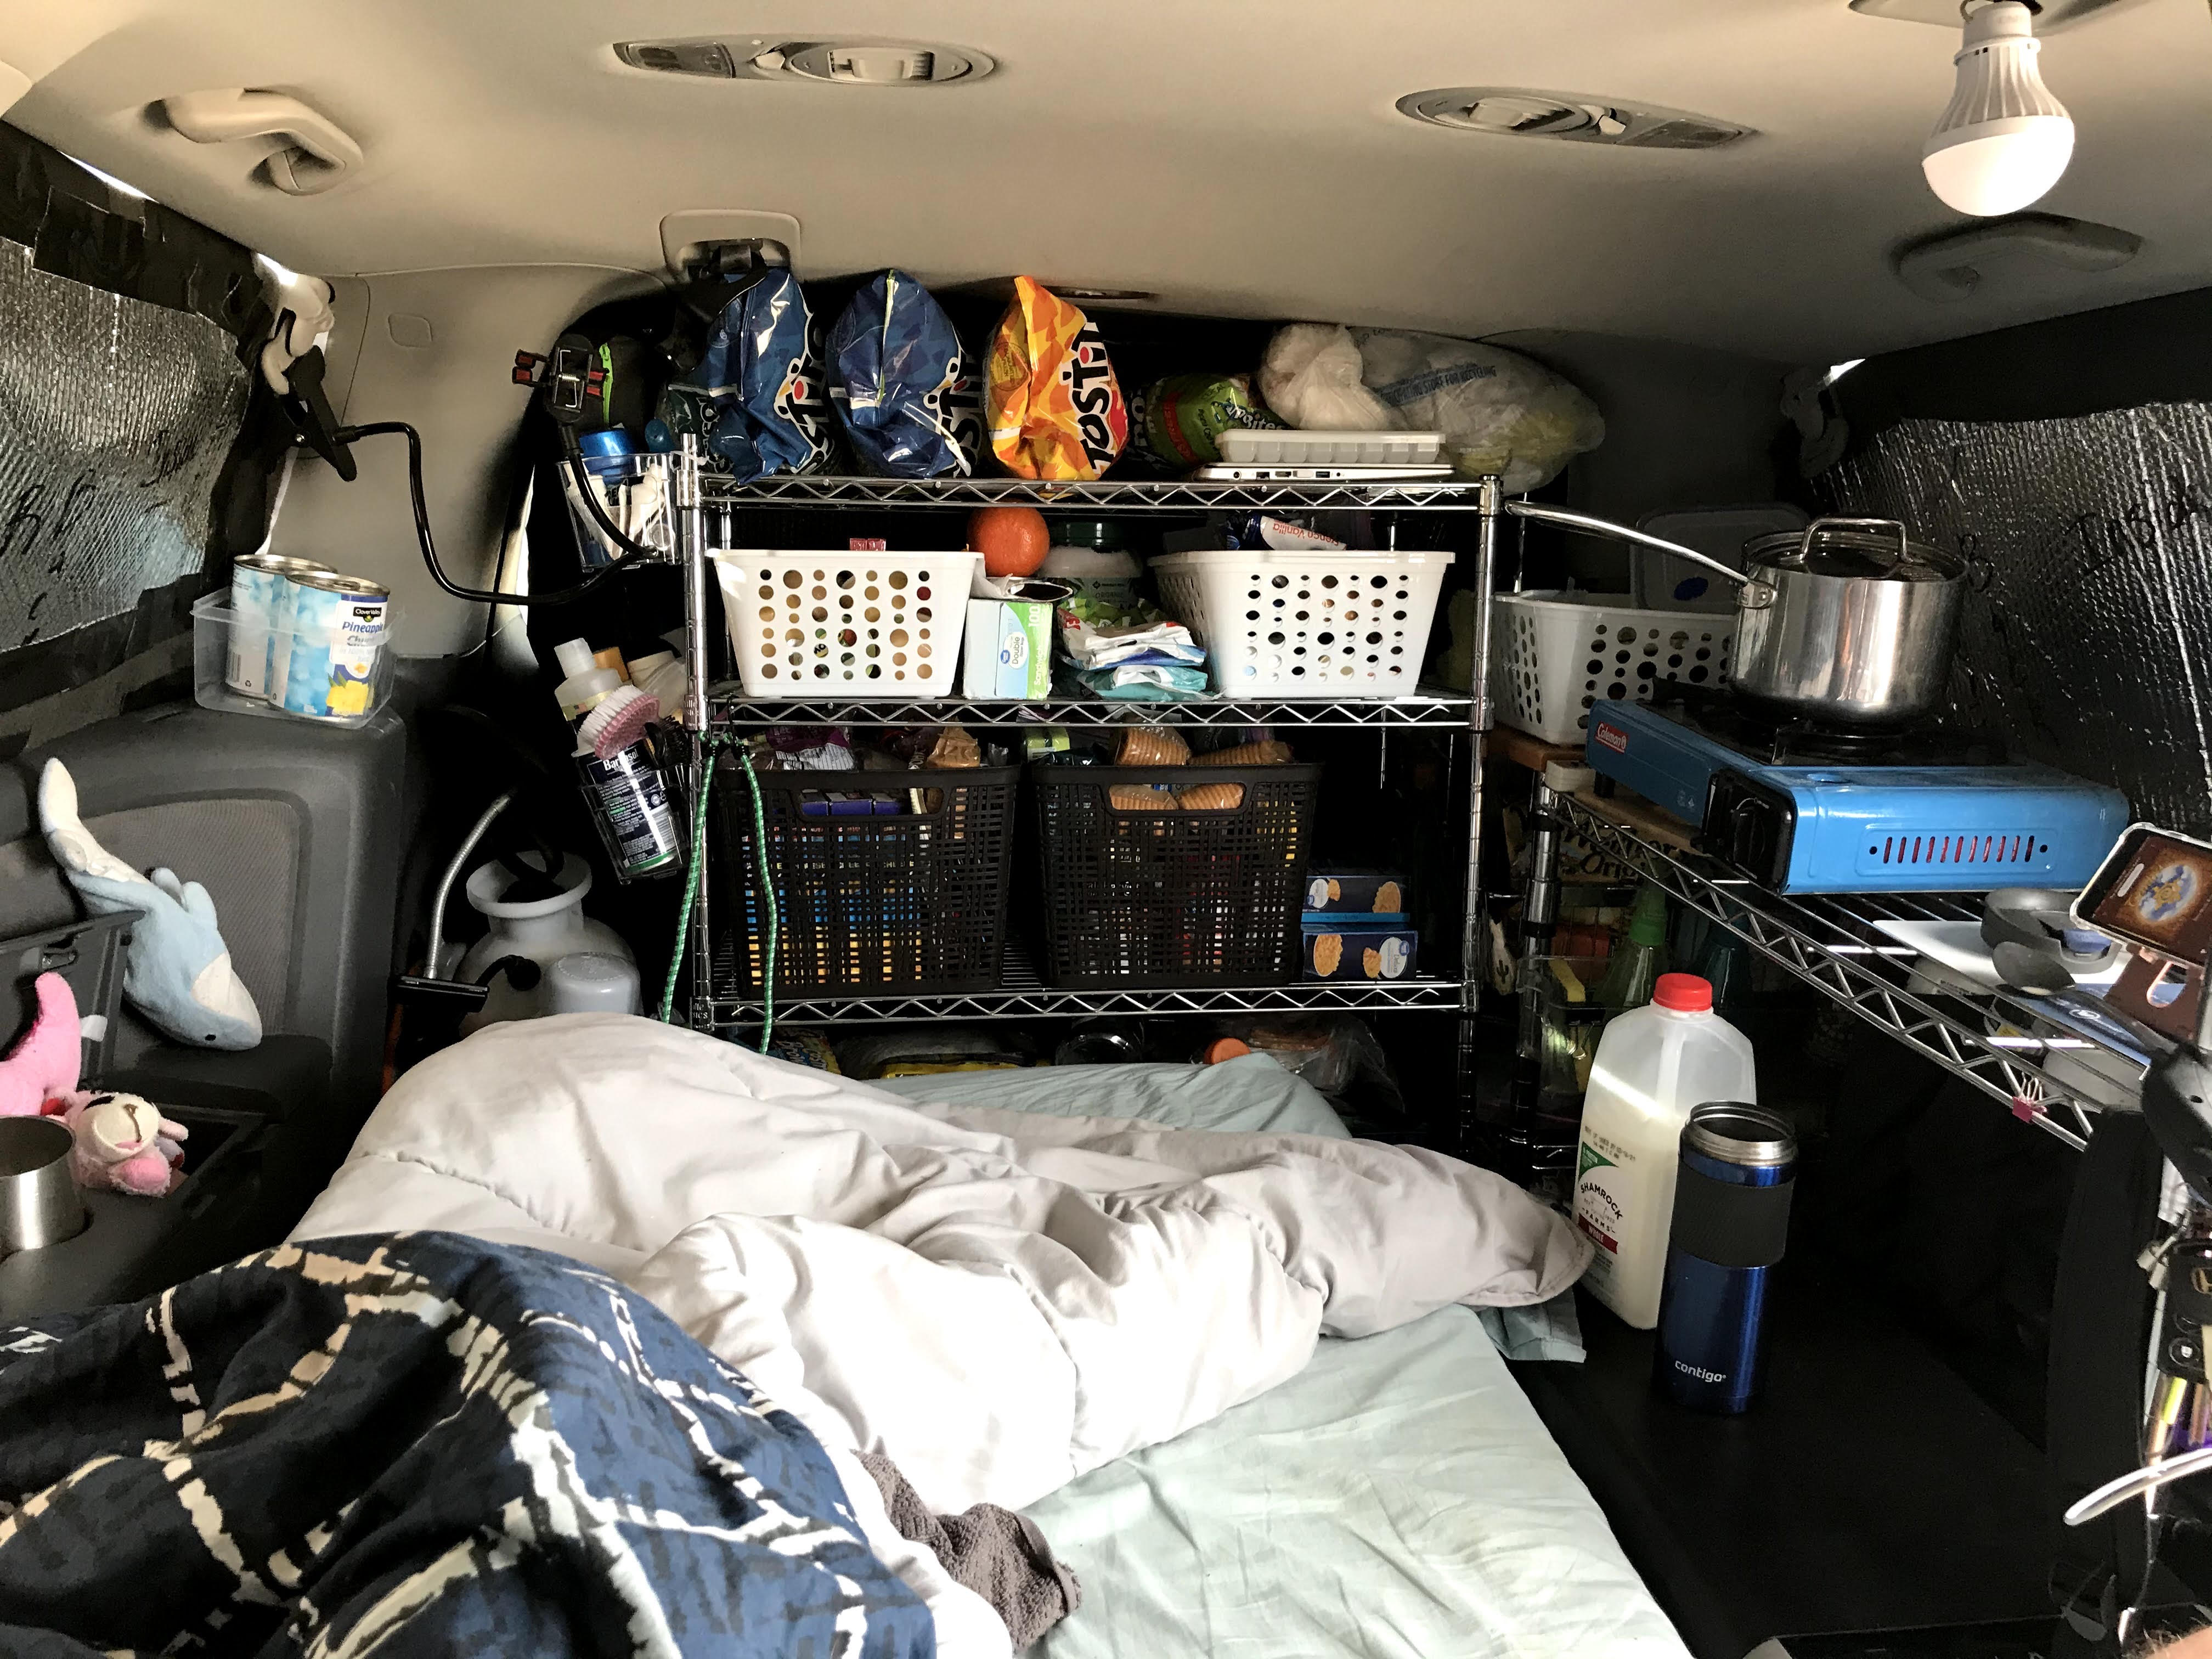
Here you can see the overlapping shelves better. I built the shelf in place and then cut off the legs to be level I took the driver side, side paneling off it saved me a lot more space for my desk/kitchen counter. I originally wanted to put in butcher block as I think it would look AWESOME! but I grew content with the free shelf I got next to the dumpster at the LTVA and just used that instead. I even thought about wrapping the butcher block counter around into an L shape onto the back shelf but the storage seemed like a much better idea for my needs.

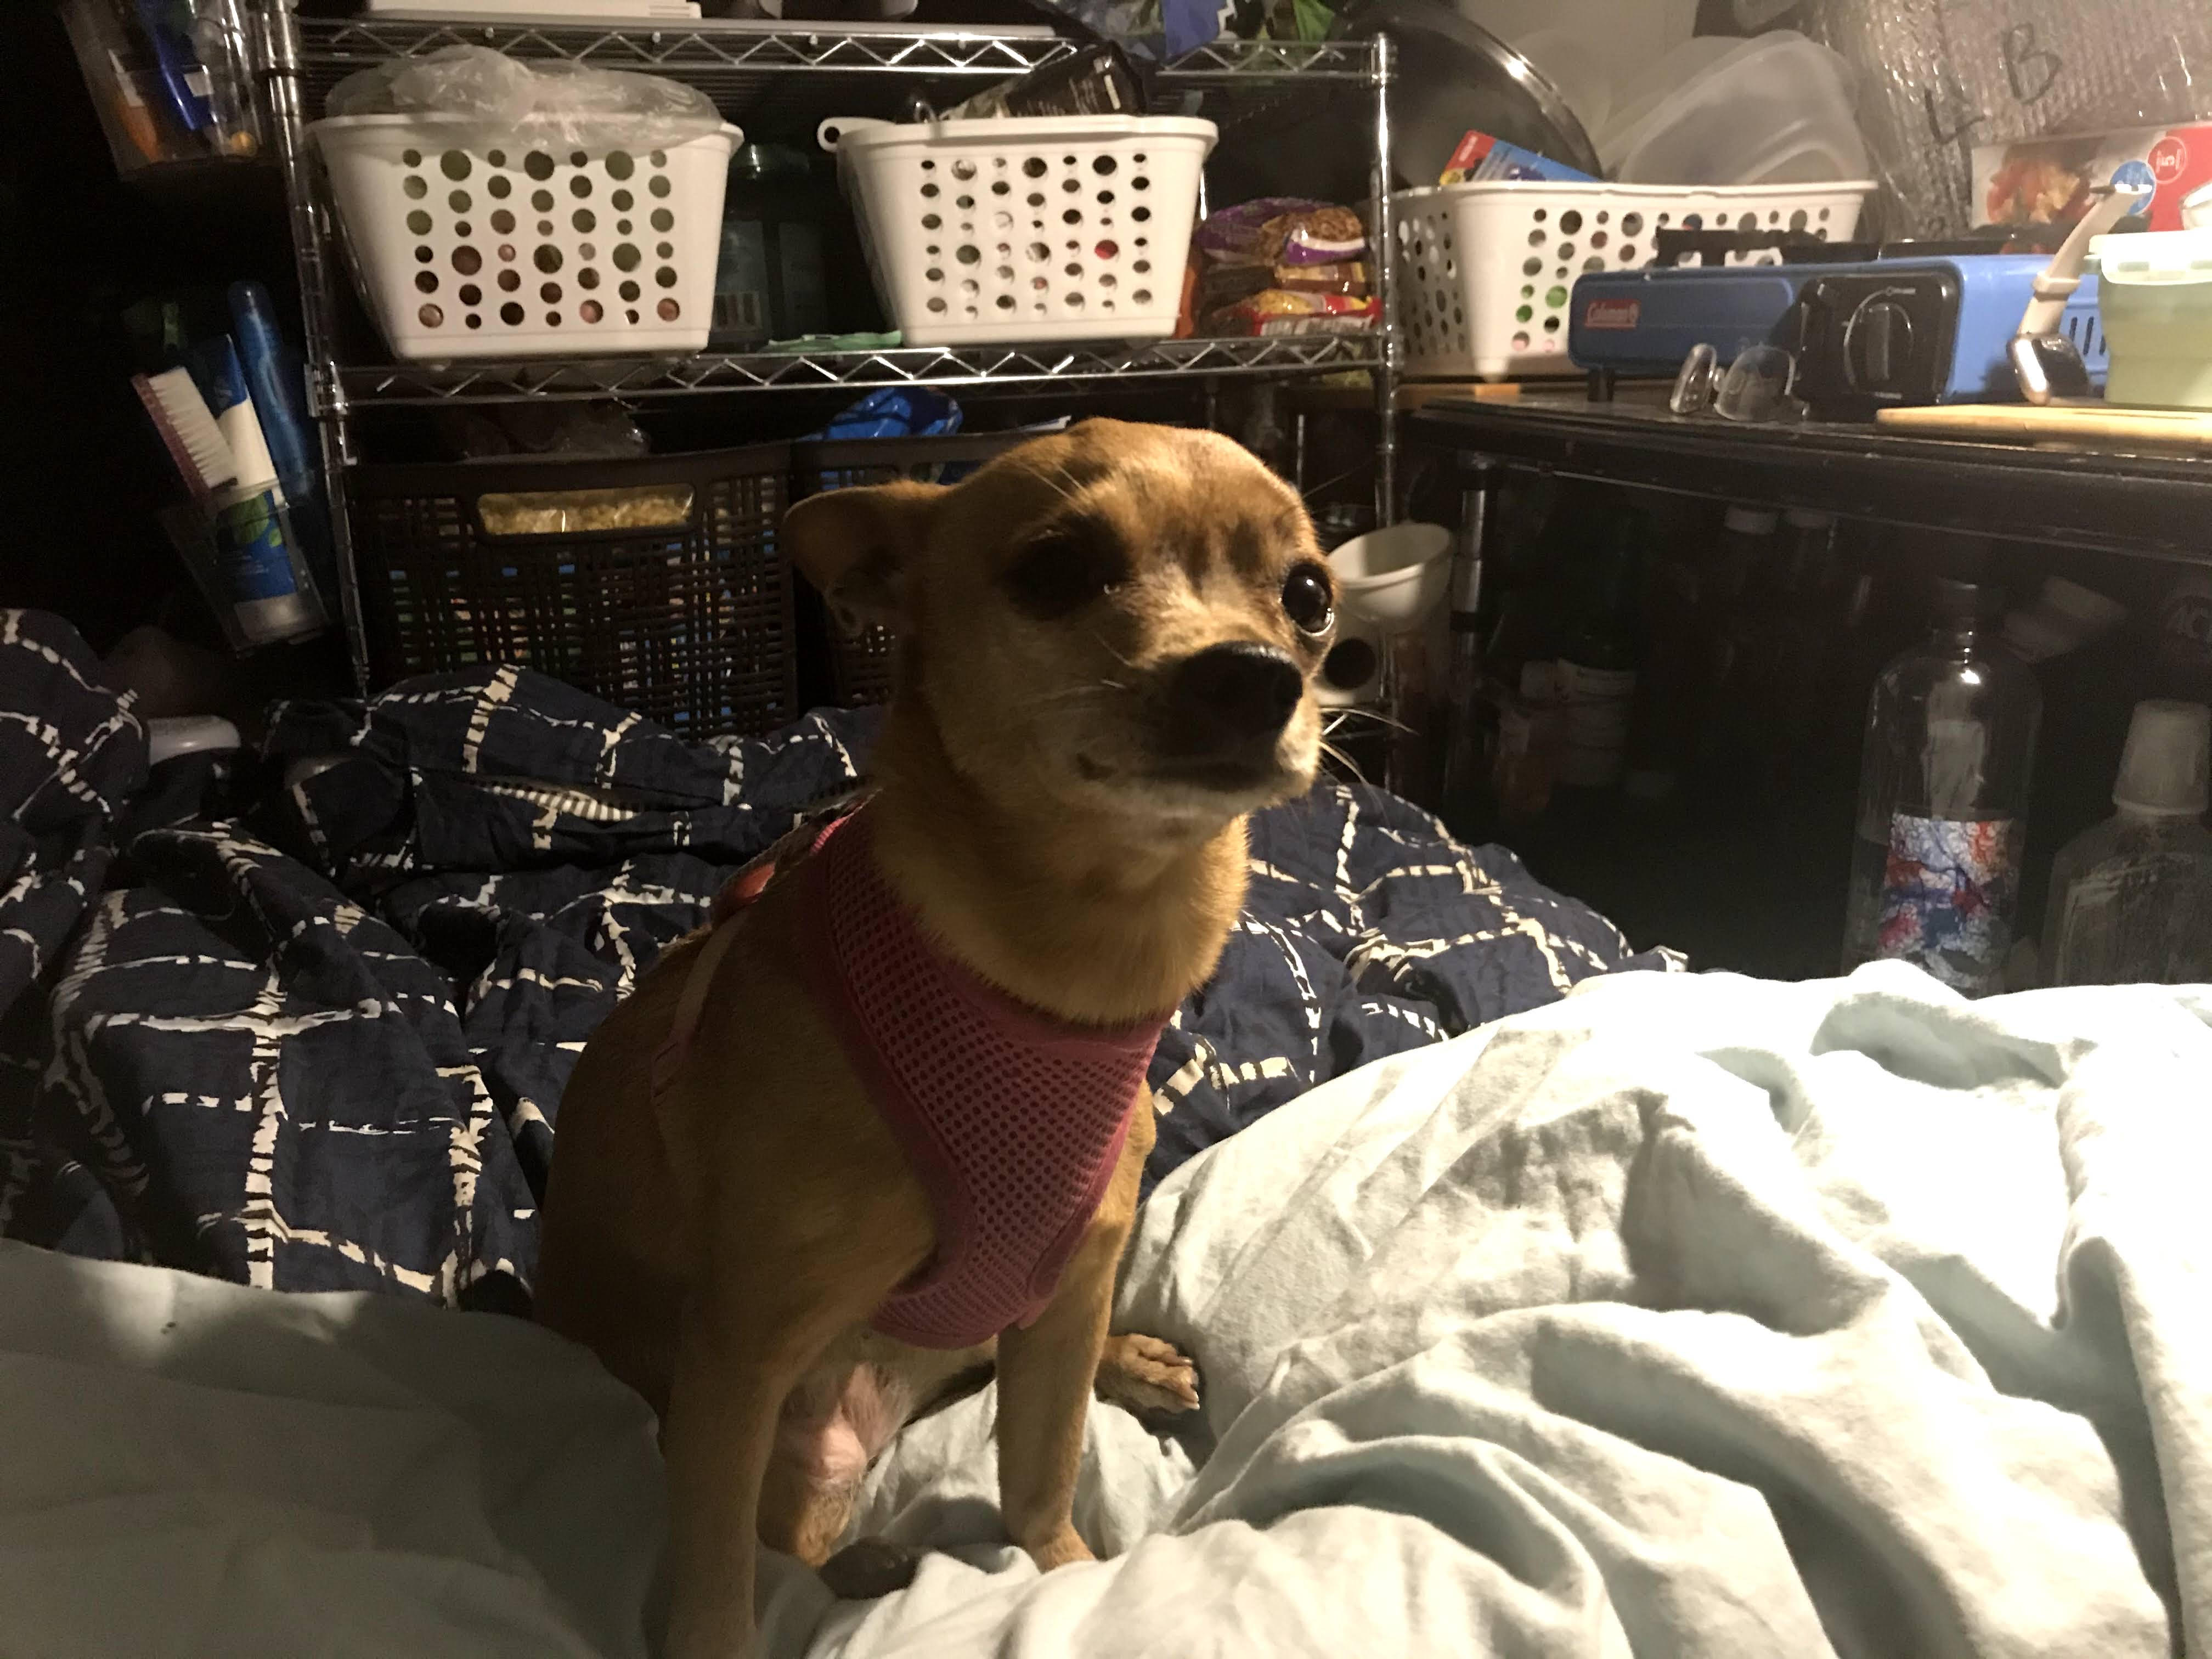
Here, is another picture of the set up. You can also see my adorable dog loving her space as well.. the clear plastic totes I zip tied to the shelf for even more storage. I had 3 in this view two toiletries to the left and one right under the stove (its a bit dark to see) I kept sauces and other items there. Under the desk is a repurposed shoe holder I used to keep vitamins and baby wipes. The funnel was an experiment to be a drain to the basement where their was a hole but it wasn't to useful for my needs. Oh and that white tote to the right was bunged into place and was a nice storage bin for my dishes, they rarely went flying while driving which was nice.
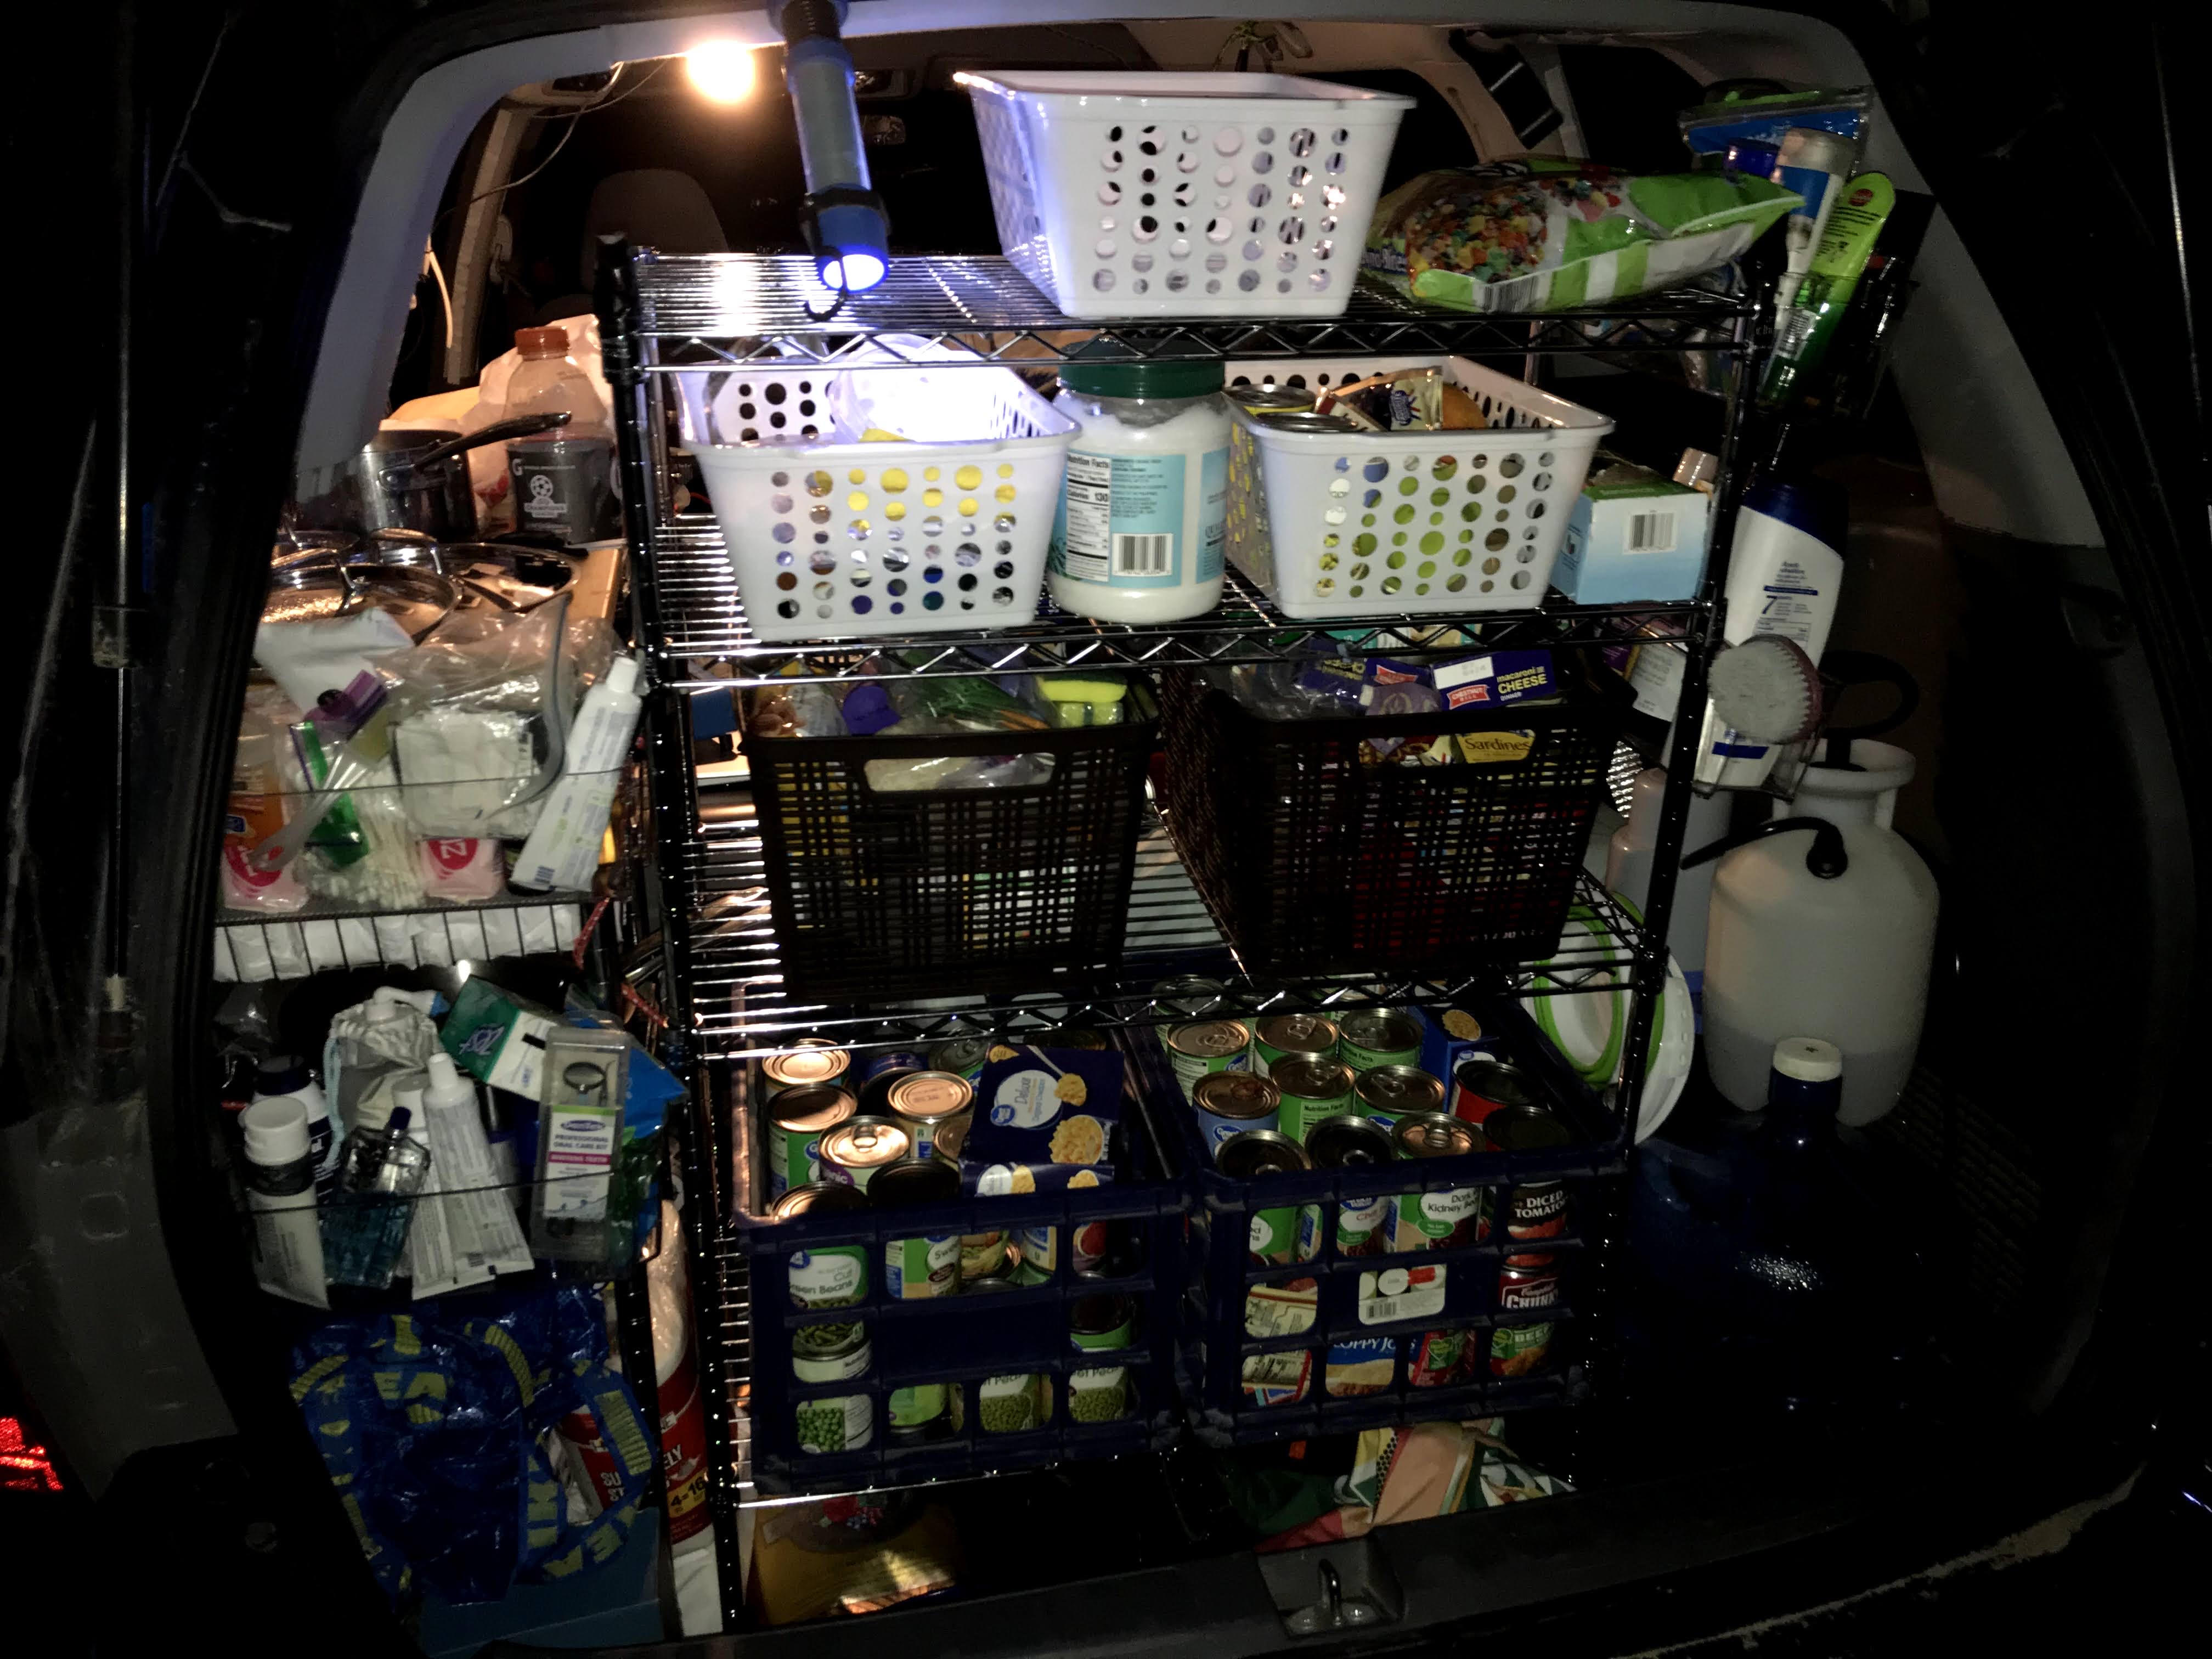
Here, is a view from the back of the minivan with the door open. I had SO MUCH STORAGE! on the right hand side I had my two 5 gallon jugs. Food storage was always important which explains the two big tubs of cans. I would go out remotely and not move for two weeks at a time so lots of food options were important to me.. Also under those bins I had storage for my tools.
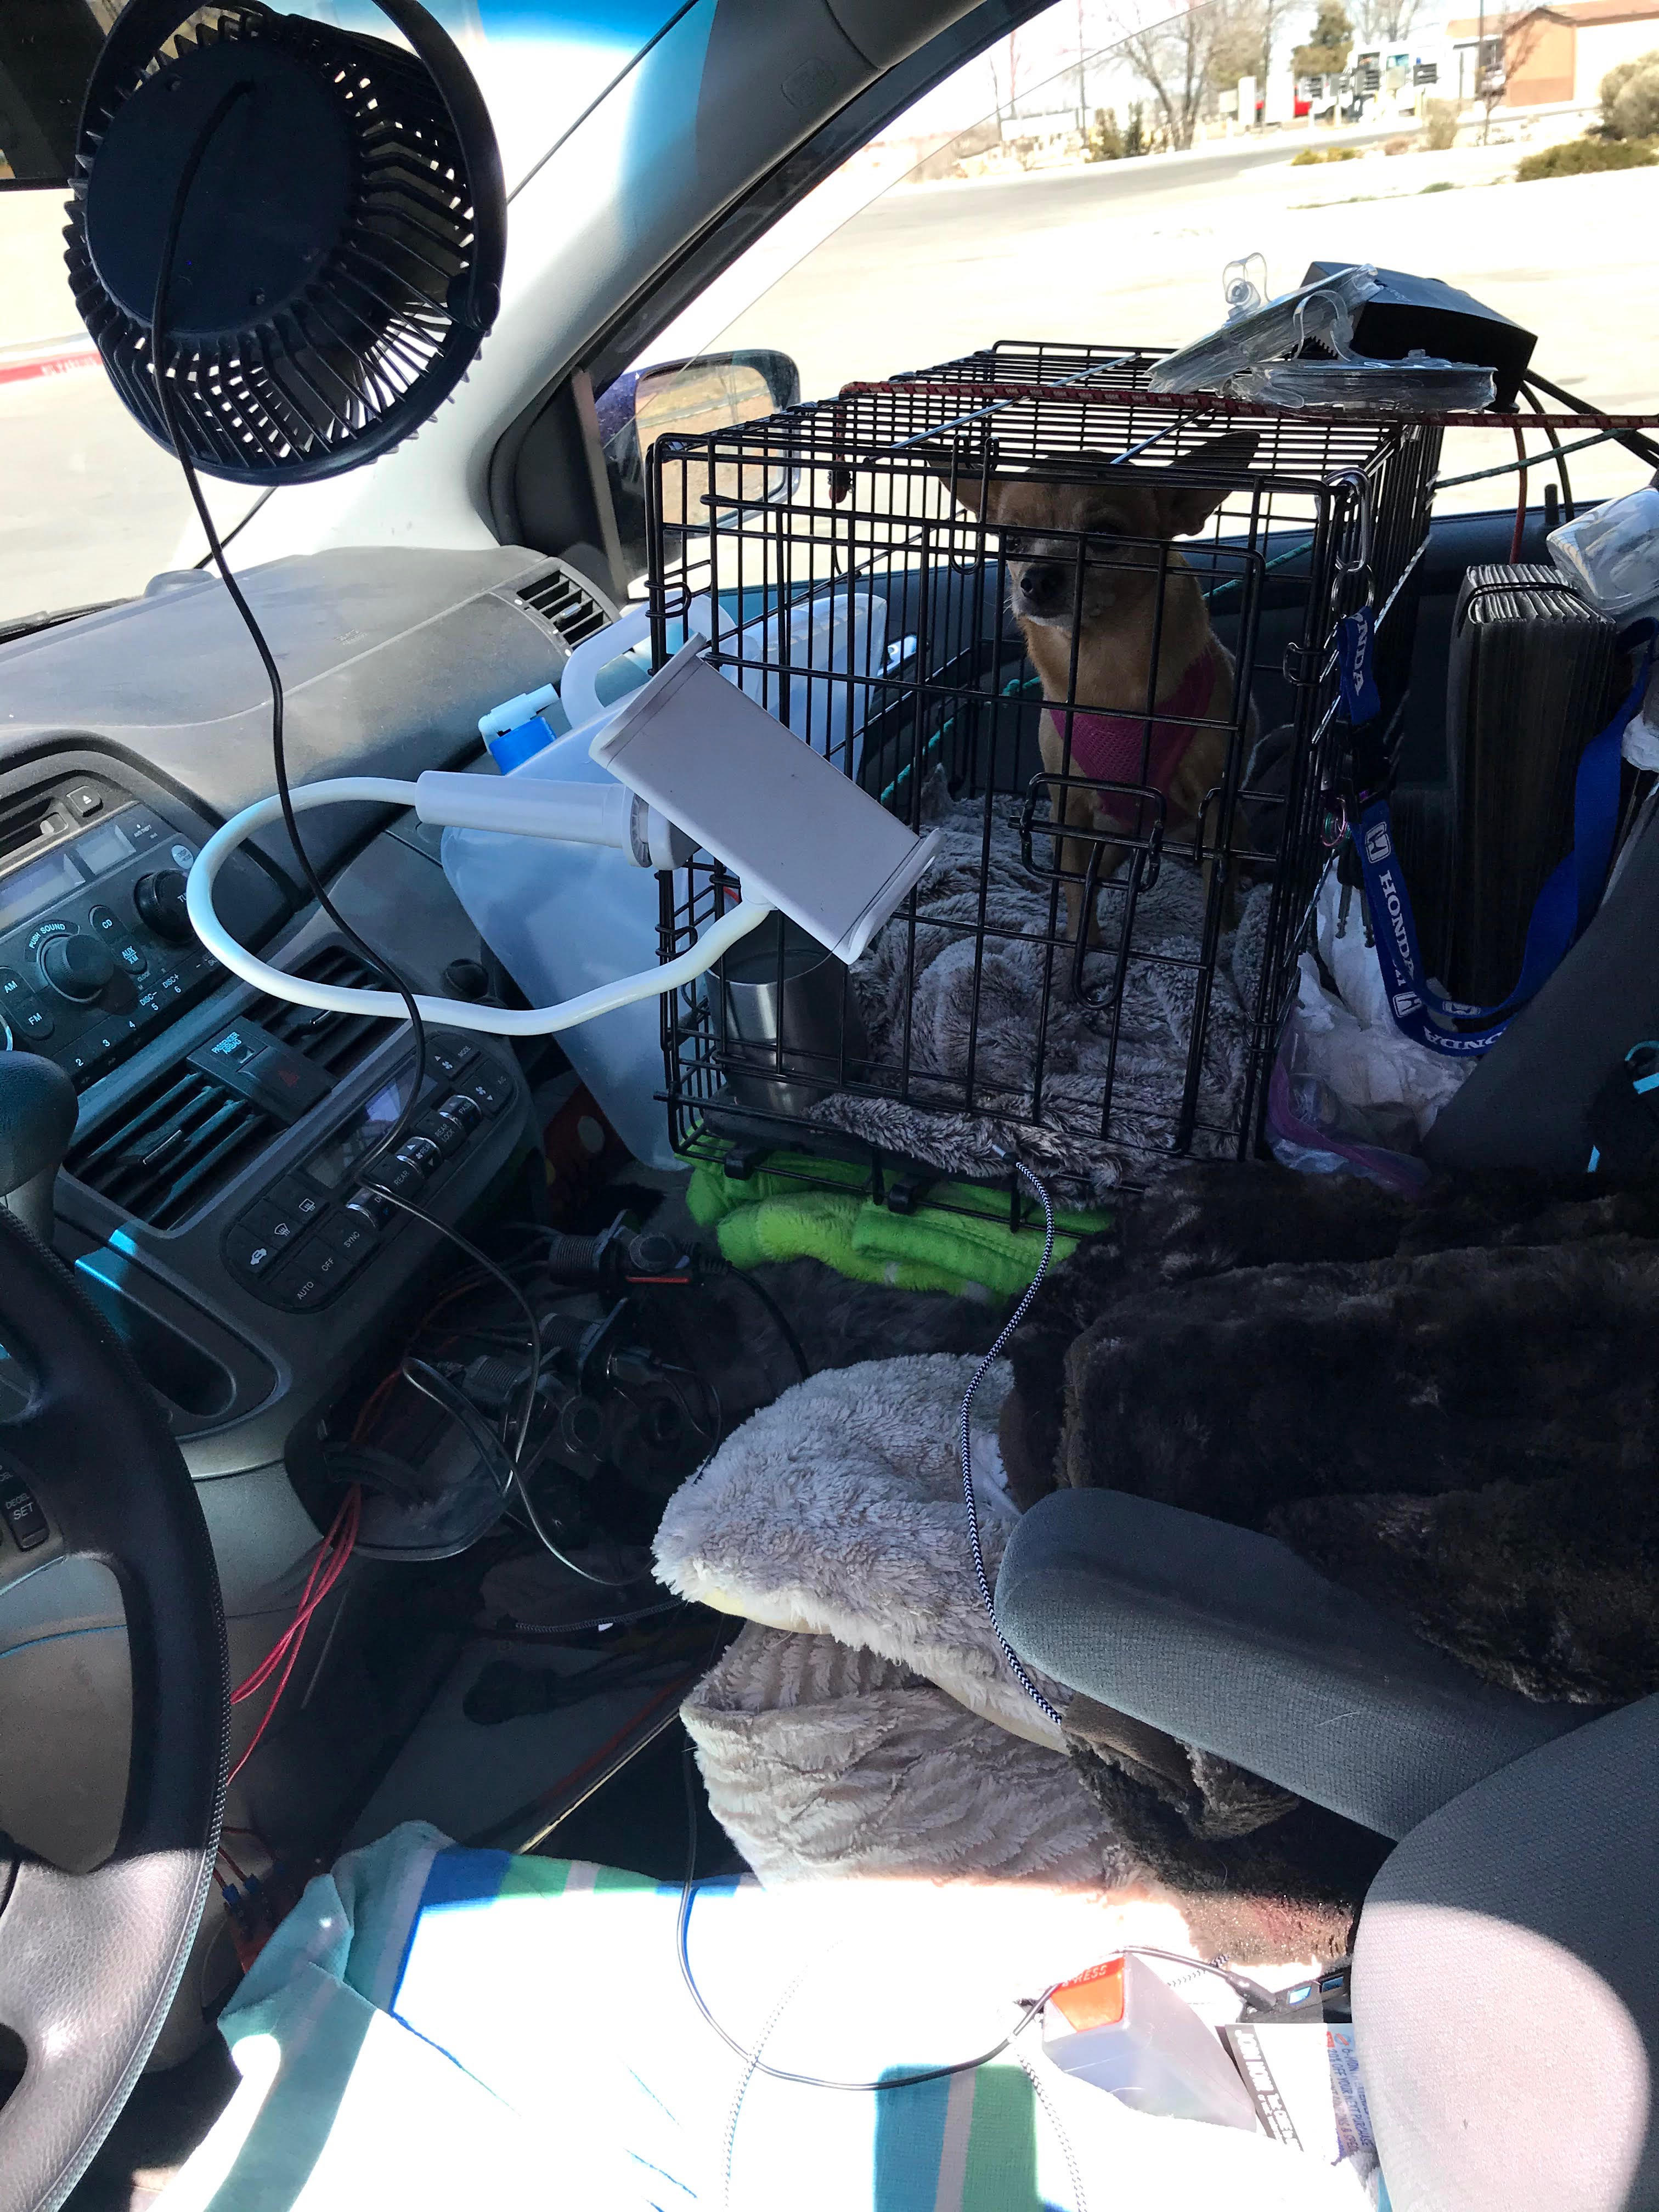
Here is the front seat, looking back I don't think it was that safe of a method for a dog so I wouldn't recommend my design but I still use it for now at least. I kept office papers behind her kennel and I used feet space for more storage. I used to say this was the co-pilot's chair! She loves her view I think. You can also see my 200 ah battery wedged between the seats. Much blood, sweat, and tears went into getting that into place! Also the charge controller has since been zip tied into place. There just wasn't a better location... I guess maybe now if I redid it I would have removed the foot space storage and mounted it down their instead plus it be out of the sun.. but still their is a lot of fabric storage there for now at least... still a working process.
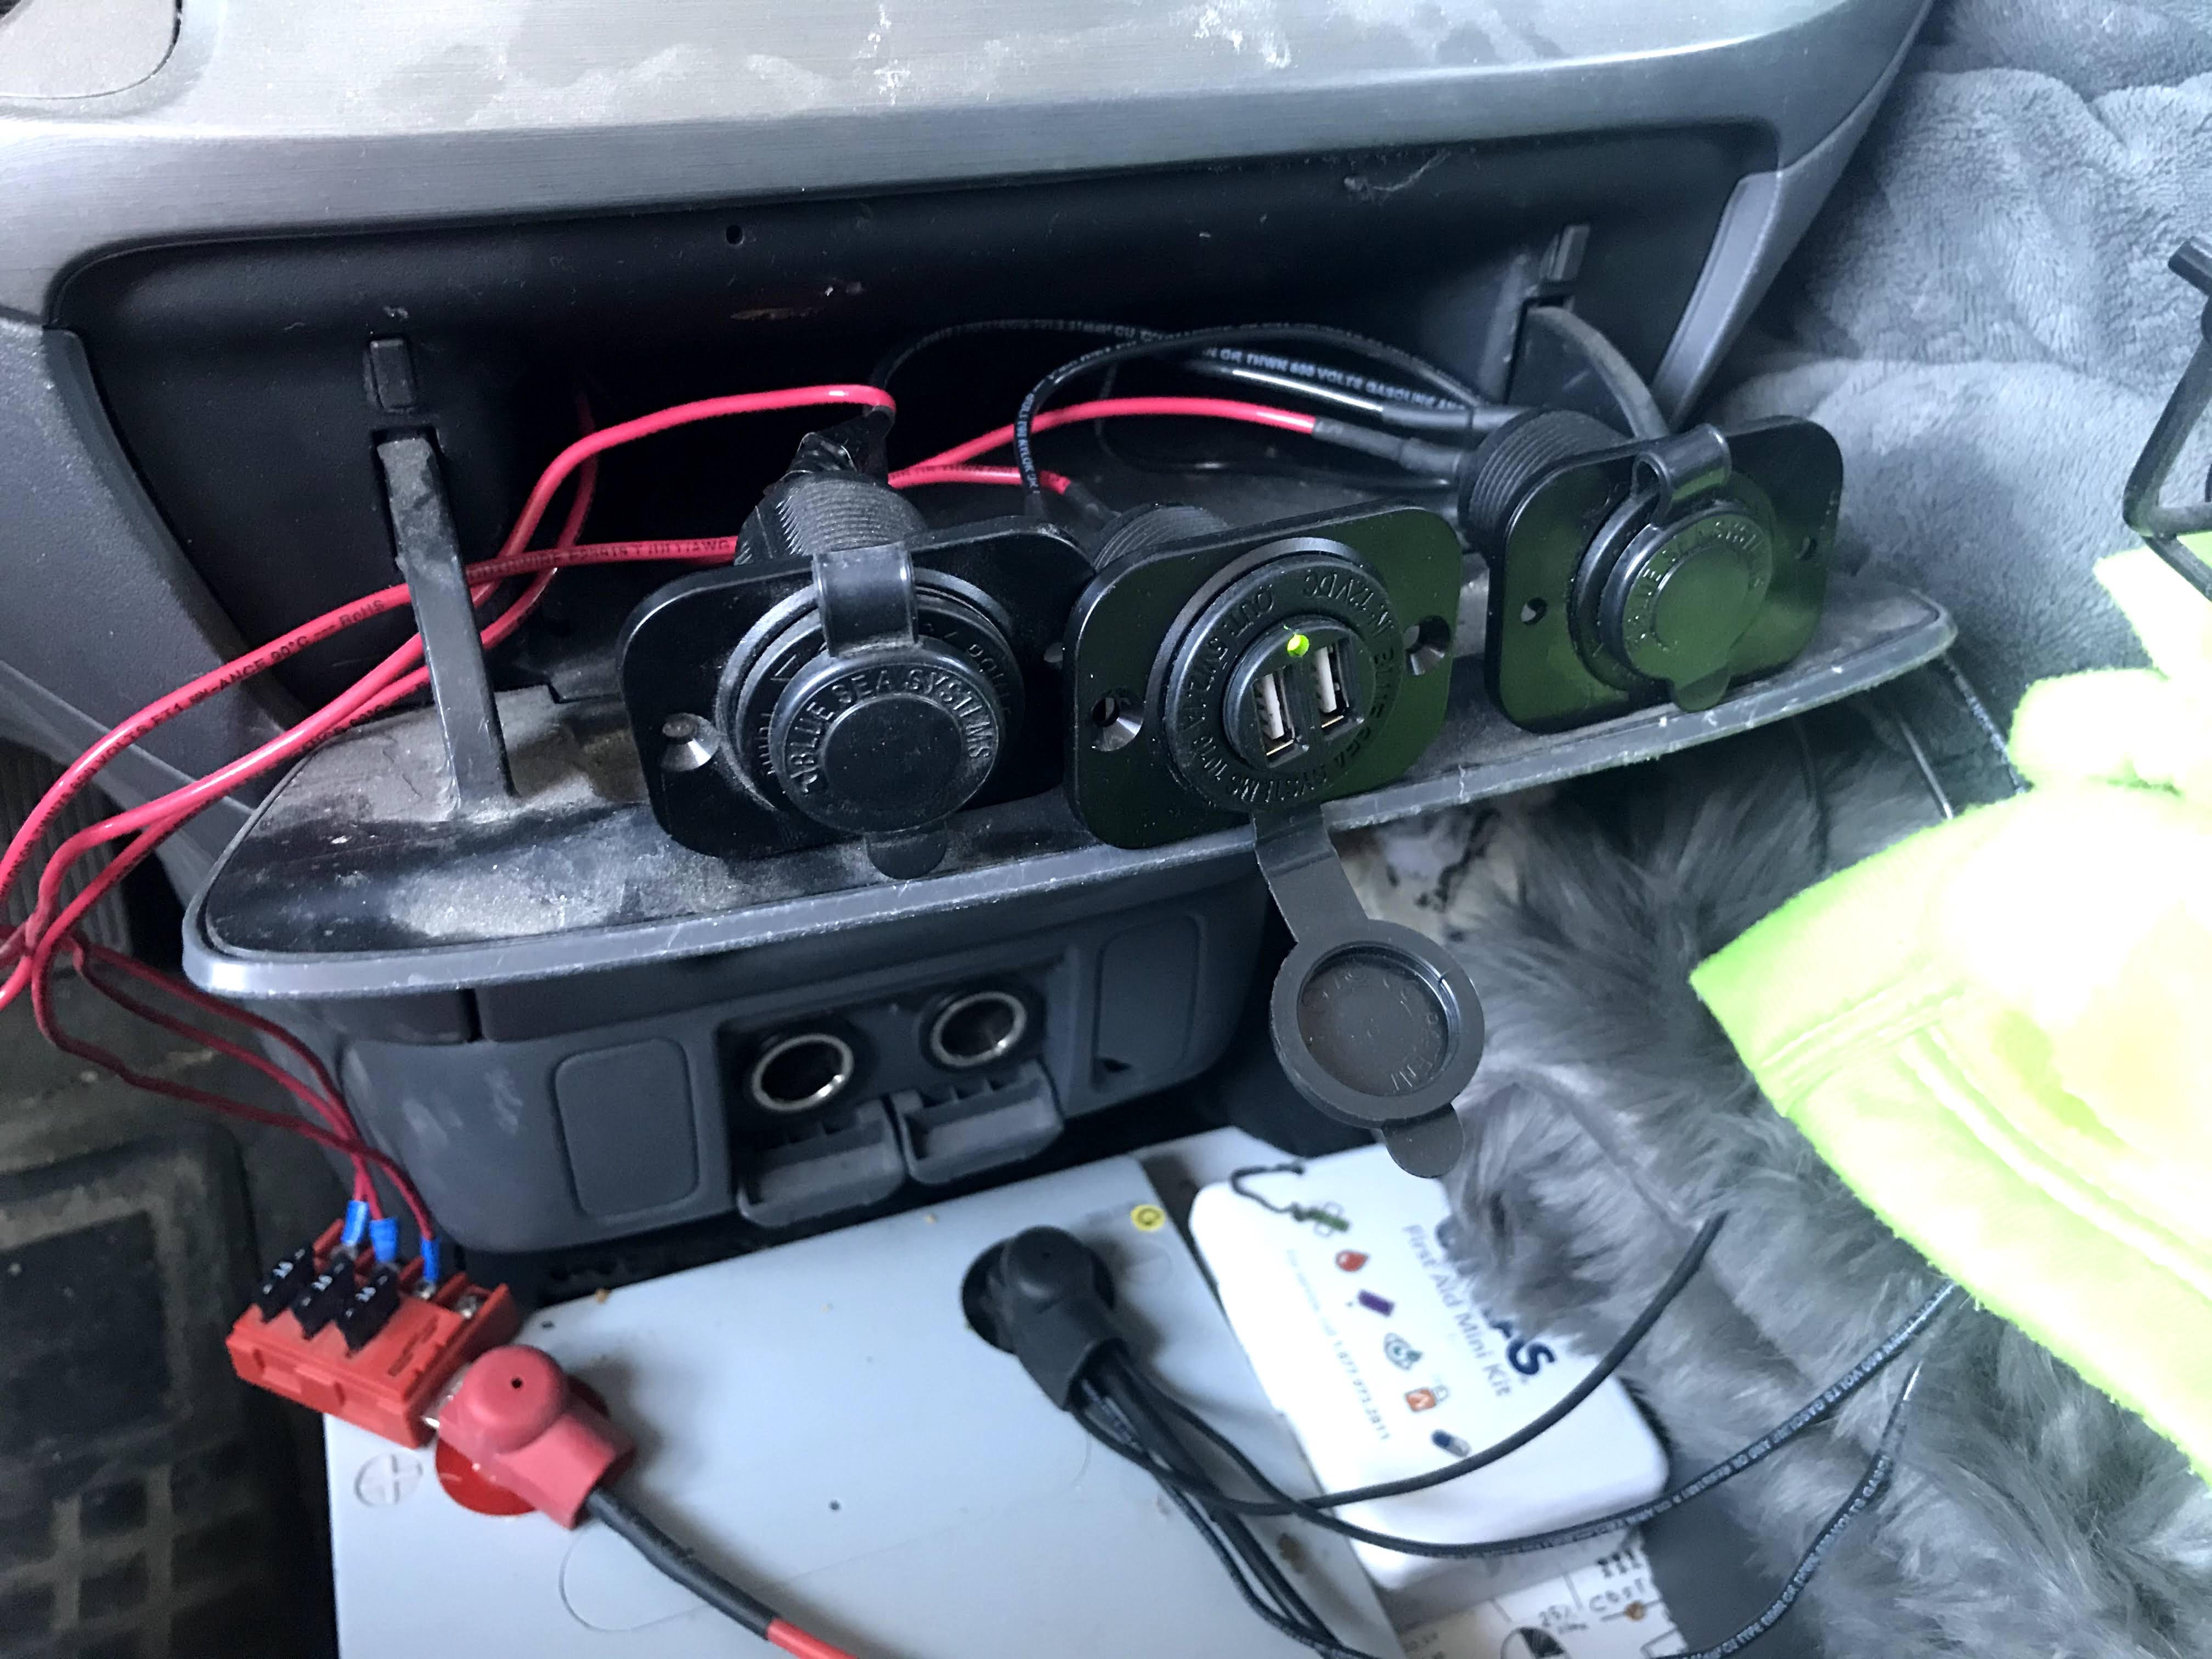
Here is a better view of my solar system. The USB blue sea outlet died on me, and I had a 2nd USB blue sea outlet I had originally designed my set up to have two USB outlets one in front and one in the back of the van but never got around to installing the back one, eventually became content with just the one in front and using power banks instead, in the back and just rotating them daily. I think that method helped me manage my power consumption better as well. I eventually got another 12V plug and wired that up instead, and just keep a 12v USB plug in their. I got one with a small light so I know when the power is connected, which should be at all times. I would NOT recommend the blue sea 12v USB outlet they are garbage! but the simple 12v plugs are fine.
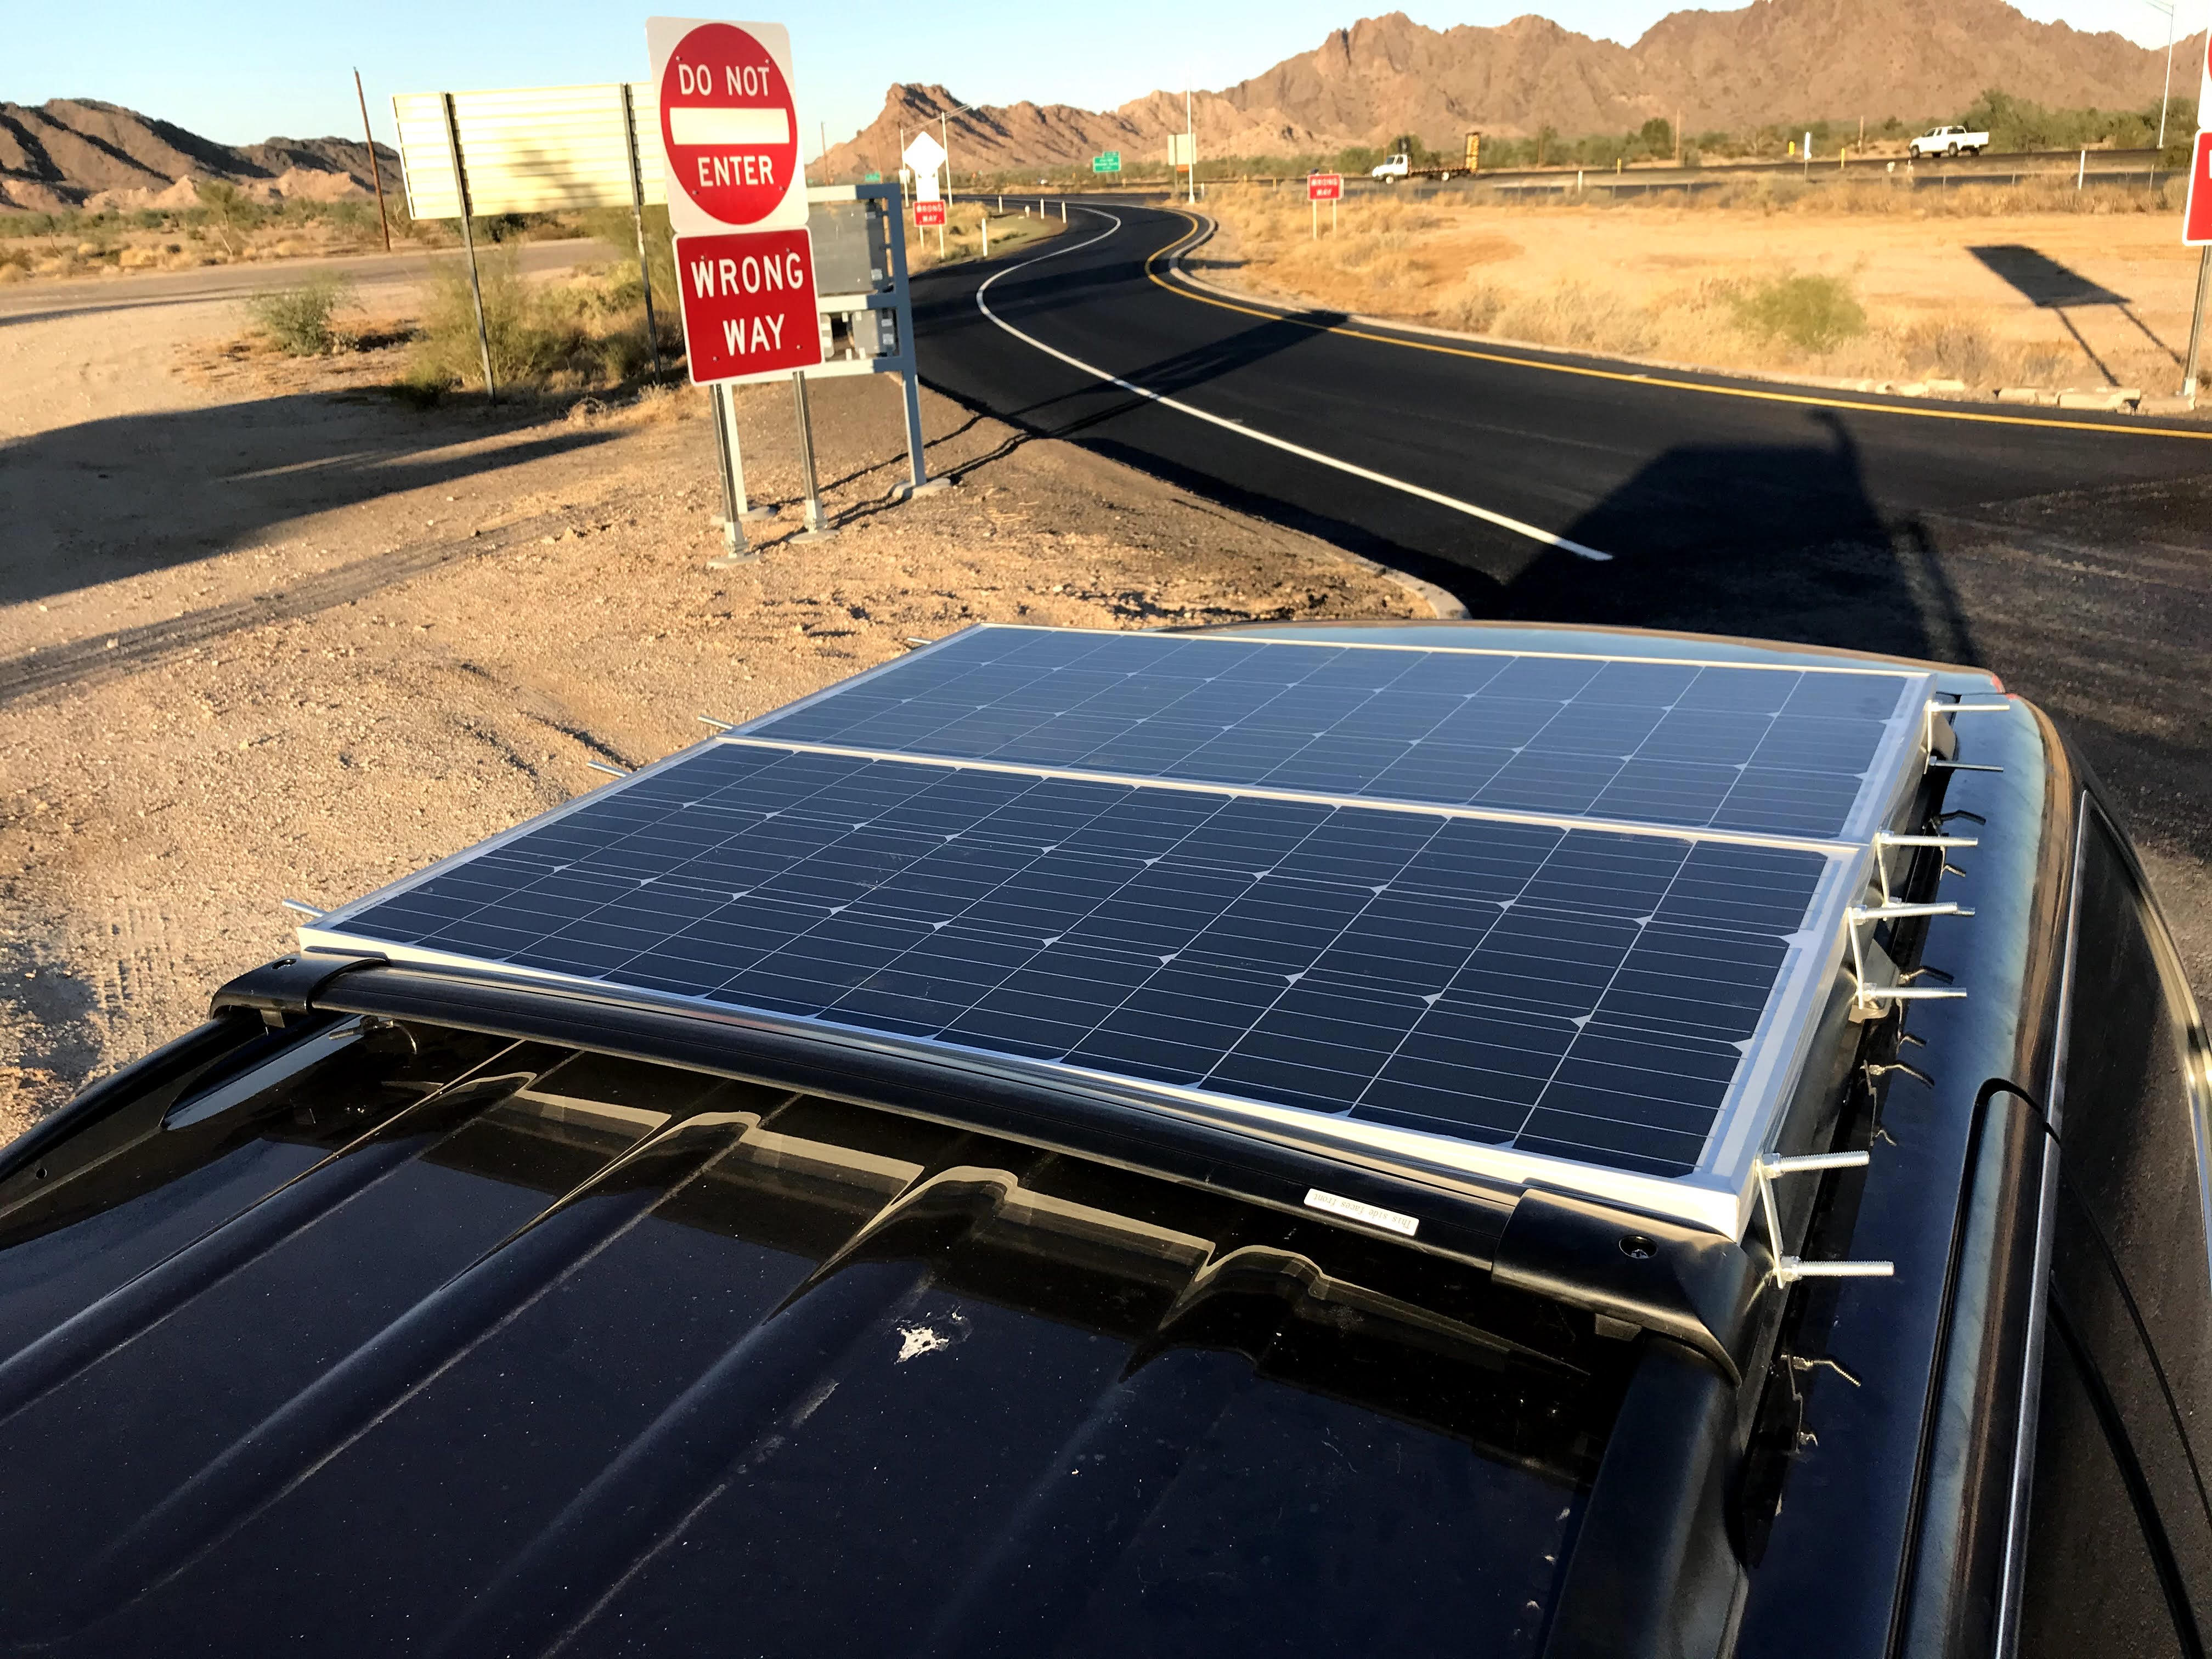
Here is a picture of my roof. I have 2 100 watt solar pannels. I drilled a hold on the side for the u-bolts and they are working perfectly! I used lock nuts so it took an entire DAY to wrench them into place! lol I didn't have enough space for the rear crossbar which did upset me at first because I really wanted to wedge them into place but I decided to just use the front crossbar to help with wind pressure on the front at least. They are completely solidly locked into place.. I mention that because when I first started out I was terrified at being able to mount them into place on my own. It was super simple now that I look back at it... took the process slow and one task and day at a time and eventually got it looking nice!
So that's my build.. Please be kind, I put much love, dedication, and heart and soul into my build. It's not perfect but I think it's the best minivan build I ever seen because it fits my needs perfectly!
I worked hard to prevent wasted space and I think my efforts paid off in my design. The plastic totes are going to be replaced with more box shaped tin totes or thin wooden creates to eliminate that wasted space.
my biggest issue with my set up was that I was cooking right over the gas tank and considering I took the flooring off, and the side panel If I had to redo my set up from scratch I would have added another 100 watts and used induction and or a roadpro and not used a butaine stove. The roof rack is TINY on my Honda Oddyessey but I could have mounted the solar pannels onto a frame and then mounted the frame to the roof. only other tweek I would have changed was the desk. with the fridge being added in later I couldn't use the desk. I would have designed the bed to remove the foot space to better fit leg room to fit at the desk comfortably given the fridge took up the leg room.
I know this is a very long post but maybe somebody found value from it and maybe it will help somebody with their minivan design. If you have any questions feel free to ask. If not thanks for stopping by and looking at my pride and joy. RobertA is her name, she is a little busted and rough looking, but she is a tough gal and is beautiful on the inside (at least to me she is and that's what's most important!) and has a lot of life and adventures ahead!
Here you can see the overlapping shelves better. I built the shelf in place and then cut off the legs to be level I took the driver side, side paneling off it saved me a lot more space for my desk/kitchen counter. I originally wanted to put in butcher block as I think it would look AWESOME! but I grew content with the free shelf I got next to the dumpster at the LTVA and just used that instead. I even thought about wrapping the butcher block counter around into an L shape onto the back shelf but the storage seemed like a much better idea for my needs.
Here, is another picture of the set up. You can also see my adorable dog loving her space as well.. the clear plastic totes I zip tied to the shelf for even more storage. I had 3 in this view two toiletries to the left and one right under the stove (its a bit dark to see) I kept sauces and other items there. Under the desk is a repurposed shoe holder I used to keep vitamins and baby wipes. The funnel was an experiment to be a drain to the basement where their was a hole but it wasn't to useful for my needs. Oh and that white tote to the right was bunged into place and was a nice storage bin for my dishes, they rarely went flying while driving which was nice.
Here, is a view from the back of the minivan with the door open. I had SO MUCH STORAGE! on the right hand side I had my two 5 gallon jugs. Food storage was always important which explains the two big tubs of cans. I would go out remotely and not move for two weeks at a time so lots of food options were important to me.. Also under those bins I had storage for my tools.
Here is the front seat, looking back I don't think it was that safe of a method for a dog so I wouldn't recommend my design but I still use it for now at least. I kept office papers behind her kennel and I used feet space for more storage. I used to say this was the co-pilot's chair! She loves her view I think. You can also see my 200 ah battery wedged between the seats. Much blood, sweat, and tears went into getting that into place! Also the charge controller has since been zip tied into place. There just wasn't a better location... I guess maybe now if I redid it I would have removed the foot space storage and mounted it down their instead plus it be out of the sun.. but still their is a lot of fabric storage there for now at least... still a working process.
Here is a better view of my solar system. The USB blue sea outlet died on me, and I had a 2nd USB blue sea outlet I had originally designed my set up to have two USB outlets one in front and one in the back of the van but never got around to installing the back one, eventually became content with just the one in front and using power banks instead, in the back and just rotating them daily. I think that method helped me manage my power consumption better as well. I eventually got another 12V plug and wired that up instead, and just keep a 12v USB plug in their. I got one with a small light so I know when the power is connected, which should be at all times. I would NOT recommend the blue sea 12v USB outlet they are garbage! but the simple 12v plugs are fine.
Here is a picture of my roof. I have 2 100 watt solar pannels. I drilled a hold on the side for the u-bolts and they are working perfectly! I used lock nuts so it took an entire DAY to wrench them into place! lol I didn't have enough space for the rear crossbar which did upset me at first because I really wanted to wedge them into place but I decided to just use the front crossbar to help with wind pressure on the front at least. They are completely solidly locked into place.. I mention that because when I first started out I was terrified at being able to mount them into place on my own. It was super simple now that I look back at it... took the process slow and one task and day at a time and eventually got it looking nice!
So that's my build.. Please be kind, I put much love, dedication, and heart and soul into my build. It's not perfect but I think it's the best minivan build I ever seen because it fits my needs perfectly!
I worked hard to prevent wasted space and I think my efforts paid off in my design. The plastic totes are going to be replaced with more box shaped tin totes or thin wooden creates to eliminate that wasted space.
my biggest issue with my set up was that I was cooking right over the gas tank and considering I took the flooring off, and the side panel If I had to redo my set up from scratch I would have added another 100 watts and used induction and or a roadpro and not used a butaine stove. The roof rack is TINY on my Honda Oddyessey but I could have mounted the solar pannels onto a frame and then mounted the frame to the roof. only other tweek I would have changed was the desk. with the fridge being added in later I couldn't use the desk. I would have designed the bed to remove the foot space to better fit leg room to fit at the desk comfortably given the fridge took up the leg room.
I know this is a very long post but maybe somebody found value from it and maybe it will help somebody with their minivan design. If you have any questions feel free to ask. If not thanks for stopping by and looking at my pride and joy.
RobertA is her name, she is a little busted and rough looking, but she is a tough gal and is beautiful on the inside (at least to me she is and that's what's most important!) and has a lot of life and adventures ahead!
